Series 3 Serious leak all over wheel and hub

This site contains affiliate links for which LandyZone may be compensated if you make a purchase.

85Santana3

Active Member
Posts
284
Location
Canada
Hello everybody
I hope 2022 is a good year and much better than last two miserable years for you all.
Ever since I had the half-shaft changed several months ago there has been oil over rear passenger side wheel and hub but now it is getting pretty deplorable. I checked the forum and other sources online for a step by step guide as what to do and could not find anything clear (at least clear enough for me). Any idea what could be the reason and how step by step fix it. I am done with going to mechanics, I will try the repair myself.
thanks in advance
 
Oil inside or outside of wheel?
If its hub seal only special tool you will need is a deep 52mm socket.

If not sure chuck up a picture
 
If the wheel cylinders gone brake fluid leak into drum and onto inner wheel. If it’s onto outside of wheel then that would be Ep90 , check the breather first on top of axle and clean if blocked then clean wheel and see if leaks stop if not then hub seal or bearing surface gone
 
As above.
You need to find the source.
Two possibilities:

Oil from axle
Brake fluid from brake cylinders

If the brake fluid isn't going down, then it's most likely the seal that fits into the back of the hub, that spins on the stub axle.

In broad brush terms:
Secure the vehicle, on a solid surface.
Chock the other wheels.
Loosen the wheel nuts.
Jack the vehicle
Remove the wheel
Slacken the brake adjusters
Remove the brake drum
Remove the hub cap
Remove the shaft lock nut
Remove the drive flange
Remove the shaft nuts
Take off the hub
Capture and retain the bearings
Remove the seal
Inspect the seal land, replace if damaged beyond repair
Replace the seal
Reassemble using new drive flange gasket
IMG_20211226_123950.jpg
 
Thanks everybody. I am especially grateful for the step by step instruction. I'll duckduckgo (we no google) it step by step to see what tools I'll need. I hope I only need a 52 socket, as Lynall says although I imagine he means on top of the usual set of tools that everybody has which might be more extensive than mine (by the way the oil is all over the outside of wheel). My brake fluid reservoir is not as full as usual but not enough to make such a mess.
I have a few related questions if you don't mind:
- How can you tell brake fluid from the grease just by looking at the mess on the wheel?
- Why would a block breather result in oil leaking on the wheel?
- In the end I would have to reverse "Slacken the brake adjusters" step. What should be done at that stage in terms of adjusting?

Thanks a million in advance
 
http://www.retroanaconda.com/landrover/2010/03/series-iii-workshop-manual/

You will find this manual very useful for the definite step by step there is also a parts book on there for ordering new bits and see how bits put together
For the 52mm socket you can get a cheap box spanner for the job or at a push use a small chisel to tap round ( they’re not usually that tight)
To see if brake fluid dip your finger in the reservoir and rub it and smell it , feels different and smells distinctly different to EP90 oil

if the breather blocked if the air in axle warms up it expands, pressurises and forces oil past even good seals
So remove on front and back axles clean, check and clean
To adjust brakes see manual but simply make the brakes work better they need to be close to the inside of drum
By turning the adjuster bolt on backplate this moves a serrated cam wheel which the shoe rests on
Adjusted properly when adjusted up till dragging then back off 2 stops

The breather is usually a small brass tube poking up from the middle of the axle, it'll have a 'rubber' tubing on it that disappears up into the engine bay on the front axle ..

 
Thanks 10000 times for your help. I am going to try doing it myself and I am pretty sure I can not make a bigger mess than my mechanics regularly do. Fortunately the required parts are not expensive and worse case scenario I can get it right the second time.
 
Thanks 10000 times for your help. I am going to try doing it myself and I am pretty sure I can not make a bigger mess than my mechanics regularly do. Fortunately the required parts are not expensive and worse case scenario I can get it right the second time.

Good luck with it ...
 
Thanks 10000 times for your help. I am going to try doing it myself and I am pretty sure I can not make a bigger mess than my mechanics regularly do. Fortunately the required parts are not expensive and worse case scenario I can get it right the second time.
Slow and steady.

Take photos as you go, ask questions as you go. Have fun.
 
I had to this on my Series 3 109. The hub to axle seal had gone. EP90 axle oil was slowly seeping out and dripping onto the brake shoes. If the truck had been standing overnight they would be a slight pull to the opposite side the first time you braked the next day as the leaked oil was scrubbed off.
It wasn't a massively hard job. You stand back & think What was I worried about" when you have done it.
The seal wasn't too bad, just installed back to front by a previous owner. I found the hub was also cracked which didn't help either.

Here are some photos of the job.

This is how I did it. Always refer to the appropriate workshop manual for the correct procedure for doing this task.

First up wheel and drum removed. The drum was proving difficult to remove. This was helped by slackening off the manual shoe adjusters.
IMG_5310small.jpg


Drum with oil contamination. Cleaned off oil with White Spirit or similar. I took care not to breathe in brake dust as there may be some asbestos lingering from old pads.
IMG_5311small.jpg


Contaminated pads. Need to refit new ones.
One point, it is far easier to fit the new pads before you refit the hub after replacing the seal. It is possible after but is a bit of a bugg*r.

IMG_5318small.jpg


IMG_5322small.jpg


Next I removed the drive shaft flange from the hub to allow removal of the drive shaft and get access to the hub nuts. I did this by removing the six bolts shown here. I got a bit carried away and removed the drive flange from the driveshaft by removing the circlip but this is not necessary.

IMG_5325small.jpg


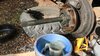
Removing Drive Shaft Flange. Placed bowl under the hub assembly to catch any residual oil. This was also necessary when removing the hub.
IMG_5330small.jpg


Removing drive shaft.
IMG_5332small.jpg


To remove the hub from the stub axle it was necessary to bend the retaining tabs on the hub nut locking washer flat. I used a flat bladed screwdriver & long nose pliers. This allowed the hub nuts to be undone. When reassembling I used a new locking washer.

When reassembling I found that having done the hub nuts up to what I felt was the correct point, they became loose after a short drive so I had to dismantle it all again and tighten the hub nuts slightly. Some "settling" of the bearing may be occuring so next time I would take the vehicle for a short drive and then jack the vehicle & check for play in the wheel. Others on here may be able to advise on this.

IMG_5332small_washer.jpg


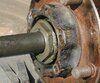
Stub axle with hub removed.
IMG_5336small.jpg


The offending seal fitted back to front.
IMG_5339small.jpg


Having removed the seal I thought it would be a simple job of inserting the new seal, the correct way around and reassembling the whole lot. 45 minutes then home for tea & cake I thought, then I found this whilst cleaning the bearing seat up. The hub was cracked. I thought maybe I had been too brutal getting the old seal out but the slightly polished area around the crack implies it had been like that a while. I stopped taking photos at this point as I was a bit miffed. Reassembly when I got the new hub was simply the reverse of the dismantling process.

Two things I would do differently next time,
1) Fit the new brake pads before putting the hub back on
2) Check for play in the bearings after a short drive following reassembly of everything.

IMG_5347small.jpg
 

Attachments

  • IMG_5310small.jpg
    IMG_5310small.jpg
    317.7 KB · Views: 103
  • IMG_5311small.jpg
    IMG_5311small.jpg
    395.7 KB · Views: 90
  • IMG_5318small.jpg
    IMG_5318small.jpg
    449.1 KB · Views: 75
  • IMG_5322small.jpg
    IMG_5322small.jpg
    250.4 KB · Views: 67
  • IMG_5325small.jpg
    IMG_5325small.jpg
    260.2 KB · Views: 80
  • IMG_5330small.jpg
    IMG_5330small.jpg
    306.4 KB · Views: 80
  • IMG_5332small.jpg
    IMG_5332small.jpg
    343.5 KB · Views: 104
  • IMG_5339small.jpg
    IMG_5339small.jpg
    278.5 KB · Views: 98
  • IMG_5347small.jpg
    IMG_5347small.jpg
    203.9 KB · Views: 75
  • IMG_5332small_washer.jpg
    IMG_5332small_washer.jpg
    77.9 KB · Views: 78
Back
Top