Scott's Series 2A

This site contains affiliate links for which LandyZone may be compensated if you make a purchase.
While I'm here, see the smaller outlet to the left of the thermostat housing? I think that goes off to a heater if there's one fitted am I right? Mine has a long old bodgey blanking hose that secures over that, is there something neater I could get that would be tidier?
 
My brother stopped by for a cuppa today and the landy was out when he arrived so we got some little jobs done. First time I've worked on a landy with him since we were young un's and messing about on Dad's. :)

- Put the new pedal pad on the accelerator (I'd done the brake and clutch for forgot this one for some reason)
- New rubber ring on the bottom of the gear lever
- New springs on the gearbox/reverse return gate
- Re-crimped the broken earth on the new wiper motor socket, fit the new wiper switch I bought to replace the old wrong one.. and.. the wipers now work and are lovely smooth after greasing and cleaning the wiper arm spindles and drive cable

We also tried to get the starter dog off but it was a bodgey job with stilsons and pipe and the solenoid gave it up after a couple of shots. We persevered by bridging it with a jump cable but then the low battery went low enough it couldn't turn it over anymore and we decided what I really wanted was a 43mm socket that won't drop off next time I have a go. (I know a 41mm fits some but I have a 41mm and it's not big enough)

Well. The solenoid looked pretty ancient anyway. :)
 
Last edited:
've fit the new solenoid and wiper blades. Yesterday I tried to dismantle the water pump to start the rebuild but the casting broke. Man up the road at the workshop said he's done loads over the years for combines and tractors and if they don't break taking them apart they often still leak when they're rebuilt so he wouldn't take my money to mess about with it. So I'm free now to just buy a new one.


Today's job is hopefully getting some Nitromoors on the black paint someone's covered a lot of the galv with, and painting the rear crossmember and fitting the new mud flaps. I've found someone with an airgun and big enough socket for the starter dog so hopefully I'll have the timing cover off soon too.
 

Attachments

  • IMG_0176.jpg
    IMG_0176.jpg
    739.9 KB · Views: 251
Rear crossmember's painted black but I don't think much of the durability. When I put the plastic cover on the tow hook it scraped some black away to reveal the undercoat! It's Frost's Extreme Chassis Black over a Tractol Red Oxide undercoat spray. I haven't had problems with the Frost paint before so I assume it's an incompatibility with the Red Oxide spray. Any thoughts? Should I just go over the top with some Buzzweld CIO or something?

I got the front timing cover off today so am at last moving towards getting that front crank seal done and tapping some threads for the seal cover. I popped the starter motor off enough to get a screwdriver in the hole in the ring gear and that locked the crank well enough for me to undo it with some stilsons and a length of pipe.
 

Attachments

  • IMG_2938.JPG
    IMG_2938.JPG
    255.3 KB · Views: 212
Rear crossmember's painted black but I don't think much of the durability. When I put the plastic cover on the tow hook it scraped some black away to reveal the undercoat! It's Frost's Extreme Chassis Black over a Tractol Red Oxide undercoat spray. I haven't had problems with the Frost paint before so I assume it's an incompatibility with the Red Oxide spray. Any thoughts? Should I just go over the top with some Buzzweld CIO or something?

I also put good quality chassis paint over red oxide primer thinking it would be just the job. Looks great but doesn't need much of a knock to chip a bit off. I have decided to just repair the chips as I go with some hammerite satin black that sticks like you know what. In future i'm always going to test my primers, primer fillers and top coats beforehand.
 
Good to know I'm not the only one. I too am going to be more careful about testing primer and paint combinations now. I think I'll do the same as you and touch it up with some CIO as I go.
 
Hooray! Front crank seal fitted and new threads tapped for mud plate fixings. Also fit new water pump.
 

Attachments

  • IMG_0350.jpg
    IMG_0350.jpg
    325.6 KB · Views: 220
Got my panel lights working today, the last of the wiring gremlins as the switch had been recommissioned for something else. Removed an LED lit ciggy lighter and some related wiring too so all that's behind the centre dash now looks original and is neat and tidy. I had a brief short circuit while I was de-tangling some of the "modifications" but it shorted at the end of the wiring I needed to remove so all that melted was the bodgey stuff! Lucky. I flipped a battery lead off pretty quick and had the extinguisher in hand but didn't "blow". :D

Cut the final outrigger off today. It was in worse shape than it looked so I'm glad I'm doing this one aswell. N/S rear tub outrigger. Takes a bit of time as the new ones don't come with the tub bracket so that has to be cut off the old one and cleaned up and I've made some plates to reinforce where they attach to the tub - same as I did for the other side. Friday looks good for welding outdoors so I'll finish the job then hopefully. I'm going to keep an eye on these reinforcement plates. They're ally so the theory is they react with the steel bracket on the outrigger and protect the tub, and can be replaced. But I might find some stiff rubber of the same thickness would be better. Time will tell.
 

Attachments

  • IMG_2950.JPG
    IMG_2950.JPG
    152.6 KB · Views: 233
  • IMG_0353.jpg
    IMG_0353.jpg
    390.2 KB · Views: 210
Last outrigger welded on today. I've started putting the rad back on after having it off for the front crank seal work and to fit a new water pump. Run test soon.. and seatbase and floor going back in once I've got the overdrive off for a closer look at that bodged up drain plug..
 

Attachments

  • IMG_0410.jpg
    IMG_0410.jpg
    312.2 KB · Views: 241
  • IMG_0419.jpg
    IMG_0419.jpg
    335.1 KB · Views: 261
I've had my first attempt at rebuilding a dumb iron over the last couple of days. It's better than it was but I wouldn't do it the same way again and I wouldn't advise anyone use these pictures as a guide.! I did learn a lot which is good and all part of working on my Land Rover for me so I'm pleased with the result. I will write up more for myself when my thoughts have cleared (http://spannersonthefen.blogspot.com/2019/09/first-dumb-iron-repair.html) to give myself the best chance of doing a quicker and better job next time. Still.. one down one to go. And yes the bumper still fits. :)
 

Attachments

  • IMG_0512.jpg
    IMG_0512.jpg
    478.1 KB · Views: 231
  • IMG_0525.jpg
    IMG_0525.jpg
    436.3 KB · Views: 226
  • IMG_0537.jpg
    IMG_0537.jpg
    303.1 KB · Views: 261
  • IMG_0544.jpg
    IMG_0544.jpg
    464.9 KB · Views: 237
  • IMG_0546.jpg
    IMG_0546.jpg
    493.6 KB · Views: 203
  • IMG_0549.jpg
    IMG_0549.jpg
    444.1 KB · Views: 209
  • IMG_0570.jpg
    IMG_0570.jpg
    523.3 KB · Views: 220
  • IMG_0571.jpg
    IMG_0571.jpg
    526.8 KB · Views: 239
Last edited:
Fixed my stripped overdrive drain plug thread with a helicoil kit today. No leaks so far with the box stood at rest with a bit of gear oil in. If it sits like that for a few days I'll be putting it back on soon and then the floor and seat box and seats can all go back in too as I've done all the welding under there. ;)
 
Hope everyone had a good christmas!

Progress has slowed.. but it must be Christmas because I have made _some_ progress! I refit the overdrive. The mainshaft nut was loose because of a broken lock washer(!) so I fit a new one of those and torqued it up. Some rocol and a new gasket and that's back on. My new (well, straight) bumper fits. Always good. I tried the seat base and the original seats I've collected and seat rails and all looks good. Paint on order for the seat rails I've scavenged from corners of the UK. Once that lot goes in and the floor I'll be getting excited. Hoping Her Indoors can handle a couple half days' welding before I go back to work next week because that might be enough to get my other dumb iron tidied up. Fingers crossed.

In typical new year fashion I am 1) getting excited about having the 2A on the road next year and maybe making it to the 'Billing returns' show and 2) looking at 'next projects' on eBay before this one's actually finished. :Do_O
 

Attachments

  • IMG_1144.jpg
    IMG_1144.jpg
    401.2 KB · Views: 145
Well the daffs have broken cover and so have I. Not much doing in Jan or Feb but I'm back on it now and looking forward to driving it on the road this year! Aiming for Billing, if they don't cancel it, as it's around the date of my 40th.. so why not?

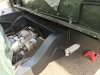
- Seat base seats floor gearbox tunnel new gators etc. etc. are all back in for a dry fit - meaning I still expect sod's law to give me a reason to take them out again before it's on the road so I'm not doing it all up just yet!
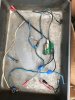
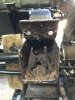
- Handbrake connected and working for the first time in 2 years. I was baffled the next time I went to pull it out the garage by hand and it wouldn't move. :D
- Original seat belts washed and going back in need some new fixings for the floor brackets as they were a !*&$ to get out and I cut and broke one or two.
- New black and silver plates are on and looking very smart
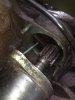
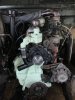
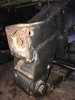
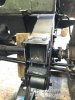
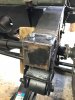
- New alternator arrived today.. (it's a Ford one on there at the moment and doesn't sit quite flush with the other pulleys and not measuring a great current at the battery.)
- I got so excited yesterday I even dug the wings out the shed.. I've got new lights ready to fit in those.. and it looks like I need a couple of new mud shields. The old ones are possibly salvageable but at £15 per part for new ones and my time so limited I'll order new ones.
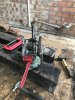
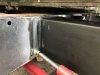
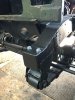
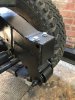
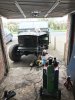
- Bumper's back on. I've got another dumb iron to cap the end on but no reason to hold up the rebuild for it I can pop the bumper off and do it when the weather's better.

And I've got Friday and Monday booked off so hopefully some more pictures very sooon. :D
 
S3 alternator bracket is in the post.. ;)
Made up some braces for the bulkhead outriggers and welded those on this morning. 14" x 3mm angle.
Rivetted a cleat to the rear tub where one was missing.
Finally fit the rear tub wiring covers I scavenged from Kelmarsh last year now the rear lights are all new or known good and all working.
Started sorting the headlamps by fitting new dishes and having looked closer today might want to replace some more bits that are cracked or not good enough.
A job coming up soon is to clamp both wings out and knock the worst of the dents out. She was treated rough in a previous life.. probably enjoyed it though.

Things are getting serious. I could be driving it up the road in April but I'll probably delay that by wanting to fit tyres and while the tyres off I may aswell paint the rims while it's easier..

Things are still getting serious though. I could be driving it up the road in May. :rolleyes:

I notice I don't take as many pictures as I used to, but I did snap a couple off today so they are attached. What's a forum without pics?
 

Attachments

  • IMG_1303.jpg
    IMG_1303.jpg
    369.9 KB · Views: 164
  • IMG_1304.jpg
    IMG_1304.jpg
    464.5 KB · Views: 165
Back
Top