Freelander 1 Rear window mechanism went crunch!

This site contains affiliate links for which LandyZone may be compensated if you make a purchase.

jchannon

New Member
Posts
8
Location
UK
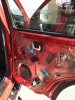
I opened the rear window and a big crunch sounded and the window went half way down as I wanted it to. Went to do the window up and nothing and some dodgy sounds. I have removed the door card (pretty impressed with myself there as complete noob) and I think I can see the wire getting tangled up so I assume it's snapped?

How do I go about replacing that wire? I watched a video about fitting a Freelander 2 window mechanism and that seemed to have plenty of space to get behind the door metal but my Freelander 1 doesn't seem to have any space to get the wire in etc.

Also the window won't manually be moved up to close so not sure how I do that before it rains!

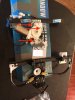
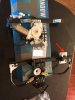
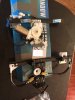
Attached is a picture with the door card off.
 

Attachments

  • IMG-2167.JPG
    IMG-2167.JPG
    347.9 KB · Views: 131
You need to remove the or cut and access hole in the moisture barrier first. Then you un-bolt the glass clamp a few turns, so the glass is free to be removed from the regulator. I use a door wedge and some parcel tape to hold the window in it's fully up position, while I'm waiting for a new cable to arrive. The regulator assembly un-bolts from the door frame, so a new cable can be threaded on, or a complete regulator assembly is fitted, based on your skill level.

Re-assembly is a straightforward reversal of the removal procedure.

I've done so many window cables on Freelanders over the years, I can change them in about 30 minutes.
 
Thanks, will see if I have a door stop. I know I have some gaffer tape but not sure if that'd rip the paint off.

Attached is some arrows that point to the bolts, are these correct ones to loosen?

Do you know where I can buy cable?

Thanks again
 

Attachments

  • IMG-2167.JPG
    IMG-2167.JPG
    314.3 KB · Views: 124
Hi all, so I managed to take the old one out and I ordered a new one without a motor and now wondering if I should have done because you'll see on the left the old one has the motor attached and the new one doesn't have a motor or anywhere to attach it to. What am I supposed to do?

Thanks
 

Attachments

  • IMG-2203.JPG
    IMG-2203.JPG
    228.2 KB · Views: 122
Hand - as in right hand side? Yes

You can't see the difference between the old and new? The old has the motor the new doesn't.

After looking at it more, I think the motor on the old one is attached to a white cover that covers the wire spool and can be unscrewed so I assume I'll put it onto the new one??
 
But the motor won’t fit because the silver bracket is at the wrong end of the rail;).
Unless you can move that bracket.

J
 
Just had a closer look you should scrub out your address in the pic:)

I zoomed in to find the part number and saw it.

J
 
Done! :) Thanks good spot.

I've managed to move the bracket down, but the motor doesnt attach to it, it sits behind the motor.

I think as shown in the arrows i'll undo these and then move that whole white cover onto the new one and see if that works
 

Attachments

  • IMG-2203.JPG
    IMG-2203.JPG
    229.5 KB · Views: 126
Welcome:).

Yes the motor will change, so you have managed to move the bracket for the motor end to the other and of the rail?

J
 
Yep.

There’s probably a fixing into the motor to hold it.
Might be a problem.

But could you use your existing one.
J
 
I don’t know the car.

Sorry But not the top bracket the 1 underneath.

Does the top 1 move along the rail to move the window?

J
 
Ok so just looked at the parts and from what I can see just change over the motor.

The silver bracket doesn’t hold the motor it moves along the rail.

Your good:)

J
 
Flip the old one over and remove the screws securing the motor to the regulator assembly. Then flip the assembly back over and pull the motor out, while giving it a wiggle. Once it's free from the original regulator, insert the spline into the new regulator assembly, pushing the motor on firmly, ensuring the motor is oriented to the correct position. Flip the new assembly over and refit the motor retainer screws. ;)
 
Last edited:
All replaced and working!!

I honestly can't believe it, I'm so useless at DIY stuff.

Thanks everyone!

Not sure what I was supposed to do with the plastic moisture layer so i sellotaped the bits I cut off back on :)
 
Back
Top