Disco 2 Rear storage box fixings question...

This site contains affiliate links for which LandyZone may be compensated if you make a purchase.
Cheers, Brian :D

It's either that, or mount it on the kick-off inboard panel instead, where I definitely have the space to do a proper job of it (depending on how secure in place that panel is, of course). I'll decide tomorrow, when it's light outside, and I can have (hopefully, at any rate :confused:) a decent look at it.

Oh, and the radio's nowhere near as bulky of heavy as a Pye AM25B Vanguard!!! Quite light, actually - 2.2Lbs all-in :D

You're right, 2.2 pounds or 1 kgm (whichever is the heavier) isn't that heavy but if it should become detached from its carrier or the panel in an accident will still do some significant damage while it's flying around inside the vehicle.
There's another slight problem with fitting on the left side panel, while there's a 12 volt supply, switched with the ignition, the hinges for the tailgate door are on the right, so you're going to have to run your aerial coax across the vehicle probably at roof level in order to get to the spare wheel carrier, if that's still where you intend to mount the aerial.
Obviously, if you decide to put the rig on the right then the aerial will be easier, but the power might present a problem.
If you don't do any towing, then you might be able to utilise the wiring to the secondary trailer socket which has a permanent 12 volt, fused at 5 amps supply on it. I think that there's a connector for that trailer socket behind the panel.

Hmm. Hadn't considered the impact value issue, but I do have a dog grill mounted above the rear seats, so that's, IMHO, an acceptable risk.

The trailer socket power's a no-go, due to insufficient amperage. Power will instead be drawn from the lines behind the rear accessory power socket; it's rated up to 12VDC/20ADC, and the radio (Yaesu FT-8900R) only draws 12VDC/8.5ADC, less than half of the rating. There are three advantages in this.
  1. The power lines will be shorter and easier to manage.
  2. I won't have to run any long lines within the trim, merely drill a smallish hole between the storage bin and the power socket, fit a small grommet, a couple of in-line fuses (one each line) and bob's my uncle, or something.
  3. Power is shut off to the radio when I take the key out of the ignition, saving me from accidentally flattening the battery on leaving the car.
The antenna cable will be run as you suspected, inside the internal trim over the back door, and from there, through the cabling conduit for the rear window wash/wipe cabling 
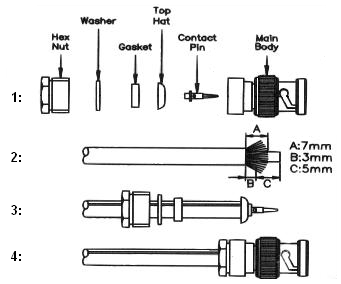
into the back door (thus saving putting dents in the door seals). I have to take the door card trim panel off to do the next bit, which is drill a hole between the two legs of the spare wheel carrier, file it smooth, then thread the cable through the new hole via a grommet, which will then be sealed with silicon on both sides and the lips of the hole as well, then over the offside leg to a boot-lip mounting between the hinges of the door (big antenna, quad-band Comet CR-8900). Once that's done, I'll stick the door card back on, and do the antenna tuning for VSWR (easy bit, that!).

I have to thread two cables from the main unit of the radio, through the internal trim to the front of the car, where the remote head will be located, these cables being the control cable, and the speaker cable. I'm not yet certain where I'm going to locate the remote head, but it has to be accessible, easy to reach, out of the line of sight to the road, and not distracting. I suspect I'll wind up either mounting it overhead, likely on the sunroof control panel (the sunroof was sealed shut by a PO to prevent leakage, and silicon sealed to ensure that), or on a mount over the centre console in front of the rubber coin mat. I'm going to be using a safety mike for the radio eventually (switch on the gear stick, mike in a flex mount from the forward A pillar offside edge of the windscreen affixed to the trim there), but in the interim, the fist mike will be clipped into a mike clip near the remote head.

Thoughts?
 
@RogerStenning
OK, it looks like you've done most of the thinking, although I might have been tempted to use a flexi mount, swan-neck or similar for the mic mounted on the "B" pillar, above the seat belt mount, above and just behind your right shoulder. I have seen that method used on London black taxis in the past. That way if you do find yourself being shot forward due to a very sudden stop the mic won't be facing you like a pointy stick.
Running the cables up behind the upper trim and over the doors behind the roof lining shouldn't present too many problems.
On the power supply thing, I'm a bit naughty there, I put a bigger fuse in the secondary trailer socket supply so that I could use it for my tyre inflator.

Hmm. That's a good point re the safety mike, thanks. I'll look into that (no pun intended!) :D

The only concern running the control cable is the length involved, which may prevent it running all the way to the centre dash. We'll see. The speaker lead can be easily lengthened by the use of an extension cable, but the control cable is a weird non-standard RJ arrangement peculiar to Yaesu. Think I'll see if anyone makes extended length versions of it. just in case.

No comment on the trailer socket re-fusing ;):D

EDIT:

yep, someone does - technofix on evilbay (http://www.ebay.co.uk/itm/like/2527...=9044979&device=c&campaignid=737386489&crdt=0), and as I've used them for other cables in the past, this should work. I'll order one anyhow, always handy to have a spare ;)
 
When you mentioned the control cable, I had in mind something like the cable I was used to when I was actually in the "trade" so to speak.
The Pye "Whitehall" iirc used a 32 wire cable which in most cases was run in straight off a drum of about 100 metres and then after it was fitted, including through holes in bulkheads and the like we had to crimp each wire and then fit the plug on each end, in the vehicle. Sometimes not easy!

heh, I've heard of those :eek: Thankfully, we get pre-assembled cables for our kit these days, which use far fewer wires :D
 
Right, while the weather was being well behaved today, I had a good long dekko into the stroage bin. Yep, no bleedin' screw holes, so I'm inclined to agree previous comments that it was done to that wagon either without it being mentioned in the article, or by a PO to the guy in the article.

So, two options remain:
  1. Screw through the outside-facing trim (not a clever idea, imho), or
  2. Strengthen/brace the inner kick panel, which is screwed in place with torque screws into the moulding anyhow.

I think I'll go with (2). It's easier to accomplish, and thus less abrasive on my nerves ;) Also, as I now find that the panel is properly screwed into place, I feel a bit better in having the radio mounted to it.

More when this is all being/been done :)
 
Right, quick update. The radio's not yet fully installed, but most of the work's done.

The storage bin front panel has been strengthened inside with a gash bit of MDF, and the radio mounting has been fixed to it inside the bin; the antenna cable has been run from the edge of the tail door, through the tail door into the cable conduit, and thence into the B frame, run along the inside of the floor to the other pillar, and through that into the bin. The power cables have been run from the bin, into the B frame by the rear seat back and seat belt roll, to the accessory socket, and power tapped from that. The radio control head mounting plate is mounted on the dash above the stereo/cd player. I have yet to run the control and speaker cables, as I'm stuck awaiting radio parts for the antenna cable connector, which today caused me no end of grief in attempting to solder it to the cable (it's still not on the cable). It's a long and rudely worded story, but the short polite version is that I'm having to use a different connector and an adaptor, and they're currently in the post to me.

This is beginning to sound like a two steps forward, one back, kind of farce *shrug*
 
I'm stuck awaiting radio parts for the antenna cable connector, which today caused me no end of grief in attempting to solder it to the cable (it's still not on the cable). It's a long and rudely worded story, but the short polite version is that I'm having to use a different connector and an adaptor, and they're currently in the post to me.

This is beginning to sound like a two steps forward, one back, kind of farce *shrug*
What cable and connector are you having trouble with?
 
RG-58/U and a confounded N male connector. Damn hole in the pin was less than 0.5mm, and the lead-free solder just wasn't playing, the air became rather vividly blue. I have a couple of PL-259s on the way from Nevada in Portsmouth now, along wiht an N(F) <-> SO-239 converter plug, and some 60/40 resin flux solder on the way from Amazon. Also a rather more powerful 12VDC soldering iron (50 watts) to replace the rather anaemic butune job I was using before (was working on the cable in the Disco). Can't so much else now until the replacement stuff arrives, and I'm back to work tomorrow (end of the leave week is today). So, a few more days without a batphone in the wagon :( Irritating, but there we are :(
 
I've never had a problem with "N" type plugs, and I've always thought of PL259 as cheap and nasty, I'm sorry, even the ones with the PTFE insulator.
As you've discovered, the soldering techniques are the key. I don't know where this "You must use lead free solder" came from. Lead free solder is only a requirement in plumbing, not electronics, provided that you are aware of the safety recommendations.
Yes, the little hole in the pin is a bit small, but with a good iron and some decent solder a good flowed joint can be made, especially if the parts include PTFE insulators. Be prepared to scrape away any excess solder after it's cooled with a Stanley knife.
If you really want to talk about awkward connectors, the N-type doesn't even come close, try the two pin BNC.
I did replace the power connector on my mobile phone today too, it's been playing up for a while now. That was a bit of a trial too!
 
Last edited:
I *did* have a whole stack of 60/40 solder, but I'm stuffed if I know where the damn stuff is now. So, had to nip out to *hiss, spit* Maplin, and all they had was the lead-free crap :( Needless to say, it flowed in all the wrong places, not down the hole it was supposed to. A "bit" of a small hole, is akin to saying that the US defence budget is mere pocket money, mate. I've done BNCs in the past, no problem. But that was with proper solder, mind.
 
OK, edumakate me, what on Earth is a 2-pin BNC? This is the BNC I'm aware of:
bnc.png
 
It has the same size and pattern outer body but the inner bits had a pin and a socket. It was used mainly to connect a waterproof loudspeaker to the control unit on the police Pye Westminster motor cycle set.
It didn't have to fit on a piece of flat twin cable and when it was assembled correctly it was supposed to be waterproof but I don't think it really was.

untitled.png
 
Right, quick update. received a few items in the post over the last couple of days...

  • 40W/12VDC soldering iron, plugs into accessory socket in the car.
  • Disassembleable soldering iron stand
  • 60/40 tin/lead flux-core solder
  • Soldering mat (essential if you don't want to accidentally cause heat damage to a surface you're working on in the car, for example!)
  • 2 x PL-259 two-part plugs for RG-58/U (one's a spare)
  • N-type plug to SO-239 socket adaptor plug
portable-soldering-kit.jpg


I also have some flux soldering paste and some fine grade steel wool due today (these last two to help me tin the new soldering iron tip)

All of this (less the two plugs and the adaptor connector) will go into the portable soldering kit for when (if) I need it in the future.

Hopefully either today or tomorrow, I'll have that darn cable plugged at last!

I'll get around to sticking the cabling from the storage bin to the front of the car later today, if I get a chance :)
 
Back
Top