Disco 2 radius arm replacement

This site contains affiliate links for which LandyZone may be compensated if you make a purchase.

02Disco2

Well-Known Member
Posts
439
Location
Hampshire
hi all, I hope everyone is coping with "lockdown" as best as possible

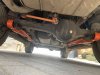
a (hopefully) quick question as I going to have a crack at replacing all 4 radius arms (they've been sat in the garage for a few weeks now) but am finding conflicting info on the process to replace.

Haynes suggests jacking and holding on axle stands under axle's, removing road wheel one at a time, and then lowering before fully torquing but some other forums/posts (albeit for Defender) suggest putting on ramps and keeping wheels on.

Any advice either way? Happy to do either and as I have the replacement arms I can do one at a time without the need to re-press bearings etc, just want to find the "best" way before I start so that I have to do as little dicking around with axel adjustment to get it to fit again as possible!

Cheers & stay safe
Si
 
On a D1 the technique if i recall involved using a ratchet strap to secure the axle to the chassis, then remove with wheels on. I dont know if a D2 is different. I think i had to adjust the ratchet on refitting to get it lined up? But was yrs ago sorry
 
At the end of the day, as for all suspension components, the idea is to get the vehicle sitting safely on its wheels or axles, horizontal, and then ideally to give it a bit of movement up and down on it's springs and shocks, and back and forth to let torsional forces on the axles reach equilibrium. Once this is done then the nuts and bolts can be torqued up.
If this doesn't happen then bushes etc can be put under more tension than they should.
If you can only do this on axle stands then you cannot roll the vehicle back and forth, ditto on ramps, but there is nothing to stop you putting the wheels back and lowering to the ground, doing all the moves to settle the suspension, then jacking the axles back up in the air, supporting them on stands and then torquing them up.
You will not put any component, or yourself, in any danger by doing that.
Hope this helps.:)
 
On ramps (or even just on the ground) and only removing/replacing one at a time will probably give least movement in the axle/chassis relationship. I would suggest fully doing and torquing one axle before starting on the other.
:)
 
Sorry, just realised I read to the end of your original post a bit fast.
My post was all about how to settle the suspension once the arms are on.
As for getting the arms on, doing one at a time is the obvious way to go as the still connected arm will hold the axle more or less in the right place. You may have use a bit of brute force, but a bit of sensible levering, use of a ratchet strap or a jack should do it. The traditional pointed, conical tool, whose name escapes me for the moment, inserted in one side, should manoeuvre the bolt holes into a lined up position allowing you to bash a bolt through from the other side, gently. Just keep the bolts loose until it is on the ground.
 
Thanks all,
Will give it a go with axle stand on one of the rear’s first and see how that goes - have ramps and ratchet straps so can change to that method if needs be!

It’ll give me something to do at the weekend either way - thanks again

S
 
Well I managed to get 1 done this eve - near side rear - and it took nearly 2 bloody hours!! Lots of leverage needed to get the chassis bolt in a position that would allow it to locate but got there in the end. Hopefully the other side will be easier tomorrow morning!
 
Well I managed to get 1 done this eve - near side rear - and it took nearly 2 bloody hours!! Lots of leverage needed to get the chassis bolt in a position that would allow it to locate but got there in the end. Hopefully the other side will be easier tomorrow morning!
Well done!:):)
(Did warn you about the leverage!;);))
 
Bits of wood, scissor jacks, ratchet straps, spanish windlasses, all have their place.
At least if you have done one the others should be easier. Don't tighten one end of the axle before doing the other end!
 
Bits of wood, scissor jacks, ratchet straps, spanish windlasses, all have their place.
At least if you have done one the others should be easier. Don't tighten one end of the axle before doing the other end!
The 2nd one took less than half the time and I was able to get it in place by hand so must have been unlucky with suspension position yesterday with the first one

thanks for all the help all. Stay safe
 

Attachments

  • D8F77333-9BCC-49BF-B9A0-2E5081410ED9.jpeg
    D8F77333-9BCC-49BF-B9A0-2E5081410ED9.jpeg
    312.1 KB · Views: 450
Im going to replace the bushes on mine with OEM rubber. What tools did you require, and could you post up a sequence to remove and refit please... I have a press so no issues there...
 
Im going to replace the bushes on mine with OEM rubber. What tools did you require, and could you post up a sequence to remove and refit please... I have a press so no issues there...
hi @tilly2 - I replaced with new bars that had the OEM bushes already fitted so cant help you on the bush replacement but bit the removal and fitting steps I followed are below;
  • I removed and re-fitted 1 arm/side at a time to limit any movement from the axle or chassis
  • I drove up onto some ramps to lift the truck up but keep level
  • (in the haynes manual it says to disconnect the negative lead from battery if you have air but I didn't bother with that
  • remove but (13mm?) from bolt holding air level sensor (if you have air) but leave bolt in for now
  • remove all 3 nuts (24mm) from the retaining bolts (21mm) but leave bolts in place to hold the arm up
  • take bolt out for air level arm and cable tie so that it is held steady and not compressed so air bag doesn't deflate (I didn't do this on the drivers side rear and it made life harder - other side was much easier when I followed this step)
  • remove the single bolt holding the chassis arm to the chassis
  • remove two bolts holding arm to axle - I had to support the chassis end of the arm with my knee while under the truck to lift up slightly which made it easier to remove the two bolts
  • arm will drop out - it's heavy!
  • **bush replacement - can't help with that bit sorry!**
  • grease bots and nuts
  • install 2 x bolts on chassis end of arm and tap through with hammer if needed - you may need to lift the axle end up right into the top of the retaining bracket to get both bolts to locate properly
  • fit chassis end - this may require some leverage with a pry bar to "pull down" and level bolt hole - the drivers side needed this but the passenger side didn't
  • fit bolts an torque
  • done!
front is the same but you can remove the drag link to give a bit more space if needed

good luck!
 
Back
Top