Project Disco Rebuild- Easy On panels.

This site contains affiliate links for which LandyZone may be compensated if you make a purchase.

Dr No

Active Member
Posts
205
Location
Brecon Beacons
Hi Guys, n' Gals,

I might have bitten off more than I can chew.

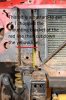
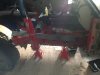
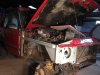
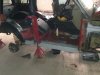
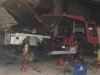
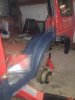
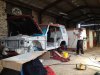
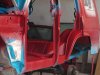
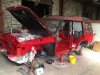
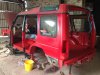
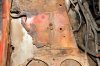
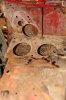
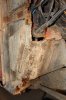
The state of my inner wings, inner sills, outer sills and rear arches meant I had to do something. I had stuck on a couple of plates before but the MOT man wasn't going to pass this......


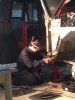
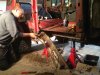
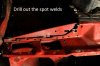
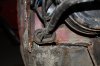
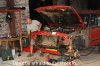
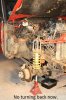
Here's how I am going about it.
 

Attachments

  • a.JPG
    a.JPG
    47.1 KB · Views: 358
  • f.JPG
    f.JPG
    31.6 KB · Views: 334
  • e.JPG
    e.JPG
    88.2 KB · Views: 327
  • d.JPG
    d.JPG
    38.2 KB · Views: 329
  • c.JPG
    c.JPG
    38.8 KB · Views: 355
  • b.JPG
    b.JPG
    47.6 KB · Views: 314
Thought my old D1 was bad till I saw yours.. Would you not be better off looking for a donor body.

Nah! they are all rotten.
It will in essence have four new corners and other new bits too, should last another 20 years then ;o)


Oh and I am in need of a mechanic who can sort gearbox leak, we might as well do clutch whilst we are at it. oh and the heavy duty lever. They have to have their own tools though and must come to me as mines off the road :eek:) Can you guys recommend someone? South Powys, food and accommodation available as will be a beer or two.
 
Last edited:
Once its repaired itl be alright.i found it cheaper when i did all mine to buy sheet steel and make ya own panels up.
 
This piece was a bit of a ****. Welded on the back and impossible to get to.

You can't get into it particularly easily and I found it easier in the end to chop through the mount so I could get in with a cutting disc to separate the two pieces. Then simply grind the back of it to remove the old mount metal.
I discovered a little later that if you take off the whole front end, which I don't intend to do, if you do get a mate to assist as both inners would have to be removed simultaneously.
 

Attachments

  • IMG_5399.JPG
    IMG_5399.JPG
    60.1 KB · Views: 241
Last edited:
Well guys the build continued and now it is nearly there.
 

Attachments

  • 191.JPG
    191.JPG
    217.4 KB · Views: 221
  • 189.JPG
    189.JPG
    239.1 KB · Views: 223
  • 184.JPG
    184.JPG
    294 KB · Views: 216
My better half has tiger sealed just about everything. She should last another 25 years now. Aye, and the Landy.

Painting was always going to be tough cause it was my first time for such a large amount, but soon got the hang of it. A new gravity fed spray gun from Machine Mart helped as did the cavity sprayer from a German firm on ebay.
 

Attachments

  • 178.JPG
    178.JPG
    235.3 KB · Views: 235
  • 195.JPG
    195.JPG
    265 KB · Views: 215
  • 275.JPG
    275.JPG
    275.5 KB · Views: 205
  • 294.JPG
    294.JPG
    211.1 KB · Views: 220
So all in all with new:

Inner wings
Outer sills
Inner sills
Rear arches
Rear cross member
Chassis repair kit
and various custom made repair sections where more rot was cut out she is now looking tidy.

Box section for sill repairs and sheet steel for chassis repairs would have been a better way of approaching the job, but you live and learn. And boy have I learned.

Been fun though.
 

Attachments

  • 306.JPG
    306.JPG
    268.6 KB · Views: 220
  • IMG_1048.JPG
    IMG_1048.JPG
    168.8 KB · Views: 228
  • IMG_1051.JPG
    IMG_1051.JPG
    278.3 KB · Views: 243
  • IMG_1052.JPG
    IMG_1052.JPG
    273.9 KB · Views: 222
looking good, wish i could take mine off the rd and do mine it's a nightmare making sure it's on the road every monday for work
 
Thanks for your kind words lads, plenty of info was gained from this site to allow her to get to the stage she is at. Next is a bigger intercooler and some service work then roof tent and away we go.
 
Back
Top