nugget's 110 Defender Build

This site contains affiliate links for which LandyZone may be compensated if you make a purchase.
Due to the long distance covered and the distance between fuel when remote touring in Aussie, long range tanks are a gimme.

I opted for a set of sill tanks which would give me an extra 100L on top of the standard 75L. The thing I liked about the sill tanks was that it kept the weight down low, they are inter connected so the weight keeps even side to side.

My only concern was about them copping a flogging from stones or being bashed in rocky terrain so the plan was always to cover them with bash plates which I will cover in a later post.


Fitted up all the hardware before hanging them using a good sealant.


The sender unit in the tank sits close to the body so if it plays up you would have to drop the whole tank. I chose to cut an inspection hole in the compartment under the seat so there was permanent access.


My compressor also lives under the seat now that the electrics have been raised /relocated in the eBox


Made up a cover from some checker plate offcut


Always good to have a wiring diagram organised …


I decided to mount the gauge on the side section of the dash. Access is a bit tight especially having fitted the in dash car pc. Enough wires for a space shuttle!


A splitter box is used to direct the flow when filling to the separate tanks so the closest tank does fill first.


A little transfer pump takes care of pumping fuel to the main tank when required.


The original filler is converted to a “Y” style so the flow can be directed to either the main tank of sub tanks when filling. The original breather is used and a “T” is placed in line below the “Y” for the line pumping from the sub to main tanks…clear as mud???


Dash all looks pretty neat when back together with the new gauge installed


And the tanks sit nice and neat along the chassis rail

 
Nice !! Bas plates are a definate. Been working on our truck today and everything underneith is rockrashed to all hell

Need a long range tank set up for my RRC tourer for my upcoming build :)
 
The big trip is rolling around faster than my ability to do the planned mods which were converting the crew cab to ute and having a slide on camping unit with a roof top camper on top of the slide on.

Whilst that is still the long term plan, the immediate problem is carrying a lot of things which were going to pack neatly into the slide on. Finally I decided to do a temporary fix which will get us through this trip plus a couple more if needed without wasting a heap of $'s.


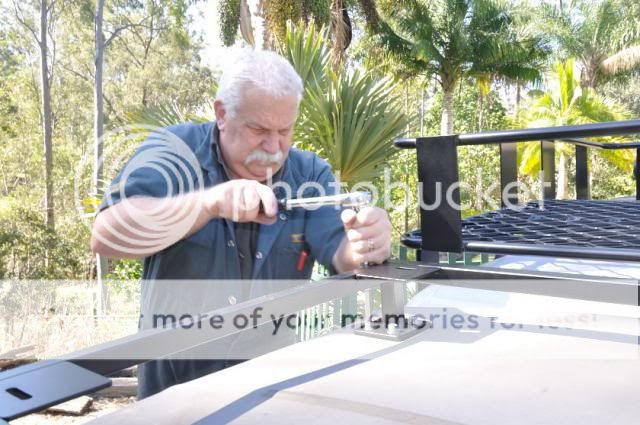
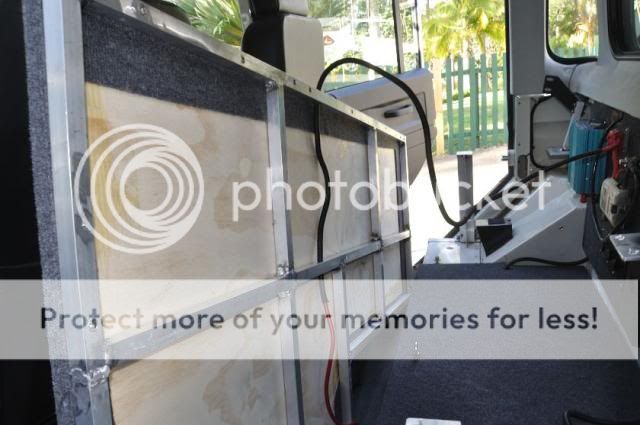
Finally decided to build a frame to take the roof top whilst retaining the canvas back, and making provision for the 2nd spare to stand vertically in the back. The design has 4 plates on top of the frame and sitting under the canvas which will bolt to an external frame for the camper. Damage is a series of 4 X 4 bolt holes which could have a patch sewn over if I wanted to return to standard.

We bent up the hoops in position and spot welded it all up. The frame sits on top of the tub and bolts down and also in from the side.


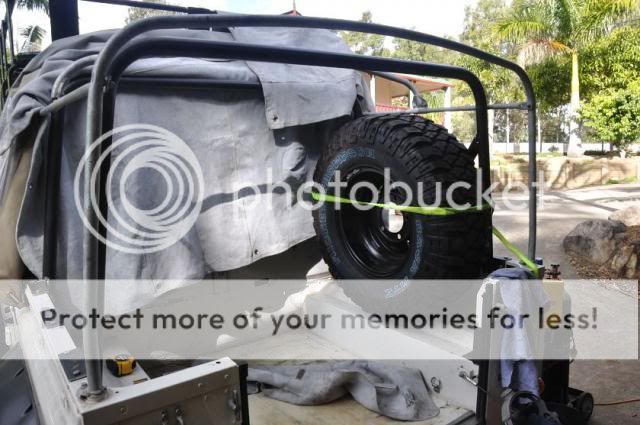
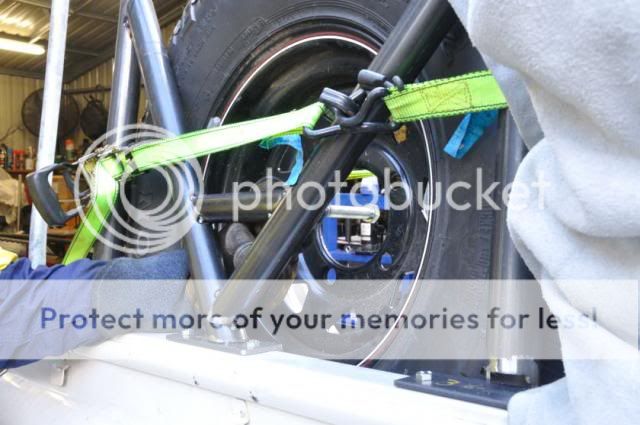
The spare will bolt tot he support bracing.


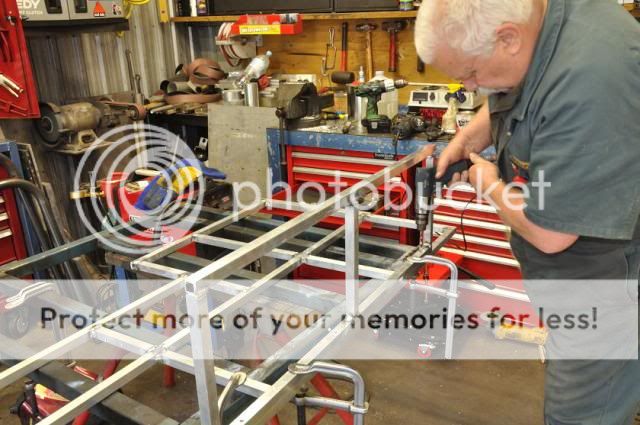
My son welding up the frame.


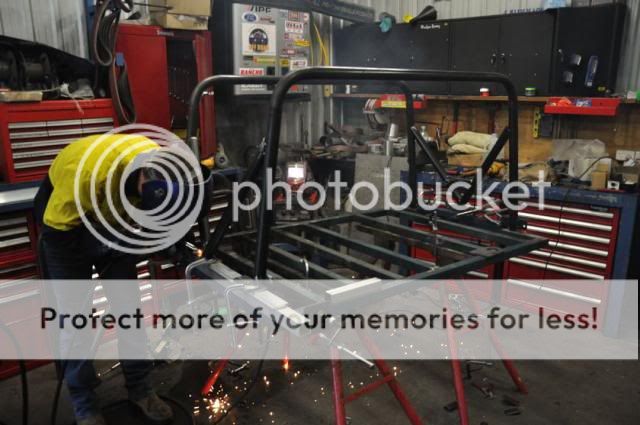
The frame will be finished over the next couple of nights with the Hannibal roof top due to be ready early next week.

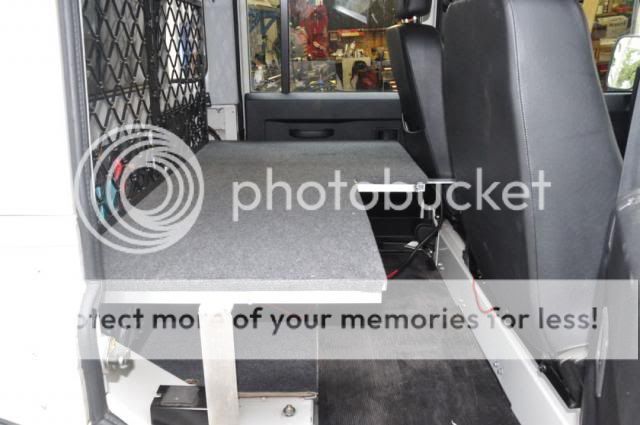
I have already stripped out the rear seats and will be doing some storage shelving and a 60L water tank.

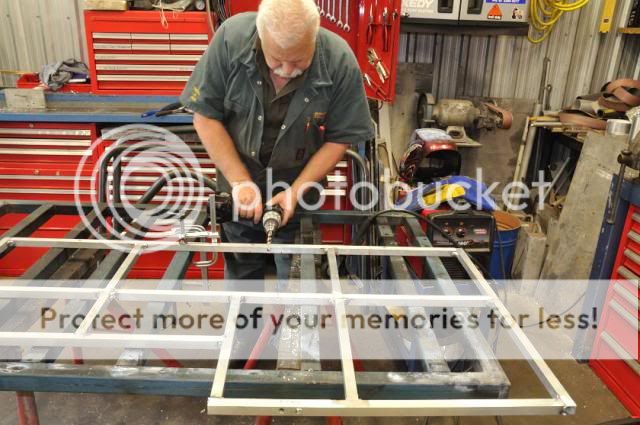
Installed the frame for the roof top today after finishing it during the week and giving it a coat of roll bar paint.


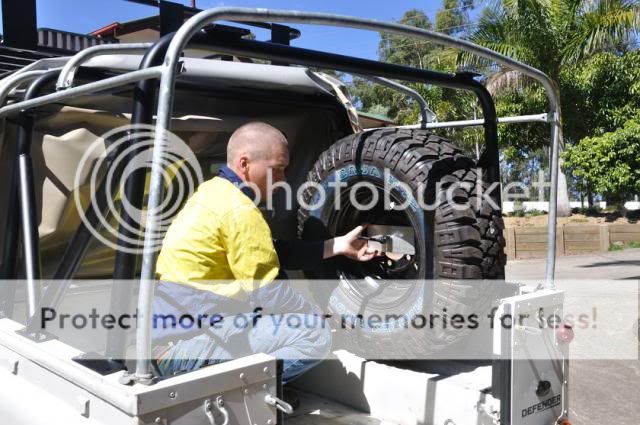
Frame for the roof top then bolted on through the canvas. Roof top due to be ready Tuesday afternoon if the plan holds together.


Used the polyurethans pads I used for my roof rack either side of the canvas to ensure a water tight seal and also protect the canvas from the edges of the steel plates. With the next trip covering 10,000kms with about 6,000 on dirt, a hole in the canvas is something I can do without.


Also got a start on the shelf for where the rear seat used to be and should finish tomorrow with the sill tank bash plates the following weekend.....just starting to run out of weekends.


Knocked up most of the rear shelves today. Still need to do some dividers which will bolt on top to stop stuff sliding around.

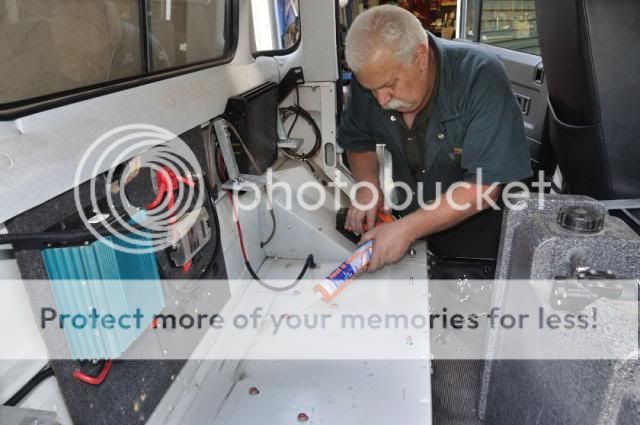
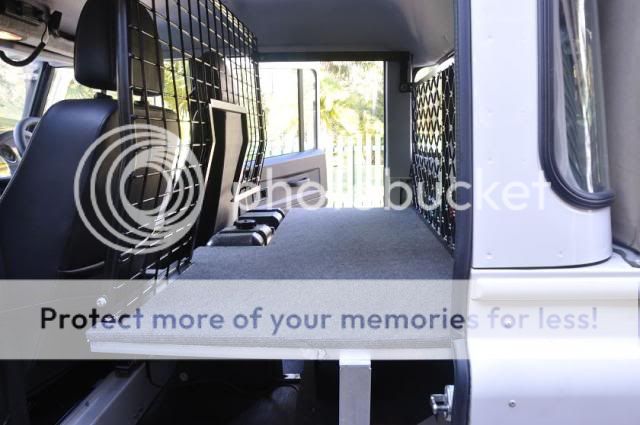
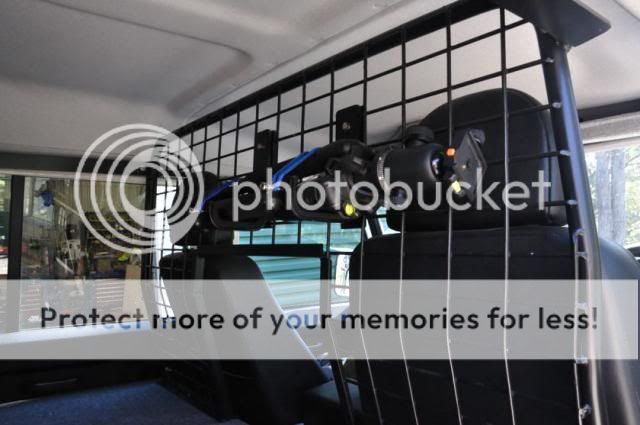
The security mesh frames top and bottom protect my power board which has inverter, fuses etc, and the amp which are mounted on the back of the cab, normally out of sight behind the seats.

The board on the floor has holes cut in where the bolts heads for the seats are. This gives a flat area as the last thing you need on corrugations is something like a 5l oil container rubbing a hole in it on an exposed bolt head.


The power board is powered from the dual battery so I made provision to run the cable thru the frame to keep it out of the way.


Bit of silicon around the seat bolts to make sure red dust doesn’t come thru


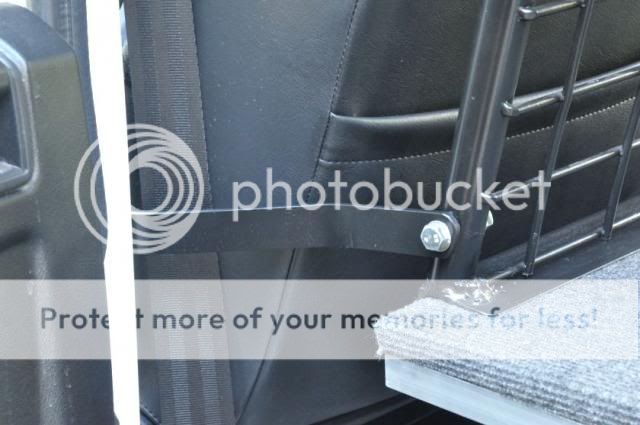
All the bracket fixings utilise existing points in the Defender with the exception of one each side to stop the bottom screen from moving forward/back. For that I used a stainless nutsert which goes into the wheel arch.

The gap behind the drivers seat is for a 60 L water tank which will feed water to the back of the truck, hopefully one night this week!


All the goodies starting to come together, which is just as well as we leave Monday week. Picking up the roof top tent from Hannibal this afternoon...getting Big Kev excited!

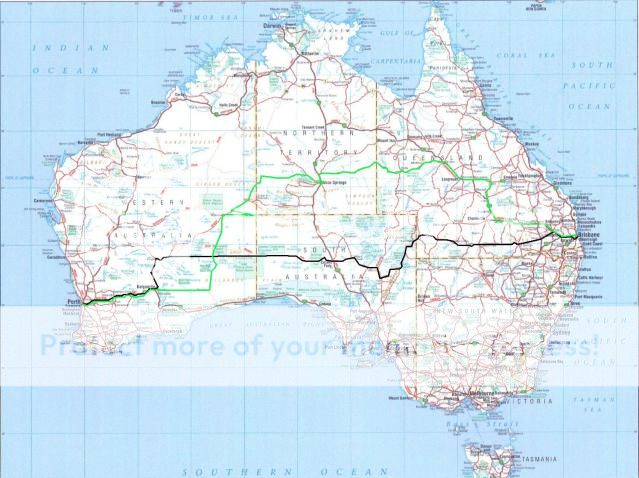
This is the plan for the trip. Basically I am planning to cross Australia from East coast to west and return with as much dirt road as possible. Black line is going out

Brisbane –Thargomindah – Innanminka - Innaminka Track to Lyndhurst – Marree – Ooodnadatta track to William Creek – Coober Pedy – start the Anne Beadell Highway – Centre Line track from Anne Beadell to 250 mile and then 350 mile pegs – Dingo claypan – Emu including the 2 ground zeros from Atomic tests – Kalgoorlie - Perth


and green line the return leg.

Perth – Kalgoorlie – Follow Trans Continental Rail Line to Rawlinna, - Connie Sue Highway to Warburton – Sandy Blight Junction Rd – Alice Spring – Plenty Highway to Boulia and back to Brisbane.

Basically I am looking to cover as many of Len Beadells tracks as possible.


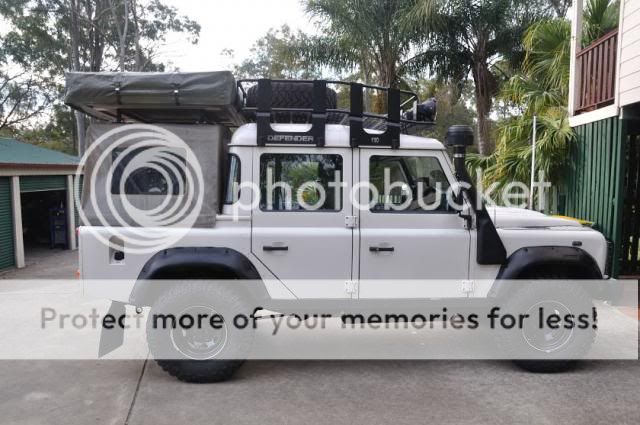
The guys at Hannibal fitted the roof top on last night.

Not as neat as it will end up when I eventually do the tray/slide on conversion but will get us through this trip without breaking the bank.


Still tossing up between stilts/small ladder/toe holds in the body work/wife on my shoulders, to reach it but sure I'll come up with something before we leave!


Did a cut and shut job on the cargo barrier I originally made for the H3


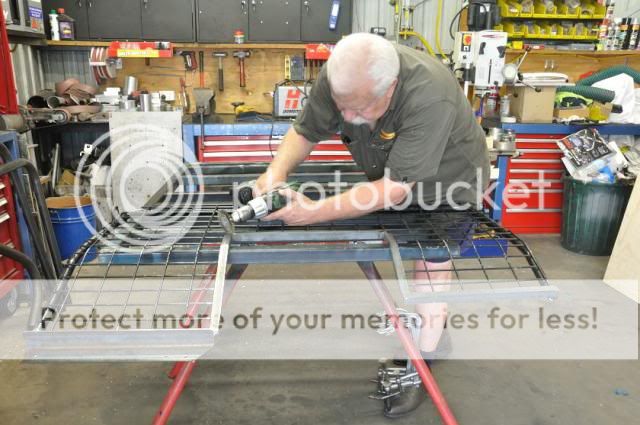
Has come up nice and strong. Will not have anything really heavy on the top shelve but better safe then sorry...


60L water tank left over from the H3 as well fits in nicely. Deliberately left it exposed on top as it makes it so much easier to fill and my camera bag can open onto it. Going to run it to the back of the truck with a spout and power button.


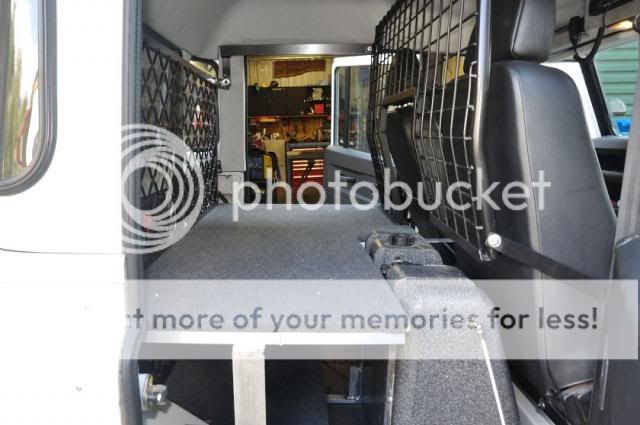
Plenty of room for spares, tools and power pack under the shelf.


I braced back to the centre pillar and also the rear seat belt mount to keep it all nice and solid.


Back on the trail of storing things efficiently and came up with this to carry my Tripod. Bit of bent ally and some neoprene strip with adhesive on one side to protect the tripod.

The little occy's are the ball end type to make it easy to clip in and out.


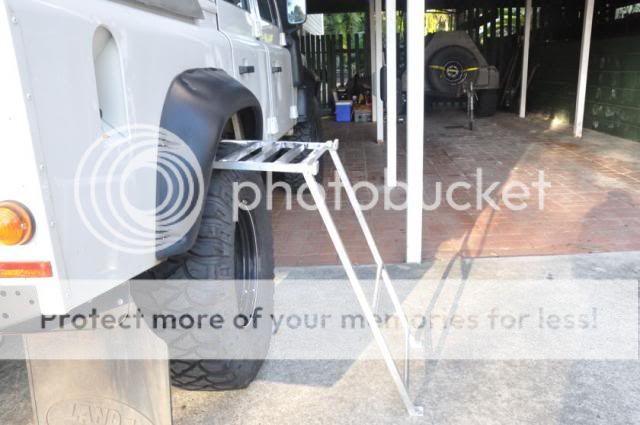
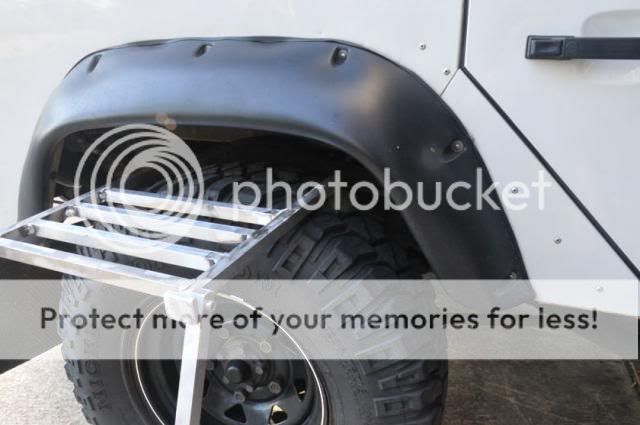
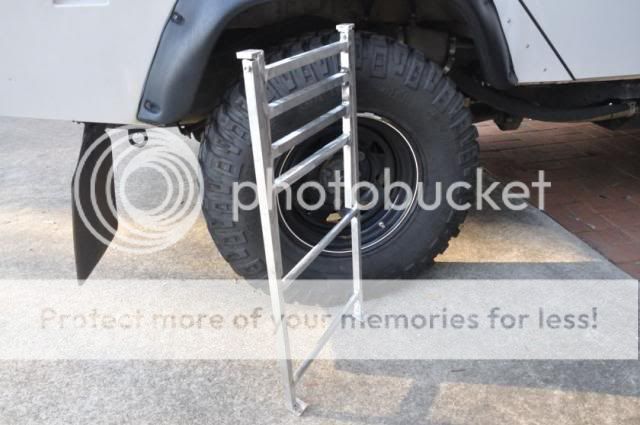
Also got onto the ladder issue and came up with this which is light and folds flat.

The other issue is that I needed to get to the top of the wheel as the best height especially for closing the roof top.


Still working my way through the list of things to be done before we leave.

Wanted to have easy access for the steps as they are the first things needed every over night stop.

 
Been held up for ages finishing the rocker rails and bash plates to protect the sill tanks.....finally, and am I happy to get this one off the list , but very happy with the end result.

Had some sheet folded up


Welded some socket nuts on for fixing


Put rivnuts into the chassis rail to bolt the other side up


Bolted them on and Bob’s your uncle


Always like it as easy as possible for the good lady when we are away. Fel;t bad her having to lift the 20L water containers around so I plumbed it all in for her! Water at the tailgate where the cooking etc it done saves a lot of messing around. Also has the light switch for an LED mounted on one of the hoops.


Also fitted the Thumper which doubles as a back up cranking battery and also backs up the dual battery. As I travel alone a fair bit, it pays to have a back up system for everything!

 
1. Centre Line Track off Anne Beadell Highway, remote bush Aussie
This a copy of a post I have done on an Australian Land Rover forum. As background information, Len Beadell was an army surveyor who cut roads thru the virgin bush in the 50's and 60's. He drove an army Land Rover and was followed by a D10, Grader and chuck wagon. It all revolved around the rocket and atomic testing being done at Woomera, Emu and Maralinga by you British lot!
Len found, recommended and subsequently surveyed all of those sights. As

I had already covered a couple of thousand k’s to get to Coober Pedy and was about to start the Anne Beadell Highway, another of his tracks named after his wife when I found the post and decided to do a “small detour.”

This is remote Aussie bush. The Centre Line track was cut by Len in 1951 and in fact is the centre line of fire from the launch pad at Woomera and he cut a track along it and placed marker posts with canvas pegged to the ground at 50 mile intervals. Each canvas marker was a different shape so each marker could be identified from from the air. The Edijt's boys from the AULRO forum had done the track 2.5 months before me in a convoy of 4 vehicles with 2 ex surveyors on board. The last entry in the visitor book before them was 2007! I was on my own and 400kms from the nearest help so this is how it went.....

I was sitting at Coober Pedy waiting to leave for the Anne Beadell the next day and cruising around the forum when I found Bushie's Centre Line post.

Firstly a massive thank you to Bushie for his help in very short time which enabled me to follow their footsteps. Without his help I would not have done it, being on my own but I was well prepared and with a copy of their Ozi Explorer track log and hopefully some tyre tracks to follow I set off.

The track wasn't that evident once you got along it a bit as the prevailing winds had erased EDJITS tracks in places which made things interesting.


Greeting me the first morning....only a 1 plug fix


Unfortunately when I went to fix the flat, I found that my trusty old 2nd battery had died and as the pump was connected to it, I had to rig up a by pass....this was doubly important as the fridge was also connected to the doggy battery and the beer was getting warm.


One thing I did forget in the packing was a jack plate for in the sand.... am sure I am not the first Defender driver to use the cover from under the seat..


The track was pretty tight between the mulga and took plenty with me..by the end of the track there was about a .6m of leaves and sticks between the back of the cab and the canvas on the crew cab


Reaching the 250 mile peg was really exciting. Len had been in this exact spot and done his thing in 1951, 4 years before I was born and the condition of what he left was amazing. Some of the original mallee pegs to hold the stretched canvas markers were still there!


A quick satellite phone call to Bushie to thank him for his help and a bit of a leg on trying to find the astro station and I was exploring again.

As this had not been part of my original plan, I didn't have a Garmin with me but drawing on all the available resources the white painted rock with Edjits post nearby by were found with my...IPhone...


The heaviest going was between the 250 and Dingo claypan and I took a wrong option at a Y in the tyre tracks and whilst turning around....you guessed it, staked a side wall which needed 4 plugs. The investment in the tyre monitoring system paid for itself right there as I am sure I would probably shredded the tyre if I hadn't been able to stop so quickly before it started running on the rim.

By now I had decided to fix the tyre as much as possible as it was likely to get staked again anyway and this was the same tyre I had already plugged.


Between Dingo Claypan and the 300, the track is well defined and I assumed that it followed the original track but when I got to the 300 and checked the screen, I saw how much it deviated and how Edjits had followed the original track. No option but to head bush until I picked up their tracks and followed it until it met up with the main track again. Some one else wasn't quite so keen on their new option and placed logs across their track..


The 300 mile marker is more readily accessible so gets a lot more traffic but it was still a thrill for a history buff like me to get there. They re-surveyed the marker and as you can see, old Len wasn’t too far out with his star observations and calculations.


Again a massive thank you to Bushie. This was of enormous help. My only regret is I didn't recover your pre cleaner for you!
 
Last edited:


Spent the night on the claypan


Even cooked up some tucker


The sun set was fantastic


Few more shots from the 300 mile marker


The original peg marking the spot of the astro station


The sign on the new 300 mile post. As you can see in the earlier pic, Len wasn’t too far out!

 
Absolutely loving this thread. Lots of inspired ideas on here and lots of inspiration for me with my next project. Keep it coming, can't wait to see what you do to the 130! :D:tea:
 
I just got back from Alice springs we managed to lose our sump if 100km from kings creek station. Superb area of the country :) thanks for sharing!
 
Hi flat. It certainly is fantastic country. So much of it was really opened up by Len Beadell and yet his story is largely untold. Whilst some of the roads he surveyed and built have been graded into real outback roads such as the Gary Junction Rd, and sections of some graded like the top end of the Talawana Track and the western end of the Anne Beadell Highway, most are still largely as he cut them in the 60's.

They are remote and generally in some of the harshest country we have to offer and deserve the utmost respect or things go pear shaped very quickly. Any weakness in a vehicle is exposed in record time and as you would be aware, helps is often hundreds of km's away.

Yeah thank god for sat phones and carrying plenty of water had a 5 hour wait in the middle of the day :D dug for grubs to pass the time and played cricket with a melon and a piece of road sign
 
Back
Top