New Owner needs a little help

This site contains affiliate links for which LandyZone may be compensated if you make a purchase.

Soul Racer

New Member
Posts
45
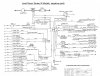
I Brought a land rover series II today, as a unfinished project, it was broken into a while back and the last owner lost heart after that, when it was broken into the dash was smashed and now there no power to anything, wheres the best place to start looking for the cause?

Many thanks for helping a newbie.
 
Im not sure, its a 2.25 diesel, i was told it got a series 3 engine though and a series 2 body, im sorry i cant tell u anymore, if u can tell me what to look for, to tell them apart i can check.

Thanks for replying
 
Hi Soul,

I think my approach would be to get a 12v bulb and a safety pin. Attach some wire, quite a few feet to the bulb and attach the earth to the battery. Now stick the pin into the insulation of the wire taking power through the bulk head and basically work your way along the wiring loom. It sounds like you need a workshop manual for a circuit diagram, otherwise this could be a long, long job... No power at all, my guess would be the feed to the starter relay may be broken, so in turn that probably means it's where it comes through the bulkhead. I'm guessing the 12v perm feed is taken off this feed for the ignition switch on the cab side of the bulkhead an this is broken or the insulation has been stripped and it's shorting to ground...

The above is a general approach I would use on any car, I have a series III but I dunno specifically for a SII. Check the battery is givin ya 12v before you start mate, if they shorted it and knackered the battery it could be very annoying to troubleshoot the whole loom and find it 2 weeks later! ;)

Cheer,

Rob
 
if its bin vandalised just take yer dash out and have a look behind it. its unlikey to be a short cos you didn't mention a fire at anytime.
check yer fuse box aswell as it may have bin damaged along wiff the rest of the dash and ferget the safety pin thing as that only works for a broken wire inside the insulation, which in all probability would cause an intermittant fault. if yer battery is good then i would expect the problem to be related to the dash being fooked
 
Ive had a look today and the wires have been pulled of the ingniton(sp?) barrel, the only problem is i dont know which wire goes where, could somebody tell me?
Cheers
 
Have at the Haynes book of lies and check out the Circuit diagrams.
Unless the wiring has been modified then you should be able to work out the ignition wiring.
For my 2a the colors and the markings on the switch tied up with the book.
 
below is a good guide to lucas wiring for all british cars for the post war yrs.
most makers used this guide. it was very common up until approx c1980s ish???


Black = All ground connections
Black/ Purple = Temperature switch to warning light
Black/ Green = Relay to radiator fan motor
Black/ Light green = Brake switch
Black/ Light green = Brake differential pressure valve to warning light
Blue = Headlamp connections
Blue = Headlamp switch to dimmer switch
Blue/White = Headlight high beams
Blue/ White = High beam dimmer switch to high beam indicator lamp
Blue/ White = Dimmer switch to long-range driving light switch
Blue/ Red = Headlight low beams
Brown = Main feed from the battery. No switches or fuses
Brown/Yellow = GEN to volt. Regulator
Brown/ Blue = Power feed to headlamp switch
Brown/ White = Ammeter to main alternator terminal
Brown/ Yellow = Long-range driving light switch to lamp
Brown/ Yellow = Alternator to 'no charge' warning light
Brown/ Purple = Alternator Regulator feed
Brown/ Green = Fuse to horn (No relay)
Brown/ Lt. Green = Windscreen wiper motor to switch
Brown/ Black = Horn to horn button (no relay)
Green = Ignition switch controlled wiring for auxiliary devices, eg wipers, flashers, etc
Green/ Black = Fuel gauge to fuel tank unit
Green/ Blue = Water temperature gauge to temperature sender unit
Green/ Brown = Switch to reverse lamp
Green/ Red = Direction indicator switch to left-hand flasher lamps
Green/ Purple = Stop lamp switch to stop lamps
Green/ White = Direction indicator switch to right hand flasher lamps
Green/ Yellow = Heater switch to slow speed on heater motor or for single speed motor
Green/ Grey = Heater switch to high speed on heater motor
Green/ Orange = Low fuel level switch to warning light
Light green = Voltage stabilizer to instruments
Light green/ Black = Windscreen washer switch to motor
Light green/ Blue = Flasher switch to left-hand flasher warning light
Light green/ Brown = Flasher switch to flasher unit
Light green/ Purple = Flasher unit to flasher warning light
Light green/ Orange = Rear window washer switch to motor
Orange Wiper circuit
Orange/ Black = Wiper switch to to motor parking
Orange/ Blue = Wiper switch to low speed on motor
Orange/ Green = Wiper switch to high speed on motor
Orange/ Yellow = Rear wiper switch to rear wiper motor
Orange/ Light Green = Switch to rear window motor parking
Purple = Accessories fed direct from battery via fuse (Always live)
Purple/ Brown = Horn fuse to horn relay when horn is fused separately
Purple/ Red = Switches to map light, under bonnet light, glove box light and boot lamp when fed direct from battery fuse
Red = Tail lights, instrument lights, parking lights and side markers
Red/ Yellow = Fog light switch to fog light or front fog light fuse to fog lights
Red/ Blue = Front fog light fuse to fog light switch
Red/ Brown = Rear fog guard switch to lamps
Red Orange = Power to rear fog guard lamp fuse
Red/ White = Fuse to instrument lamp switch, Instrument panel lamps
White = Ignition circuit, no additional switches, not fused
White = Power to coil
White/ Black = Ignition coil to distributor
White/ Black = Distributor side of coil to tech impulse sensor
White/ Brown = Oil pressure switch to warning light or gauge
White/ Pink = Ignition switch to radio fuse
White/ Red = Ignition switch or starter switch to starter solenoid
Yellow = Generator connections wired through the ignition switch
Yellow/ Green = Dynamo 'F' to control box 'F' Alternator field 'F' to control box 'F'
 
Attached a wiring diagram. Its for a series 3 and negative earth, but the wiring colours are probably the same.
 

Attachments

  • wiring1024.jpg
    wiring1024.jpg
    147.1 KB · Views: 20,706
Just had a closer look at the wiring diagram, its for a petrol what differences are to the diesel? i know the starters on a push button, so what does III go to on the ingnition?

Sorry to ask so many questions.

Cheers

P.s how do i tell if its postive or negative earth?
 
if its a series 2 with a dynamo then almost certainly its a positive earth.
if its been changed to an alternator itll be a negative earth.

you can find the odd one with a dyno and changed to neg earth, but not often.
 
Sorry to bug you all again so late after the last post but i had exams and coursework to deal with, im still having trouble with getting it running. The starter is turning the engine over though not fast enough and the glow plugs dont work. Ive charged the battery though it was brand new when i started and ive fitted some extra earths though the orginal is getting hot. There is a wire just bolted to the engine next to the last glow plug that is disconnected its only bout 4 inches long. Any ideas? are the two problems related?

Cheers
 
Back
Top