Series 3 My Series 3 restoration

This site contains affiliate links for which LandyZone may be compensated if you make a purchase.

Jack Baker

Member
Posts
19
Location
Studham
Hi everyone,

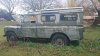
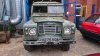
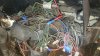
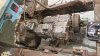
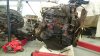
Thought I'd get a thread going about my first and current ongoing project. It's a 1983 Series 3 109 with the 2.25 petrol. I'm 20 years old and work for a vintage car restorer but have always wanted an old Land Rover or Mini. I was given the Series 3 by the previous owner who just wanted to get rid. A history check hasn't flagged anything wrong with the car so dropped myself in the deep end and took it on! It has been left in a field for the past 11 years but looks to have had a hard life before this. I have contacted the MOD and they have no military history for the car and so I am assuming the green paint was applied by someone just for the looks. Peeling away the paint reveals layers of white, tan and many different shades of blue, with what looks like the yellow used by the AA and dark blue used by the old RAC highway patrol landys.

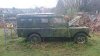
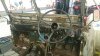
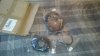
The car has been stood on an open hilltop sharing the land with sheep. It had firmly sunk itself into the ground and I've counted 2 bees and 3 birds nest around the vehicle, one of them in the chassis! Its got no working brakes or clutch so it was a bit of fun getting it onto the road! Its now living in Bicester where I'm currently working on its every Wednesday.

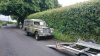
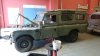
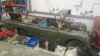
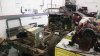
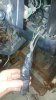
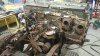
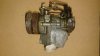
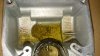
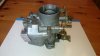
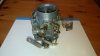
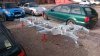
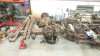
I've so far removed all of the bodywork and ordered a complete new chassis for the car as every part of the old one had some form of rust or hole. My long term plan is to restore it to a pristine non military condition whilst adding extra bits that take my fancy to make it a bit more unique. I don't plan on massively offroading with it but may have some fun with it once complete, it's had a pretty hard life already! Every single body part has suffered some form of damage and Im sure almost every mechanical part will need seeing to once I get stuck into it. I've left myself a fairly high budget and have prepared my brain as best as possible as it's set to be a fairly long project! The one condition the old owner gave it to me was that I would drive it back up to him and show him it once its complete and so I hope to eventually see that through :D

I suspect I'll have a fair few questions as I go and I hope I'll be able to get some assistance if (when) I get really stuck. A quick browse through the forum has already answered a couple of questions I had! I'm keeping a huge folder of images as I go but I'll post ones of interest onto here. Looking forward to one day taking it for a drive!

Jack

DSC_1248.JPG
 

Attachments

  • DSC_1208.JPG
    DSC_1208.JPG
    163.2 KB · Views: 387
  • DSC_1256.JPG
    DSC_1256.JPG
    147.8 KB · Views: 326
  • DSC_1652.JPG
    DSC_1652.JPG
    183.9 KB · Views: 352
  • DSC_1655.JPG
    DSC_1655.JPG
    95.8 KB · Views: 354
  • DSC_1661.JPG
    DSC_1661.JPG
    152 KB · Views: 393
  • DSC_1792.JPG
    DSC_1792.JPG
    101.8 KB · Views: 357
  • DSC_1881.JPG
    DSC_1881.JPG
    144.1 KB · Views: 334
  • DSC_2247.JPG
    DSC_2247.JPG
    114.8 KB · Views: 385
Nice project to have there! I've got a (used to be) yellow 109 with the same door/window configuration except no alpine windows.

Good luck and sounds like you have the skills and resources to get a good job done!
 
Thanks everyone!

I've been stripping the bulkhead down today which turned out to be a bit harder than expected. The wiring has been seriously bodged in the past and whoever did it left all of the old wires just unconnected which helped with getting the instrument panel out! My bulkheads suffering damage from the usual suspect areas so I'm going to be looking to get it blasted and repaired properly as it'll ruin the rest of the new parts if i were to just slap some paint on it. Unfortunately throughout the stripdown most of the bolts have been lost through shearing or having to cut them however alot have turned out to be metric bolts and all kinds of different screw heads so ill probably look to getting some good quality and correct type fixings when it comes to reassembly. The dashboard pieces are fairly worn and will need new lining and potentially a whole new piece, hopefully only surface rust I'm seeing on it at the moment! I was unable to remove the steering wheel but a quick google search showed I'm not the only one, I'll try and tackle that another time with the right tools.

The one thing I don't have is any paperwork relating to the car. The previous owner has said he's sorting out the passing of ownership but I've got no paperwork to give any clues of its history. I have however found souvenirs ranging from james bond theme tune casettes, a survival knife, air rifle pellets, timber merchant invoices, lighters and a bunch of matchstick boxes hidden away behind the instrument panel itself!

The windscreen was only held in by 1 hinge bolt and the sealant that had been applied along the bottom of it, the bolt on the other side appears to have sheared in the past. I'm going for a complete new wiring loom as whatever i took out of the instrument panel is never going back in! I've brought the zenith back home with me to keep myself busy and going to send the gauges off to look shiny new again.

How are the pictures looking? I'm having to resize them to reduce the filesize but hopefully im not making them microscopic!

DSC_2436.JPG
 

Attachments

  • DSC_2383.JPG
    DSC_2383.JPG
    89.9 KB · Views: 370
  • DSC_2385.JPG
    DSC_2385.JPG
    126.1 KB · Views: 365
  • DSC_2389.JPG
    DSC_2389.JPG
    114.5 KB · Views: 336
  • DSC_2401.JPG
    DSC_2401.JPG
    54.3 KB · Views: 325
  • DSC_2421.JPG
    DSC_2421.JPG
    79.5 KB · Views: 346
  • DSC_2438.JPG
    DSC_2438.JPG
    138.5 KB · Views: 371
  • DSC_2439.JPG
    DSC_2439.JPG
    141.1 KB · Views: 347
Not yet, but I've been meaning to. As I've only been stripping the car down so far The Haynes manual and a camera are the main things I've been using. When it comes to starting to reassemble everything or take parts apart I'll keep the parts manual close by. I've done ok so far with keeping small bits bagged and labelled but I'm going to slip up at some point!
 
I think you'll have a lot of fun with that.
Doing a restoration on one of these seems like a fantastic idea. Just like giant lego kits. See if you can blag a go in someones completed series. Think very carefully about what springs and seats you want to fit. It's essentially a road going tractor so anything you can do to improve the ride a little bit without going the coil spring route has got to be a good thing?
An overdrive is also a fantastic addition that'd be worth getting hold of. You can actually use the motorway network and keep up with the lorrys with an overdrive fitted.
 
I suspect the reassembly will be a bit more like a lego kit than the stripdown. Lots of rusted nut/bolts to remove to get all of the body pieces off, turned out to be a real battle for me. Luckily I had a couple of people helping me, more pairs of hands the better! Keep thinking how much easier it'll all go back together and you can find just enough motivation to keep going with it :D I've just finished the stripdown stage but that was a solid 6 days worth bolt shearing, angle grinding and the occasional bolt that actually screwed out but all part of the fun. I was able to be a bit merciless with the cutting in the knowledge I was getting a new chassis anyway, it would have taken alot longer to try and remove what were a bunch of rounded off mounting bolts.

I want to keep as much original as possible so it'll be staying with leaf springs, only replacing them if they're too much hassle to restore. I'll take whatever comes in terms of the ride comfort and I kind of see it as part of its character :) you can quote me on that further down the line when its actually on the road! Never have actually driven an s3 before, I should rent out a canal boat for a weekend and get a feel for what it might be like:D
 
Like the photos, you have the basis for a good re-build. Its not an ex MOD vehicle, it's got a standard rear cross member and the engine isn't duck egg blue. The roof is a rare safari type (nice). Hope you keep it as original as possible. Nice workshop too!
 
Thanks John. The workshop is in fact my college. Its very well kitted out and it means I can use the car as my own learning piece as I go along!

I had a go at rebuilding the zenith over the weekend, stripping it, cleaning it all out + the jets and replacing the gaskets. Little job to keep myself busy but I've noticed the arms and other brass components have lost their plating and I don't want to try and get the stubborn muck off of them to make the problem worse. Is the plating fairly important in preventing the parts from wearing out or will they get on ok just as bare metal. This includes a face of the butterfly too. I'm inclined to find some new replacement parts anyway as its shadowing the rest of the carb I took the time to clean up!

DSC_2511.JPG
 

Attachments

  • DSC_2447.JPG
    DSC_2447.JPG
    65 KB · Views: 266
  • DSC_2461.JPG
    DSC_2461.JPG
    87.5 KB · Views: 269
  • DSC_2544.JPG
    DSC_2544.JPG
    101.4 KB · Views: 255
  • DSC_2566.JPG
    DSC_2566.JPG
    57.5 KB · Views: 295
  • DSC_2568.JPG
    DSC_2568.JPG
    52.7 KB · Views: 268
Hi everyone,

Just checking in on the cars progress so far. I haven't had massive bounds of progress over the past couple of weeks, only trying to get the bulkhead stripped which I pretty much have done now. The new chassis is only a few weeks now so I'm starting to get a bit more excited over that. Unfortunately progress on rebuilding it will probably slow dramatically as the new college term begins but I'm hoping to get over to it as much as possible and not lose momentum.

I'm deciding on which colour scheme to go far with the car at the moment. I'm currently torn between either the light green or bronze green and the white/limestone hardtop (not sure exactly which colour it should be or whether there were a couple of options for this?) I'm leaning towards the light green at the moment just to give a bit of vague credit to whoever slapped the nato green on it in the past!

DSC_2638[1].jpg
 
Nice project there Jack. You will learn an immense amount from doing a rebuild like that.
What ever budget you have will be tight, don't ask me how I know this ! I have had series for 35 years and some can be money pits, others just run with a minimum expenditure. Personally I love the light green but have never owned one in that colour. Don't worry about the rivet counters it is your Landie to do what you want with. Just keep away from Gay disco alloys and chequer plate.......
 
had to do a double take on that pic, wondered why it had a funny looking front at first, then I realised it was just the dash resting across the chassis :D

+1 on the do what you want, that's part of the attraction of landies to me,

on the colour front, series landies look amazing in navy blue
 
Good work so far Jack, keep the updates coming as we all like a good build thread.

Not many lads your age wood go for a landy, let alone a series.
On the plus side you'll never get a speeding ticket in it and non of your mates will have such a cool car.
 
Hi everyone, thanks for your replies!

Quite a big check in now with the car. I've managed to keep good momentum with the project despite being back to work at the college. The car is now completely stripped from its old chassis which I can happily roll out the door and out of my life, its going to be used by the college as a training aid. Overall it took around 12 days of hard work between 2-3 people and we're happy to have the stripdown stage out of the way. Now its time for the restoration and rebuild, the fun part!

The new chassis has arrived and is being stored under cover until I'm ready to clean up a couple of rough edges on it and have it painted. Also got a full new wiring loom ready to go when needed. Before all that though its time to strip down all the mechanicals and see how its all looking. Once everythings opened up I've got to decide whether I want to rebuild parts or clean them up and refit. Based on how well the engine ran I'm hoping a full engine rebuild wont be necessary and instead a full cleanout and repaint to look like new will do the job but I'm keeping an open mind! The springs look complete but with some pitting so need to look at whether they can be restored. I've bought Monroe shock absorbers and a Delphi steering damper which will get the car comfortably on the road, genuine dampers were looking very expensive!

The main thing I need to look into now are new fixings, nuts/bolts and such. The majority of what came off either broke or look awful and will need to be replaced. What's the best choice for these? I've seen a lot of articles suggesting stainless fixings but I've seen the disadvantages these bring. I've found a website that offers full zinc plated bolt sets but I know nothing about how durable they are? In my mind I'd like galvanised but I imagine these would be very expensive, but I could be wrong

As I'm about to move onto 'phase 2' of the project I suspect I'm going to start having a lot more questions but straight away is there anything common I should be looking out for in terms of mechanical issues?

Updating from my previous post I've decided to go for the light green with limestone wheels and hardtop. Running gear and chassis will all be black. I need to decide on an engine block colour though, it's currently red but part of me wants it to match the body colour.

I'll be updating with more pictures as I start opening things up!

DSC_6353.JPG
 

Attachments

  • DSC_2954.JPG
    DSC_2954.JPG
    169.6 KB · Views: 326
  • DSC_6325.JPG
    DSC_6325.JPG
    107.1 KB · Views: 298
  • DSC_6333.JPG
    DSC_6333.JPG
    118.5 KB · Views: 301
  • DSC_6355.JPG
    DSC_6355.JPG
    101.3 KB · Views: 300
Good choice of colour scheme, I like the pale green.
Keep the updates coming. I think you're going to have a very nice classic when you've finished. You don't see too many 109's getting restored - probably the higher refurb cost being a factor.

Original springs in good well oiled order offer a very satisfactory ride.
 
Keep your thread going and keep every picture. I've just started putting my '83 Series 3 109 (ex mil) back together after two years stripping down and the pictures are invaluable.
 
Back
Top