My 110 300tdi rebuild

This site contains affiliate links for which LandyZone may be compensated if you make a purchase.

mikerajjers

Well-Known Member
Posts
1,467
Location
Bedford UK or Trnava SK
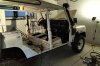
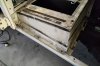
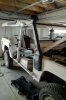
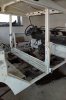
Earlier this week I started doing my 110 rebuild. Really, its a partial rebuild. I had the chassis overhauled and galvanised about two years ago after which I paid another bloke to do the rest. This was done to such a poor standrad that I have decided to take it all apart and do it myself. I will outsource the electrical and mechanical jobs as I am not confident with these. I will prep the body and get it resprayed, after which I will put it all back together myself.

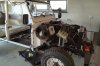
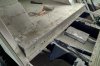
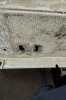
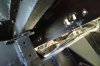
Here are picstures of me dismantling...I started on monday evening.
 
here are my first pics
 

Attachments

  • IMG_20190416_1822081.jpg
    IMG_20190416_1822081.jpg
    234.4 KB · Views: 137
  • IMG_20190418_1948079.jpg
    IMG_20190418_1948079.jpg
    210.6 KB · Views: 140
  • IMG_20190418_1948303.jpg
    IMG_20190418_1948303.jpg
    238.6 KB · Views: 114
  • IMG_20190419_1050105.jpg
    IMG_20190419_1050105.jpg
    189.1 KB · Views: 121
Can the seatbox side panels be replaced? They are quite badly corroded but otherwise they are in fairly good condition.

I have taken the front wings off...is it better to dismantle them before a respray or is it best to have them assembled (light panel, side panel and top panel) before a respray?
 
Can the seatbox side panels be replaced? They are quite badly corroded but otherwise they are in fairly good condition.

I have taken the front wings off...is it better to dismantle them before a respray or is it best to have them assembled (light panel, side panel and top panel) before a respray?

YRM should be doing the full seatbox assembly now. Anything you need should be on their site.

I dismantled 95% of all my panels and painted them before reassembling. It’s a much more complete job than LR done originally.
 
Can the seatbox side panels be replaced? They are quite badly corroded but otherwise they are in fairly good condition.

I have taken the front wings off...is it better to dismantle them before a respray or is it best to have them assembled (light panel, side panel and top panel) before a respray?
As the guys have said YRM do them. I got mine from them. They sell the pop rivets you need to. Where are you doing the rebuild, UK or Slovakia? Just wondering about parts availability.
And, I think you might be surprised with the jobs you will be able to take on, so don't outsource jobs until you've asked on LZ what's involved. The more you do yourself, the more job satisfaction you'll get.
 
I´m rebuilding it in Slovakia. I am very rarely back in the UK. I buy all of the parts I need from the UK, the shipping is not so bad and is quite quick. The companies which sell land rover parts over here charge maybe 2-3x the UK retail price and I would have to wait over a week...I suspect they just buy them from the UK themselves...so not much point buying from them. I really do miss the UK...especially the choice of so many suppliers with next day delivery! I want to drive over to one of the land rover shows to buy a new bonnet and other large parts but I´ve found a guy fairly local that fabricates various parts himself (he sells them on ebay UK too).

Attached photos show how far I have got today. I´m considering whether to take the sill and B pillars off or not as well as the tub. What do you guys think? I don´t think they need to come off as I don´t need to do anything with the chassis. Is the tub only attached to the chassis at the rear crossmember?
 

Attachments

  • IMG_20190419_1631229.jpg
    IMG_20190419_1631229.jpg
    216.8 KB · Views: 117
  • IMG_20190419_1631322.jpg
    IMG_20190419_1631322.jpg
    206.7 KB · Views: 91
I´m rebuilding it in Slovakia. I am very rarely back in the UK. I buy all of the parts I need from the UK, the shipping is not so bad and is quite quick. The companies which sell land rover parts over here charge maybe 2-3x the UK retail price and I would have to wait over a week...I suspect they just buy them from the UK themselves...so not much point buying from them. I really do miss the UK...especially the choice of so many suppliers with next day delivery! I want to drive over to one of the land rover shows to buy a new bonnet and other large parts but I´ve found a guy fairly local that fabricates various parts himself (he sells them on ebay UK too).

Attached photos show how far I have got today. I´m considering whether to take the sill and B pillars off or not as well as the tub. What do you guys think? I don´t think they need to come off as I don´t need to do anything with the chassis. Is the tub only attached to the chassis at the rear crossmember?
What year is your Landy? It looks in very good condition and, to be honest, I'm wondering why you are stripping it down? Does it look better than it actually is because of the work the previous guy did? :confused:
Your sills and B pillars look good to me and, from the pictures, I can't see any reason to remove them. The access you now have will make it easier to Dinitrol (or similar) the underside of the inner sills for example. I'm not sure about the 110 tub, but the 90 tub is also bolted at the front. I think the 110 is too, probably through the seat belt mounts etc. With the tub check the body cappings for signs of corrosion, the floor plate where it touches the floor supports which run underneath the floor plate.

The body is in relatively good condition. I decided to strip it down as there are seals missing, wrong bolts were used, other bolts were missing altogether and the paint finish was very poor. I want to have peace of mind that it will be done well as I would like to tour around europe in it
 
I´m rebuilding it in Slovakia. I am very rarely back in the UK. I buy all of the parts I need from the UK, the shipping is not so bad and is quite quick. The companies which sell land rover parts over here charge maybe 2-3x the UK retail price and I would have to wait over a week...I suspect they just buy them from the UK themselves...so not much point buying from them. I really do miss the UK...especially the choice of so many suppliers with next day delivery! I want to drive over to one of the land rover shows to buy a new bonnet and other large parts but I´ve found a guy fairly local that fabricates various parts himself (he sells them on ebay UK too).

Attached photos show how far I have got today. I´m considering whether to take the sill and B pillars off or not as well as the tub. What do you guys think? I don´t think they need to come off as I don´t need to do anything with the chassis. Is the tub only attached to the chassis at the rear crossmember?

I would only remove what you need to remove to do the job you need to do. Don’t make extra work.

The tub should be bolted along the rear crossmember, and two bolts next to the seatbelt mounts in the tub floor. The outside seatbelt mounts are bolted through the front of the wheel arch and also to the sill rail, so the bolts will need removing. Other than them, it’s riveted down each side.
 
What would have been attached through these holes? There are two holes either side of the panel behind the middle footwell. They are slightly corroded. I´ve also attached a picture taken from inside the wheelarch. Also pictured is the tub resting on the chassis, should it be like this?
 

Attachments

  • IMG_20190420_0901173.jpg
    IMG_20190420_0901173.jpg
    278.1 KB · Views: 103
  • IMG_20190420_0901275.jpg
    IMG_20190420_0901275.jpg
    338.9 KB · Views: 98
  • IMG_20190420_0901388.jpg
    IMG_20190420_0901388.jpg
    302.1 KB · Views: 105
I would only remove what you need to remove to do the job you need to do. Don’t make extra work.

The tub should be bolted along the rear crossmember, and two bolts next to the seatbelt mounts in the tub floor. The outside seatbelt mounts are bolted through the front of the wheel arch and also to the sill rail, so the bolts will need removing. Other than them, it’s riveted down each side.

Do you have a picture of the rear seatbelt mounts? Mine didn´t have any seatbelts in the rear. I would like to fit the newer seats at some point in the future but will need to find a suitable set.
 
Do you have a picture of the rear seatbelt mounts? Mine didn´t have any seatbelts in the rear. I would like to fit the newer seats at some point in the future but will need to find a suitable set.

This isn’t my photo, but it shows the bracket that bolts the front of the wheel arch to the sill rail.
upload_2019-4-20_8-57-33.png

Looking at this photo, I got it wrong as it bolts to one of the crossmembers and not the sill.

I don’t have a photo of the mounts, but I have a photo showing where they should mount.
upload_2019-4-20_8-59-40.jpeg

The galvanised floor support you can see at the front, has 4 bolt holes going through it. The outside 2 are for mounting to the chassis, the inside 2 are for the seatbelts.

If you google it, you will find a few threads about fitting them, and mounts.
 
I've been working away on the 110 and am beginning to put it back together again. I've put in a new crossmember as it was missing altogether.
IMG_20190511_1726351.jpg


I also ordered a new aluminium piece to fit in the rear footwell
IMG_20190511_1818597.jpg
 
I bought a new panel on one side, the other side just needed straightening and I am yet to fit it
IMG_20190605_1833509.jpg


I thought the seat box was going to be too difficult for me, but I managed it. I had it professionally sandblasted and then replaced the two side panels with new pieces from YRM. I painted it inside and the underside with UPOL paint. I went over the bottom with Raptor.

IMG_20190606_2018026.jpg
IMG_20190606_2018563.jpg
 
Crackin job, Mike. Nothing too difficult for you, so scratch those thoughts. it's looking mint. Keep the pics coming, mate. It's impossible to post too many :D
 
Back
Top