LULU The 110' & Finley the 90' & Friends Projects

This site contains affiliate links for which LandyZone may be compensated if you make a purchase.
Seriously trying to get to page 4 so I can start pics again! Computer crashed twice loading this page its so pic heavy lol - help help help!
 
If you upload your piccies as thumbnails, it won't take so long to load as the page fills up.


Right we're on page 4! Goal!

I don't really want to upload as thumbnails as then you have to click onto each one, bit of a pain in the bum rather than just scrolling down.

Will start work on my next post with a flurry of pictures to redeem my excessive bumping!
 
Ok, excessive bumping to one side, I've learned my lesson and i'll use less pics per post to help stop the backlog and my PC having a melt down!


Leading up to me getting married, the mrs had her hen do. I proceeded to use this time wisely of course and helped my friend Ryan put together his lovely new V8. Was just a learning curve for me but I enjoyed the process - for what I saw of it anyway.


Forged pistons and all sorts of other niceness going on here.


FB_IMG_1524992217213.jpg


FB_IMG_1524992222831.jpg


IMG-20180421-WA0023.jpeg


IMG-20180421-WA0026.jpeg


received_10156014577786233.jpeg


He'll be strapping a blower to that down the line... Wish I could afford the mpg!
 
Last edited:
Around this sort of time myself and said friends (Charlie, Ryan, Alex) all went to look at a unit. This is just short time light industrial space. The cars pictured here aren't ours - they were just being stored there while a new group of silly individuals came there deciding working out in the rain was no fun no more.


Little storage area behind the WC, this was originally where we would put glass etc so was safe, quickly just became a dumping ground we didn't need to look at! One day we'll tidy... one day...


20180417_112512.jpg


20180417_112515.jpg


We've done some modifications in here - it still leaks but now has a 'flush yo' written on the back and a seat fitted for those unfortunate enough to be caught short!


20180417_112529.jpg


What has become Charlie'ss area leading up to the what was an office.

20180417_112541.jpg


And said dumping room - I mean office.


20180417_112554.jpg


20180417_112558.jpg


What has become my space

20180417_112617.jpg


20180417_112625.jpg


What is Ryan/Alex space; door is the toilet

20180417_112628.jpg


Standing from my space, we have the doorway into the other side, what we call the 'parking room'


20180417_112657.jpg


20180417_112701.jpg


20180417_113734.jpg


Charlie took command and we got the keys. EDIT: That actually was nearly 2 months from viewing to getting the keys - getting ahead of myself here like its some next minute thing!
 
Last edited:
So I think we're about on that time where I go in search of the 90' to have at my mud toy. I had a small list of wants - dented no care attitude for the mud and secretly wanted the slide windows in the back. I found both - this however came with a host of issues!

Settled on this one and named him Finley, so now, lulu has a little brother. Welcome Finley to the family!

On viewing day;

20180330_191019.jpg


20180330_191026.jpg


Fibreglass bonnet ooo errrr. And a winch - a Warn one too. Winner! Note only passengers aloud a windscreen wiper in this one. Driver has to 'use the force'

20180330_191041.jpg


20180330_191047.jpg


Centre cubby box was on my to get list, so that's saved that I suppose.

20180330_191059.jpg


IMG-20180514-WA0009.jpeg


Said Warn winch - which of course didn't actually work.

Screenshot_20180330-200844.png


Absolutely nothing closed or worked, for some reason I had to have it!


Despite the truck being left doing nothing since 1305BC the engine started and ran sweet as a nut. Its a 200TDI out of a disco - that's a story for later but it'll be finding a new home as it has no place in my wants list.


Seat bases were in good condition so they could go into lulu as hers are ripped. The tyres had plenty of tread so I could swap the wheels over on to lulu. Then i can see how the all terrains are as so many seem to run them.


That's all for now :)
 
So was my time to get married! Grand young age of 31. We had an amazing day, wasn't interested in the 'fairytale wedding' but it was everything we wanted and a bit more. Weather started miserable then turned out screaming hot.

Suited and booted, the night away from the lady before the big day.
IMG-20180526-WA0003.jpeg


Part of the family is our lulu - big talking point of the day and sooo many selfies taken with her! Spoilt girl she was.
IMG-20180527-WA0231.jpg

Then 2 days later off we flew to Greece!
20180528_123837.jpg


Nice ride from the airport to our hotel - this thing was pimping inside!

20180528_164042.jpg

Nice little pools like this everywhere and just all around amazing place.
20180528_165812.jpg

20180528_210207.jpg

Lots and lots of trying the whole drink menu and eating more in 2 weeks than I have in the last 6 months!

20180528_191051.jpg


20180529_163437.jpg


20180529_172925.jpg

We planned a few trips here and there - wont bore you with all that but to note the quad bikes had winches!
20180605_062137.jpg


Booked a safari trip - they said you get to go out in a 'jeep' for the day. It was pictured clearly as a landy so that needed correcting! Anyway, was a convoy of 4 trucks, a disco, defender and 2 erm nissans I think it was.

20180607_072333.jpg


20180607_081557.jpg


Was a real eye opener this honeymoon. Being in the UK and just traveling it made me realise how little I actually knew about the world.

We flew back, then had 2 days in bed not well at all. We hadn't actually had a hangover since our wedding as we just kept drinking - didn't think about it until the stop of drinking and it hit us soooo bad. Worth it totally. Any other time I don't drink and we're talking tipsy kinda drinking not hammered so you can't walk kinda drinking. Although - wedding day walking was becoming a bit of an issue and 2.30 in the morning to finally get to bed the room was spinning a touch!
 
So a quick update on Ryans engine change. As I want to upload these in one section I have to skip ahead of time a touch - in the photo's you'll see the 90 in the unit but that's part of a bigger upload really that will come after. Limited time means just easier to do it this way for a mo.

After the pictures before of Ryan building up his new V8, he dropped the car in the unit while we were all getting ourselves set up so he could swap them out and do the gearbox upgrade etc.

Pictures a bit limited as I wasn't there a lot of the time he was, will get him to send some more stuff over in due course.

IMG-20180612-WA0008.jpeg


IMG-20180613-WA0042.jpeg
IMG-20180528-WA0018.jpg
IMG-20180520-WA0018.jpeg
IMG-20180520-WA0016.jpeg
IMG-20180520-WA0014.jpeg
IMG-20180514-WA0018.jpeg


Well they didn't upload in a great order! Hey ho you get the drift!

Till next time....
 
So another big heavy pic update.

Catching up we're now into moving in - to give us as much pennies as poss for the projects in house everything around the unit was salvaged where possible. All wood etc was/is just stuff we've had stored up in garages and then keeping an eye out for freebies on gumtree and the such.

All concerned loaded up our vans/trucks and started to take stuff down and making do with what we had to hand.

Getting organised.
20180128_172920.jpg


Loading up said wood pile! She drove so much nicer with some weight in the back.
20180422_161334.jpg


Aaaand another trip... This happened many a time but 2 pics will suffice me thinks!
20180612_123657.jpg


Little rollable bench knocked together while we were fitting out. Again no money or time wasted here just grab some scraps and screw them together - no tape measure or levels required here thank you very much!

20180513_150529.jpg


Found a sterio laying outside a neighbours house - power button is trashed but you wedge it and it'll play the ipod so extended the wires a bit and screwed them up so we had some music to work to.

20180620_171350.jpg


20180620_171356.jpg


This is about as clean as this bench will ever be! Note: Yellow compressor on the floor isn't one I talk about a bit further down. This is just handy having around for quick blow off purposes. Ohh arrr.

20180620_171838.jpg


Somewhere around all this moving in was when the truck arrived so these will sit here I guess.
IMG-20180514-WA0024.jpeg

IMG-20180514-WA0026.jpeg


IMG-20180514-WA0028.jpeg


IMG-20180514-WA0030.jpeg


Back to the free side of things, Charlie spotted this on his travels so loaded that up sharpish!

IMG-20180520-WA0012.jpg

The area infront of the 90' got some free wood treatment! (Vince pictured here)
IMG-20180520-WA0021.jpeg


Charlie found an old fire door so that made another bench. More legs etc added to this at a later date.
IMG-20180620-WA0012.jpeg


Charlie picking something or other up and found the trolley for a couple of quid. Handy!
IMG-20180712-WA0000.jpg

Mid modification to hold the little welder and the plas cutter. More on the MX5 pictured later.
IMG-20180712-WA0028.jpg


Using more of the chipboard laying around - Charlie housed mine and his 50l air compressors coupled together and popped it on wheels. Awesome idea and its worked brill for us so far! Has kept the noise levels down being boxed but that's just personal preference.
IMG-20180712-WA0027.jpg


More odds and sods arriving.
IMG-20180803-WA0037.jpeg


Alex got an old unit and sink so that got fitted up - the tap in the wall ment you washed your legs more than your hands at the end of the day.
IMG-20180820-WA0012.jpg


And that's all for now.

You all bored yet or what? We'll get to the nitty gritty soon!
 
A Charlie update;

His project is based off the MX5, so the donor was bought and then set about stripping it down. All the bits not required etc getting listed up on Ebay and with the resale of parts it worked out cheaper this way round for him with the bits he wanted to keep.

Charlies sister helping with the tear down
IMG-20180829-WA0008.jpg


IMG-20180623-WA0002.jpg


I was swapping over wheels on my truck to the other so felt right to offer it up for size!

IMG-20180829-WA0019.jpg


Moved back into the other room now Ryans TVR was gone to remove the subframes

IMG-20180829-WA0017.jpg


Then it was say bye bye to the leftovers
IMG-20180802-WA0010.jpg


Alright so the shell is pictured here but it did go I promise! This is what he was left with, host of other parts obviously but that's the running gear salvaged.

IMG-20180829-WA0013.jpg


IMG-20180829-WA0011.jpg


IMG-20180715-WA0022.jpg


He went and purchased a cool as feck ford pickup body! The other parts are there but this gives an idea.
IMG-20180829-WA0018.jpg

Then the mandatory lets just place something here photo

IMG-20180829-WA0010.jpg


Big undertaking this one, but I can't wait to see it on the road!

Any comments/suggestions to the boys I will pass on btw.
 
So couple of steel bars put on and starting to get a feel for whats going where - not actually in the right place in this photo.

IMG-20180829-WA0012.jpg


Some more measurements to determine stretch required etc.

IMG-20180829-WA0015.jpg


Then a new base was made and levelled off to work from. From this the chassis negative was starting to be born!

Seeing as it was just a sizing guide he let me loose on the welder for a bit of a tutorial - I need all the help I can get!
IMG-20180829-WA0002.jpg
IMG-20180829-WA0003.jpg
IMG-20180829-WA0004.jpg
IMG-20180829-WA0005.jpg


Shorts and vest for the win when welding! Was so hot that day im surprised I wasn't actually just naked.


IMG-20180829-WA0021.jpg

IMG-20180829-WA0024.jpg


Meanwhile, I found a friend in an electric bike and a kids trailer - coming in super handy for taking bits back and forth and not needing to use the truck. All folds down and sits under my bench when its not needed. The seat part for the kids was all trashed so managed to pick this up super cheap. Its made its money in diesel saved already so i'm happy with that. Note - wheels from the 90 are fitted in this pic. I have since transferred back over but you'll see pics of both sets of wheels on both trucks at various times.

IMG-20180618-WA0000.jpeg
 
So a Finley update!

The more I looked, the more rust I found and made the decision that the body was coming off. Although a heap of extra work I didn't intend to be doing to begin with means at least I know its done. My paint of choice will be a bit easier panel by panel inside and out but that's not exactly filling me with joy!

Lots of things are absolutely trashed and I'm going to spend way more money in new parts than I intended. Plans change as they always do but in this case they started to change very quickly.

Both the front doors are well and truly trashed - I'm not sure at this point if its in my capabilities to repair them. Locks don't work, windows do go up and down but that's about where it stops in the list of pro's vs cons. If you happen to be reading this and have a set of front doors then shout me.

20180516_150218.jpg


Where there has been no check strap or whatever you want to call it, the doors have been able to rotate forward into this position and do some cracking damage to the door and the surrounding areas.

20180516_150230.jpg


Set about taking off the winch (more on this later) and front bumper, grill, headlight surrounds etc. This uncovered a wiring nightmare which of course is my favourite thing in the world.
20180612_174947.jpg


Not until you take one off do you realise just how damn heavy these winch bumpers are! Will be getting some media of sorts down the line and blasting this before painting. A whole host of parts will need blasting. The line rollers are seized up but i'll attack this bumper when I have 5 minutes and get them moving again. More than likely just bushings rather than bearings so getting them off and mobile again shouldn't be too much drama.

20180612_174954.jpg


Doors off and rear slide windows removed, just a load of rivits then some sealer behind for those. Fuel filler had no working key so had to break out the lock from that to get that removed. Yet another part to buy huh! Vince was on site giving a hand as usual.

20180612_192236.jpg


20180612_192242.jpg


Aaand off comes the roof. All the interior trim had a quick power wash then put to one side to dry out and for me to look at later. Material is bad but the backing is in reasonable shape so a quick retrim somewhere down the line we'll be fine and dandy. Floor pans also removed to find more rust.

20180612_200744.jpg


Started to get into the removal of the arch and wing. What an utter PITA that is!
20180624_144147.jpg


Marked up a wire or 2 here and there and pulled the dash and heater assembly etc. More horrors lye here!
20180624_175814.jpg
 

Attachments

  • 20180624_144358.jpg
    20180624_144358.jpg
    300.3 KB · Views: 171
This thread is awesome - just read from start. The ford body looks the nuts. Your lucky you have mates that are petrol heads too. Mine can't understand why I'd enjoy ripping apart a landy lol. Watch it welding without long sleeves- I did it is summer and got bad sunburn on bicep. Won't do that again!
 
This thread is awesome - just read from start. The ford body looks the nuts. Your lucky you have mates that are petrol heads too. Mine can't understand why I'd enjoy ripping apart a landy lol. Watch it welding without long sleeves- I did it is summer and got bad sunburn on bicep. Won't do that again!

No for sure - theres still more to come as far as whats going on at the unit. Im just the tag along trying to soak up as much info as i can from those who actually know what they are doing! I wouldnt advise in any way shape or form vest welding as there was a few stings here and there!

It was me just getting my hand in, at the time the welder was running gasless so i was able to use up the spool at no cost so to speak and on something that didnt matter. Now its running gas so wont be wasting that. There is a much bigger welder down there for the serious stuff (this is where Alex comes in a bit later)

Im confident enough from my little tutorial to do bodywork style welding as my mate the grinder will hack back my failures. However when it comes to patching the chassis i'll be doing the templates and tack into place and then get Alex to weld it properly. Over time i'll learn and get better but when safety is a factor im more than happy to bow my head and say i can't do it and get someone who has been welding for years do it instead. The time to dress the area and make a template could be say 2 hours for me, once tacked Alex can then zap a proper weld across it in minutes.

It's also why everyone is in this thread because this do it at home style work seems to be dying out (not the landrover scene obviously) and just going ahh thats a bill in the garage so i'll buy a new car.

Also i wont take credit for other peoples work - where i can i'll mention who has done what if it wasnt me etc - like the welding mentioned a second ago will be a good example of that.

Just posting on my phone but i hope to put another picture update on this morning as we're still playing catch up.

As always any comments/questions/observations directed at the other lads projects i'll pass them on and get replies.

Till a bit later :)
 
Right made a coffee and a stack of dunkies at the ready!

I skipped these pictures on the last update, wheels got swapped before anymore panels came off.

20180613_161301.jpg


Real shame the battered old yellow has to go, looks mean with the black wheels on! Or did when things were still attached anyway.

20180617_184722.jpg


Offered up Charlies MX5 seats just to have a ganders... You know.. as you do.

Anyway, fitted in there nicely and felt good. He says he's using them but I will keep working on that until he gives them up to my cause. I didn't want the middle seat in this one anyway so the change of seat isn't a concern. Its also not an essential so if it ends up staying with the landy seats then so be it till later down the line. More of a roadside job that anyway so not overly bothered.
20180624_152614.jpg


IMG-20180623-WA0001.jpg


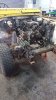
Here he is with the wing off. Not looking forward to doing the other side at all!

20180624_144358.jpg

20180624_154324.jpg


Some of the rust I need to deal with on the rear tub.

IMG-20180518-WA0053.jpeg


IMG-20180613-WA0046.jpeg


IMG-20180613-WA0048.jpeg


Parts are just being stacked up in the office area - amazing how many bits you get and how quickly you loose lots and lots of space!

IMG-20180612-WA0014.jpeg

Winch has been pulled apart, no real pictures to be honest. However I got these.
IMG-20180524-WA0006.jpg


And Charlie came to the rescue to weld onto the bolts holding the motor, every single damn one of them put up a fight and was about an hour of faffing around to remove the 4.

20180826_163420.jpg


Turns out that's trashed, couldn't get the winch to run so taking a look inside told us why very quickly! I've sent an e-mail about getting a new motor for it, however being an older model I have no paperwork for reference and its a reet pain in the arse. These things are like 1500 quid for a new one and I figure this one repaired will be better then a 300 quid no brand one. Still need to buy the rope etc for it but until this kicks into life I'm not going to waste any money with that.

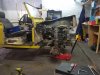
Charlie went and got 2 pipe benders, the red press one just seems to be a complete fail and waste of money.

IMG-20180812-WA0014.jpeg


This yellow one he is borrowing however is doing the job lovely for the smaller stuff.
IMG-20180818-WA0001.jpg

Having never done any of this stuff before my aim is to have a play with it and make myself some side steps/rock sliders whatever you'd like to call them (From thicker tube than this). Again as mentioned before I'd do the bending and making of mounts etc and get that tacked together and set it on Alex's bench to have it welded properly.

Just a skills test to get myself up to scratch and add something else to my very lacking bag of tricks. A roof bar among other things would also be on my to do list.

Things like this give me a bit of head scratching time at home and will proceed to happen when I'm in between jobs and I have a hold up. Waiting for parts etc as an example but that's not looking likely any time soon. Vince is also well up for having a go fabricating some stuff on that note so we may yet have a mini project from him in form of a fun toy for his grandson. I'll keep nagging so he makes a start on it anyway.
 
It is definitely dying out. I think a lot is due to new cars being so tricky and company car schemes etc. I get an allowance for my daily rather than a cc. This has age restriction on to 6 odd years. I wouldn't dream of working on it. It would drive me mad and is just too expensive to make error on. You need all the readers etc too. When my grandad died my gran have me all his tools. He was an engineer too but finished life sat behind a screen as I now do. I thought his tools had to keep working so got a landy lol. You'll be surprised with your welding. I started on my body too prior to chassis then when I got to chassis I went for it and it went well. You clearly have good people around to show you too.
 
To add on, wing off and windscreen off

20180624_175805.jpg


Somewhere along the line the fluids all got drained minus the fuel tank. Then off came the rest of the front end, radiator and intercooler etc then an assortment of odds and sods undone.
20180708_180739.jpg


Again had extra hands and things like the props etc all got disconnected. EDIT: Didn't need the extra hands for removing the prop, that's self explanitary just pointing out I wasn't on my own in cracking into the project on this particular sunday.

20180827_160140.jpg


20180827_160129.jpg


So in a moment of anger I decided it was time to remove the other wing. Argh - I think nearly every bolt required the bloody grinder!

20180827_163740.jpg


Actually before the wing came off Ryan had finished his TVR and come out of the unit (for now) and I spent some time working on lulu. Update on this coming probably after this one.

IMG-20180812-WA0007.jpeg


Till next time...
 

Attachments

  • IMG-20180711-WA0019.jpeg
    IMG-20180711-WA0019.jpeg
    371.7 KB · Views: 212
Last edited:
Back
Top