LULU The 110' & Finley the 90' & Friends Projects

This site contains affiliate links for which LandyZone may be compensated if you make a purchase.
So time to play catch up! - This isn't going to be in the order its been done, more a case of order it uploads lol

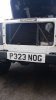
Took off the front grill, painted it real quick with the old rattle can in a satin black. The silver had no business being there.

20170904_133902.jpg


Edit: That's first coat to tack onto, thought I uploaded the finished one.

20170904_150405.jpg


It's dulled down a bit now so just looks like the bumper.

As I'm just learning as I go, I read up about being able to adjust the shifter - set about stripping the gubbins back and making her shift smoother than ever (In fairness - the oil change helped more!)

Previous owner had let the door latch wear to a point you had to yank on the door over and over to get it to close - I fitted a new latch and now it closes fine enough for me. Side note - door needs welding anyway but also at the top as its come away where the door had been yanked so hard. Had to also fix the door card. This is currently off as I need to pull the door and do the repair.

20170905_102538.jpg


20170905_155243.jpg


While I had a quiet moment I thought I'd try the in house jack - all was fine until I came to the back left corner and boom she collapsed. Trip to the shop to buy a bottle jack fixed that problem for me however! Looking on the inside the rest of the rear crossmember looks to be in alright condition so I'm leaving it just like that for now. Unless of course theres a reason not to.

20171004_133554.jpg


It's also the corner where it was arse ended so that might have something to do with it. That corner is creased on the body itself where it was hit by a Volvo in its previous life.
.
As always, any advice, tips/tricks are welcome.

That'll do for now, dog walk duty!
 
So as mentioned before the cambelt was due - I had a crack at doing this myself with a proper mechanic on hand to answer any questions that may have popped up. Getting the pully bolt off was where I needed his help, the rest was straight forward enough. I like having someone on hand just incase, increases the confidence a bit if nothing else!

20170906_125802.jpg


20170906_174534.jpg


IMG-20170906-WA0004.jpeg


While I was at it, I replaced the exhaust/intake gasket as that was chewed up. I noticed this while I was doing all the water works, had to replace p gasket etc as covered in previous posts.

IMG-20170907-WA0009.jpeg


20170907_145535.jpg


I still have many oil leaks to get to the bottom of!
 
Having done this to my old van etc I set about doing interior work. Did have photo's of headlining etc out but not sure where they are right now!

The rear panel was trashed, I wanted to insulate everything best I could as its cheap and effective. I made a rear door panel so I could stuff the door with insulation and then the panel I was putting over the top got stuffed also. Bit overkill but I have loads left over and we're not done yet. Plan will be to wrap the lot in some material of sorts when I'm happy with the back. For the moment I've just put some plywood on the uprights either side to stop stuff moving around. Long term the spare wheel will end up on the back door with a swing away mount and then i'll build something upto the roof to house everything I want and leave me space to say get some shopping and not just have it fly around everywhere. I just used plastic boxes for this in my old Vito but I don't want to do this here as I loose all floor space. The bike etc goes in and out of it and its a general work horse. Probably why I've not sorted it yet as I'm still debating!

20170926_173304.jpg


20170926_164509.jpg


20180103_092835.jpg

20180101_153228.jpg


Roof has temp panels fitted with the aid of the little strips to hold them, the sides have been stuffed as has the back area etc. Once I make the corners and the top it'll get another layer of the soft stuff added.

IMG-20171230-WA0005.jpeg


Door stuffed and template made.

IMG-20180101-WA0003.jpeg


Came out not too bad just to 'eyeball' it ha

20180327_193917.jpg

Blackened off a bit and a handle to close added. Note handle is mounted into the metal but its not for getting up in with just to close from inside. Had this laying around I think it was off a cheap rollcab which I got with my shop so reused that.

Difference was night and day, still have lots of things like the side panels where the seatbelt mounts to make some covers for etc but need to get hold of some more plywood for that. The material will cost loads so I'm being cheap and using off cuts as I find them. I'm in no rush and too skint to go blow hundreds on wood right now.

EDIT: On rollcab note - using the Halfords industrial boxes for my full time work - they often come up at 50% off or deals on buying top and bottom - really well built for the money despite the name I'd recommend them. I added the middle box as was running out of space - they make side boxes for it also if your lucky enough to have enough tools to fill it. I like my drawers laid out pretty thin so could stuff them way more but I hate searching for stuff! The Halfords advanced gear gives you a lifetime warranty also - having a friend with a trade card if you don't have one will save you a surprising amount of money here! The 200 piece big box everyone seems to get as its a cracker of a deal is like 300 bucks or something but with the card you'll get it around the 180 mark if I remember right.

20180412_100557.jpg


And one of lulu in the mud on the forum meet - awesome day back in erm jan/feb I think! I'll upload more of these later. Used this one cause your in it Rob, you famous man!

20180120_132815.jpg
 
Last edited:
I keep thinking of fitting a 40mm lift and larger tyres on modular wheels... but if I do go ahead and get a Defender, the Hippo might be easier to sell on as a standard car? :confused:
 
I keep thinking of fitting a 40mm lift and larger tyres on modular wheels... but if I do go ahead and get a Defender, the Hippo might be easier to sell on as a standard car? :confused:

Keep the freelander for your daily and get a mud bogger for the weekend?

So back open to a open field - on an interest of learning - i bled the brakes through on the 110 as i was having to pump the pedal to get a hard brake. Did a full bleed through and the pedal was loads better - been on my to do list for a while!

Anyway, the issue isn't fully resolved. When i go into reverse seems to set it off a bit more, the pedal will drop again as if i've pushed the fluids away. Now i know thats not possible but the dumb question is - does the brake master have a vacuum line or something which is causing my issue? Any help will be appreciated. Its not deadly as it still works but the pedal position is lower so would like to know its cause. - EDIT: Bit more reading would seem a low vacuum pressure would make the pedal harder not softer. So, i'll get and buy more fluid and bleed it through even more as must still have some trapped air.

Cheers ta!
 
Last edited:
So let's continue in the interest of playing catch up!

Couple to add on here from doing the cambelt and the work I've been doing in the back.

20170906_142023.jpg


So those following this slow and painful progress will remember that is my BMW so kinda dominated the garage a bit over the time I was there!

IMG-20170907-WA0001.jpeg


I refreshed all fluids while I was there from an oil perspective anyway. Diffs, gearbox, transfer box (Taking care to clean off any magnetic plugs and have a feel around with an additional magnet for any debris) and then engine oil and filter. Kinda love Landrovers 'self-servicing' engine oil - put some in.. it gets dirty and a few weeks later has dribbled out of every orifice so you can put fresh in again haha.

IMG-20171228-WA0017.jpeg


20171228_154804.jpg


20180327_193912.jpg


This is pretty much how she sits at the moment, headliner back in, sides on, plywood lower sides on.

Just incase i ever find a headunit i decided to use the back corner to house an old raggy 10" sub i had laying around. It really wont do much but it will be better than say 6x9's on there own. This is for the longer journeys in the future. Need to source a little amp to power the little bugger too. Currently just showing a bluetooth speaker in the dash. Nasty.

20180408_185354.jpg


20180408_191344.jpg
20180408_191912.jpg


Absolutely no thought went into this from a volume perspective not even a tape measure if i remember right. Was just one of those i want the sub at an angle and low enough that i can come above it if i wish with further shelving plans. The lips front and rear allow me to screw it down but can also unscrew and move if i need to get to the panel for brake lights etc. The hole still not cut in the box itself, so i may end up cutting the hole and adding a spacer ring to lift it and put the magnet end inside the box. I'm in no rush at all to do anything with it as i say not even got a headunit fitted. Wood was just scraps i had laying around.
 
Still on catch up. Going back lulu spat her guts all over the floor - this was luckily for me right outside my house. Was nearly home and the steering went tight, thought at first i lost my power steering. Turns out the coolant that spat everywhere was making the belt slip so wasn't a steering issue.

You'll see photo's below of the strip down - turns out it was the P Gasket that let go. During the strip down i made the choice to replace everything sensible and some choices were made for me. For example the cores no longer existing in my radiator. I took this down to Arrow Radiators to get it re-cored rather than buying a new alu/plastic variant. Replaced water pump, thermostat, hoses and splitters where appropriate. Everything was thoroughly rinsed out with the hose to remove any nasties left in the block etc. Despite a few stupid bolts the whole job was quite enjoyable compared to some i've had to do!

These may well not be in order as they upload here so apologies for that.

20180502_165716.jpg


Bought these to bang on the drill to make life a little faster. I'm a bit old skool so i like to crack off the nuts by hand but these made removing much faster. Same for tightening, just started threads by hand, span them down and then tightened by hand. I do own an impact gun but for the same reasons i only like using that on the big stuff thats being a bugger!

20170825_135409.jpg
20170825_135415.jpg

Intake and intercooler all cleaned during this strip down process.

20170825_182011.jpg
20170825_182018.jpg
20170826_183848.jpg
20170827_142217.jpg
20170827_142231.jpg
20170827_144103.jpg

The old bolts in carboard so i don't forget later deal. Takes more time in the beginning but saves the tears later.

20170827_144609.jpg
20170827_144620.jpg
20170829_152337.jpg
20170829_153026.jpg
20170829_154019.jpg
20170829_160104.jpg
20170829_160110.jpg
20170829_161021.jpg
20170829_161812.jpg
20170829_165420.jpg
20170831_160148.jpg
IMG-20170825-WA0010.jpeg
IMG-20170825-WA0013.jpeg
IMG-20170827-WA0000.jpeg
IMG-20170827-WA0002.jpeg
IMG-20170827-WA0006.jpeg


The culprit! Nasty bugger
IMG-20170827-WA0008.jpeg
IMG-20170827-WA0015.jpeg
IMG-20170827-WA0017.jpeg


I struggled to remember why i took those, it was because A it was dirty and B i had to scrape off the old gasket.
IMG-20170827-WA0026.jpeg
IMG-20170827-WA0028.jpeg
IMG-20170827-WA0030.jpeg
IMG-20170827-WA0032.jpeg
IMG-20170828-WA0010.jpeg


Amazing how much crap came out the intake on cleaning!
IMG-20170831-WA0015.jpeg

downloadfile copy.jpg


And i'll just place that there if its helpful for anyone else!
 

Attachments

  • IMG-20170831-WA0009.jpeg
    IMG-20170831-WA0009.jpeg
    240.9 KB · Views: 194
Last edited:
Bought some bits for lulu;

Cheap cheap cheap off ebay style. I love the nice factory looking durite gauges but having no dash to put them in and not really knowing what i want as yet i settled just to get the cheapies.

20170922_103119.jpg


EGT Gauge so i know whats going on when i play with the pump.

20170922_103209.jpg


Boost gauge - this one for me is more of an economical driving tool but its nice to know things are working anyway.

20171012_123830.jpg


Exhuastive list....

Next up i was sorting an assortment of wiring just led up in the dash which was powering a raggy old CD player. Ipod only for me - skipping CD's on bumps have no place in my life anymore.

First, having no idea what i was about to run into, thought i'd just pop off the ground from the battery as there was every chance i would place live wires across the bulkhead at some point! (Reconnected as required for testing lines if needed) Came across this little shocker!

IMG-20170830-WA0010.jpeg


Pulled both wires so i could get them both out and on the floor. I put the volt meter on to see what the score was with this second battery.

IMG-20170830-WA0044.jpg


So obviously died and then just left in situ - hopefully that one gave you a smile!

Now onto the dash wiring mess
IMG-20170830-WA0013.jpeg
...

IMG-20170830-WA0020.jpeg

IMG-20170830-WA0022.jpeg

IMG-20170830-WA0029.jpeg

IMG-20170830-WA0034.jpeg

IMG-20170830-WA0008.jpeg


Some might say a bit excessive amount.. Not that it was actually attached to anything either!

Another job i needed to do was tighten up my wheel bearings. This ended up being a phone call or two (thanks for your help guys) - Not because of doing the bearings themselves but somehow i managed to knock the shaft in on the back so had to end up stripping everything to get enough purchase on it to get it free again! Nightmare hour lost for no reason than my own clumsy self!

20180328_160959.jpg

20180328_161002.jpg

IMG-20180328-WA0004.jpeg

IMG-20180328-WA0009.jpeg


PITA day that was....
 
Last edited:
Ok, some more pics of the day out with the forum boys, I have pictures of everyone else's trucks but unless you guys give me permission I won't post them up.
20180120_104255.jpg
20180120_113217.jpg
20180120_152924.jpg
20180120_161149.jpg

20180121_150444.jpg

20180121_150448.jpg

20180121_150500.jpg
IMG-20180120-WA0021.jpg


Now I appreciate its a land rover...However, I HAD to clean all this crap off so don't player hate me!

20180321_163759.jpg


I don't think this is actually the after the mud wash off but it's a fitting time to post it so whatever.

Rob - Its all yet to come mate!

so I acquired a ladder - just in case I do ever get a roof rack.

20171228_114806.jpg


Any other of my cars if I woke up to this I'd be rather peeved!

IMG-20180214-WA0010.jpg


Somewhere down the line I also painted the inside area of the door handle on the back. I think did that while I had the can out to do the front grill.

IMG-20180204-WA0010.jpeg
 
Back
Top