KV6 timing mark - not like the book or write up

This site contains affiliate links for which LandyZone may be compensated if you make a purchase.

britrest

Member
Posts
67
Location
Canada
Hi guys - quick question on a KV6 timing marks on the crank pulley

I have a KV6 here with a busted belt, so heads have been rebuilt and now it is fitting time - but following the manual brings questions (safe place does not line up with pin hole etc.) and the information I have gathered here is great - thanks to Hippos photos

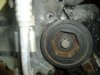
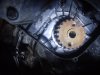
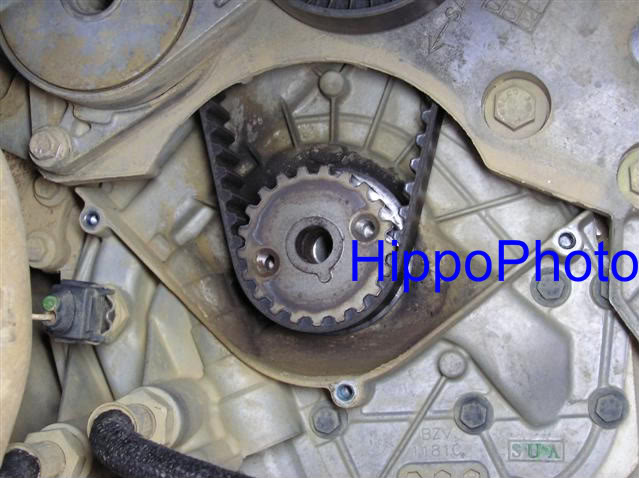
However - when I put the timing pin in and compare what I see to Hippos pics - it looks like my bottom pulley has the marks in the wrong place.
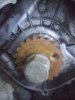
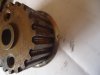
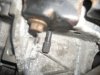
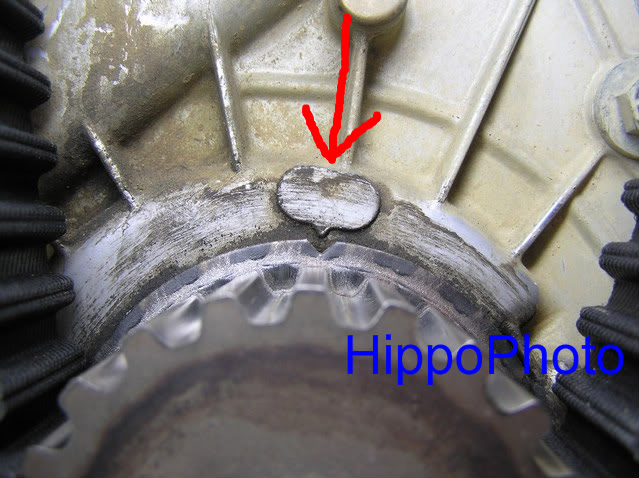
This is a US spec Auto and I can feel the timing pin go in the flexplate but this is the odd thing - the V grove on the rear shield points to the root of the tooth and Hippos pic looks like the V points to the top of the tooth

I have spent a long time on this motor and cannot risk it going wrong again!

I have not removed the front pulley to see if there is key damage, but it feels ok

So why will the pin go in and not line up?

Mike Canada
 

Attachments

  • DSC02204.JPG
    DSC02204.JPG
    607.4 KB · Views: 1,125
There isn't an accurate timing mark on the crank pulley. The crank can only be locked in the "safe" position through the locking hole in the engine back plate. You need to use something like 6mm drill bit through the hole, that fits into a corresponding hole in the TC drive plate. You need to slowly turn the crank until the locking pin or drill bit can be inserted. It's going to be hard now the heads are fitted as there is a real risk of bending valves.
 
Thanks for the quick reply!
No the heads are not fitted - I am about to though

I have the Laser fitting kit so got the tools

So to get this straight

the pin locks the crank in the safe position so you can turn the cams, but to do the belt the v must line up with the pointer on the oil pump cover?
So I can feel the pin go in the flex plate, but it is half a tooth out on the pulley - remove pin and put V to pointer - correct?

Then fit heads - OR fit heads in safe mode? - this is the bit I am not clear about

I have heads locked up and ready to fit

I took the pulley off and enclose pic - it does look slightly off set but pointing to the peak of a tooth
 

Attachments

  • camera dec 11 2013 016.JPG
    camera dec 11 2013 016.JPG
    149.5 KB · Views: 801
  • camera dec 11 2013 015.JPG
    camera dec 11 2013 015.JPG
    128.9 KB · Views: 496
So reading about this They say push pin in to align marks in safe place so that is what I did - I put the outer pulley back on turned anti clockwise a bit and with my finger on the pin to keep pressure I pushed and turned until I felt it pop into the hole

Great - lets have a look at the results!

Well the mark on the outer pulley is quite a way out and what is confusing me - the safe mark is at One O'clock and the pulley marker is at 2 O'clock

So then I take the pulley off and look at the timing mark - now that is almost at 10 O'clock - eh?

Quote from a web page:-
The setting on this engine is:
1. engine in safe mode (the valves cannot touch the pistons here, so move the cams to your hearts content) and
2. the marks on the rear sprockets in line, the two protrusions on the sprocket centres pointing towards each other.
3. With the front belt correctly tensioned.


Engine timed.


So question is - do I trust the locking pin and ignore the markings, fit the heads locked then remove lockers and fit the belt using lockers - tension up and be done

OR

Ignore the pin and turn crank so the V lines up with the mark on the oil pump pulley and fit the heads?
 

Attachments

  • 002.JPG
    002.JPG
    142.4 KB · Views: 1,266
  • 004.JPG
    004.JPG
    129.3 KB · Views: 979
  • 008.JPG
    008.JPG
    242.8 KB · Views: 802
Video's:
Includes knowledge on the operation of the Rover KV6 engine and how to replace the timing and cams belts.


Also a Rover K series engine timing belt change.


It looks like your v groove has turned about 70 degrees anti-clockwise when compared to mine?

mine:

ltItEyA.jpg

P8221634 ltItEyA

fXzpii4.jpg

P8161375 fXzpii4
 
Last edited:
Hi
I took the belt pulley off and the flat steel plate with the V groove in is pretty firmly attached to the pulley - key and keyway look fine

The last pictures I attached were with the pin in the flexplate and when checked at the front there was a 30 degree difference in the safe mark to the outer pulley - but the V grove was as you saw approx 70 degrees anti clockwise

I have seen the videos and that is the thing that is confusing me - do I forget the locking pin and go off the V grove and mark in the oil pump cover - OR - put the pin in the flex plate and put the belt on in that position?

As I looked at it tonight - the rear piston on the right hand bank (looking from back to front of the motor) is almost at TDC - but with the tool locking the cams, the same cylinders intake valves are opening - I think they will touch the piston

So confusing as I do not have what it says in any instructions

When the V groove is lined on the oil pump cover mark - where is the number 1 piston in relation to this mark - is it at TDC?

In the Land Rover book of words it says

Using a socket on crankshaft pulley bolt, rotate
crankshaft in a clockwise direction. Align the
engine "SAFE" position, notch on crankshaft
pulley with the "ARROW" on front mounting
plate and the timing marks aligned on the rear
camshaft gears as illustrated.


then

Insert timing pin LRT-12-232 through hole in
lower crankcase, ensuring pin is located in hole
in drive plate.


But I have to turn the crank a further 30 degrees to get the pin to go in the hole - I have tried all sorts of combinations and still same results
 
Provided the drive plate "flex plate" is bolted to the crank correctly "Almost impossible to be wrong" then go with the locking pin. I've seen the V notch 90° out ;)
 
Oh and don't turn the crank unless you have locked the liners down or you run the very real risk of damaging the bottom seal.
If the bottom seal is damaged the coolant will leak into the sump. If this happens the only fix is remove and reseal the liners!!
 
Last edited:
Good morning from a chilly Canada - -20C this morning so the garage floor is a tad cold for laying on to check these marks

However this morning I turned the crank 360 degrees (liners locked down) and found out there are 5 places that the pin enters the flex plate!

Going back to the safe place the pin locks 30 degrees off, but if I turn it further the pin locks where the V groove and pin are almost in line - half hole out as in my first message and pic

The pistons look a lot 'safer' than in the safe place as they are all well lower of the surface

So which place to I use to time the belt - the 30 degree off or the V groove as in the video?

I know I keep repeating but nothing makes any sense
 
Sorted!
Spoke to Chris at Mg Lifestyle (Uk) Ltd and he said the pin in the flex plate where the V groove is, is the right place to time the motor - even thought the V does not line up properly he said he has seen a few
So I hope this fixes it!

Thanks
for all your help
 
Sorted!
Spoke to Chris at Mg Lifestyle (Uk) Ltd and he said the pin in the flex plate where the V groove is, is the right place to time the motor - even thought the V does not line up properly he said he has seen a few
So I hope this fixes it!

Thanks
for all your help

Refer to post '7' ;)
Glad you are sorted!!
 
Well, it turns over by hand which is encouraging but what a b*lls aching job to do!
Not sure what these are like in the UK but being LHD and having the A/C and cats on makes this a pain to work on - took over an hour to put the manifold bolts back in - all the studs came out of the head so I thought that would be easy to get the heads off ( the flange connections underneath to the ex pipe were so bad that the nuts were round - so I let them be rather than cutting and punching new studs in), however getting the ex gasket to line up was another story - on my own with mirror, torch and sockets - I know you have been there

Will report back once all together - had to order the plastic pipe that goes from pump to thermostat as it was broken on the pump end

Thanks for your help - the V grove being off threw me quite a lot!

Land Rover engineering too! Who'd have thought! Lol!
 
I've rebuilt loads of KV6 over the years, lots making much more power than the factory unit. On the whole they are good engines. I see them as a nice power unit that sadly had bad bits bolted to them. Maybe that was a deliberate attempt to discredit the company by the owner at the time?
I've seen the V notch in all sorts of random places, but seldom where it's supposed to be. This is why the flywheel/ drive plate hole is used!! It's the only way ;)
Manifolds are a challenge especially the rear. The Freelander is better than the MG ZS180 which is a real ball ache.
Good luck with it ;)
 
Our mainstay is 2/300 Tdi which are a dream to work on in a Defender or Disco - even better with a 300 in a 2 door RR with the clamshell bonnet.
I can only work on this car in short burst as there is not enough room to get into the engine bay and work on the rear head - kills my knees on the slam panel !

Our best time is 3.5 hours to swap a motor on a 300 Tdi defender - I think it took that long to put one head back together with those fiddly collets!


This is a whole new learning curve, but sadly not a good investment in time as I know of only 3 within 50 miles! (and the other 2 are the Freelander 2) There are a few more in Montreal but too far away for customers to come - then again if I can offer a timing belt changing service now I have the tools I could get a bit of biz - dealers in Montreal have degrees in charging exorbitant prices for remedial jobs/parts and only want to sell you a new car

Still, better than shovelling snow - or is it?! Lol!

Will report back when I get the plastic pipe for the thermostat to water pump - by the way - on that plastic tube - what is the purpose of the two plastic clips on that pipe? Are that stops as they seem to clamp nothing

If you can make some cash on doing belt changes, why not? The Freelander is the easiest of all the KV6 powered vehicles to do as it has the most space around the engine with the fewest ancillaries to remove. Once you have changed a few you should be able to turn them around in under 4 hours ;)
The plastic clips stop the pipe sliding side to side. This is because the pipe is deliberately shorter than the recess it fits into ;)
 
Yeah I might try an advert or two - but if a snapped belt I would like to have 2 x rebuilt heads on the shelf - ordering parts from the UK takes time and when you get gasket sets with some seals missing the time drags on for replacements = this job has been on and off for 4 weeks now - and to make matters worse my assistant's dad died this week and he took most of it apart - so I am trying to figure out what when where - the rear harness had me foxed as I thought it bolted to the back of the motor where in fact it bolts to the plastic intake! :doh:
There's an hour I won't be getting back...

Still I am sure it is a way to ward off Alzheimer's having to remember where all the parts go back together!

I was wondering about the clips as I would have thought they would have moulded stops to the tube - but it is a Land Rover! :)

If you need to know where anything bolts on or routes correctly just ask ;) Many of us take pictures so those could be useful to you and others.
The thermostat assembly wasn't designed by Rover. The original KV6 thermostat was an alloy unit of similar design. Sadly this was superceded (made cheaper) when BMW took over the ownership of Rover Group. The plastic inlet manifold was also a cheaper version of the alloy unit fitted to the original engine incarnation too.
 
Yeah I might try an advert or two - but if a snapped belt I would like to have 2 x rebuilt heads on the shelf - ordering parts from the UK takes time and when you get gasket sets with some seals missing the time drags on for replacements = this job has been on and off for 4 weeks now - and to make matters worse my assistant's dad died this week and he took most of it apart - so I am trying to figure out what when where - the rear harness had me foxed as I thought it bolted to the back of the motor where in fact it bolts to the plastic intake! :doh:
There's an hour I won't be getting back...

Still I am sure it is a way to ward off Alzheimer's having to remember where all the parts go back together!

I was wondering about the clips as I would have thought they would have moulded stops to the tube - but it is a Land Rover! :)


You probably know this already, however rockauto (the website) has a great shipping to Canada in CAD$ with customs fee already included. I could not believe the low costs of parts in the USA. Rockauto has a few Freelander parts, including belts.

If my reading is right, Dayco was the original Manufacturer of belts. Dayco 94719 (LHN100410) and 94720 (LHN100420)
 
Back
Top