Hiya, I'm going to take a bit of time and go into detail on this as I know you put a fair bit in with the electronics supporting the community developing diagnostic equipment etc...
I can't give you any definite comments based on experience of welding a freelander, but given I've done a rear body cross member, inner and outer sills on a discover, plus tonnes of floor pan repairs on the discovery, some of my learnings will most certainly be transferrable to you and I'll go into some of the lessons I learnt from the discovery and give you a provisional project plan based on those learnings for attacking the freelander inner sill repairs.
Some top tips are remove everything melty / burnable in the vicinity on both sides, and if possible have someone, such as SWMBO firewatch for you. I had stripped the carpets scraped out the sound deadening / stone chip / waxoyl, and kept the doors closed as much as possible to prevent the body sagging when working on our Disco. However I nearly lost the car, and my workshop, when a small bit of bonding sandwiched between the layers of the wheelarch metal overlaps the floorplan started a really "small small" flame that tickled a door card, that duly went up in 14" flames, inside the cabin. Had those flames caught the headlining it would have been a catastrophé. So for a while when welding on the landy I had Mrs Jay sitting with an airline and a dust gun blowing out the wee small fires that started. And remember, the heat travels along the metal, so you either need to remove a lot more combustable material than you would initially think, or weld in short bursts with a bit of cool down time, say one minute welding to three cooling down, or both, short bursts and all the combustable material removed.
If you're doing this welding outside, I'd recommend you look at getting flux cored wire used for "gasless mig" welders. I know a lot of people will be crinkling their nose up at this suggestion, but if you are working outside, the wind will blow away most of the shielding gas and create all sorts of problems. If you are working inside and thus using gas for the mig, don't be buying the silly wee disposable bottles, pony up the money for a refillable bottle from the likes of HobbyWeld or Adams Gas, it will save you a fortune over the project. When MIG welding is running properly, it sounds like bacon sizzling, a steady stream of zips and spits nd stappers, intermittent spark spark stop spark stop spark spark spark will result in what is colloquially known as chicken**** welding. Have a spare torch liner on hand, most mig problems come from the wire sticking and popping in to the weld puddle in fits and starts, rather than as a steady stream. Simply changing the "torch lining" tube, and nozzle solves most of those issues. For the same reason, keep the welder as far away from you as you can and keep the umbilical as straight as possible to reduce the internal resistance to the wire flowing. There is a fine line to tread between having too much tension on the drive roller, and not enough. With too much, if the rolling resistance of the torch liner increases there is a propensity for the wire to birds nest inside the machine, if there is too little tension the rollers will slip and the wire won't flow The latter is the better option, as every time it birds nests you lose three or four metres of wire, plus you have to respool the gun again and its a PITA and eats into time and increases material costs.
Buy plenty of consumables in advance, LOTS and LOTS of wire, nozzles/tips, flap disks, couple of torch liners, it's better to have £50 excess stock on the shelf that you don't need, than be stuck needing something that's going to take 4 days to arrive mail order. 1mm thin slitting disks are a godsend for neatly, quickly and accurately cutting sheet metal, and aren't expensive, like a tenner for a stack of £25 and mone well spent. Also on the topic of grinding discs, the cheap brown flap discs aren't worth buying, the grit falls off them in about 8 seconds flat, the blue ones are Zirconium abrasive rather than the Aluminium Oxide on the brown ones, they are a little more expensive, but significantly more effective and durable so will pay for themselves hand over fist. I'd recommend 40 or 80 grit flap disks rather than the super fine polishing ones at something ridiculously fine like 320 grit.
I don't know what machine you have, and thus am unaware whether it uses the 0.5kg hobby reels, or the bigger 4.5 & 15kg industrial rolls? If its the latter, that's the best setup, get the wire in 4.5kg rolls, if its the hobby ones, buy them in bulk on eBay, say five or ten at a time. Another top tip is a magnetic earth clamp, essentially its a ring magnet with a brass bolt sprung on to it and the magnet sticks to the steel so it sticks anywhere, so you can get the earth point through the brass bolt as close to the arc as possible, you simply spot this then clip your earth clamp crocodile clip onto the other side of the brass bolt. Again, these are cheap online, or you could fashion something yourself. Clean the area you are putting the earth clamp onto back to shiny metal, and do the same for the area you are welding onto. Wire-wheel or wire cup on a grinder is great ar removing rubber stonechip stuff, as does a scraper but that uses more embow grease, then polish it to shiny with flap-disks. The cleaner you get it the better the weld will be and the easier it will be to weld it in the first place, so time spent prepping is most definitely time spent wisely.
I'm always wary about off the shelf repair panels, as a lot of vehicles I've seen repaired have been what I describe as "patched with biscuit tin", I genuinely do not understand why, but a lot of the repair panels, as well as the sheet metal garages tend to use, is often silly thin, like 0.8mm. This silly thin stuff is difficult to weld and rusts through easily, so skimping on the metal thickness will set you up for a repeat of the job in a couple of years and be a nightmare to work with. The reason it's difficult to work with thinner steel is its a very fine line between not penetrating through to the base metal, to burning ruddy great big holes in it. You are much better getting 1.6mm sheet metal for this sort of repair, it will last longer, be stronger, and be easier to weld.
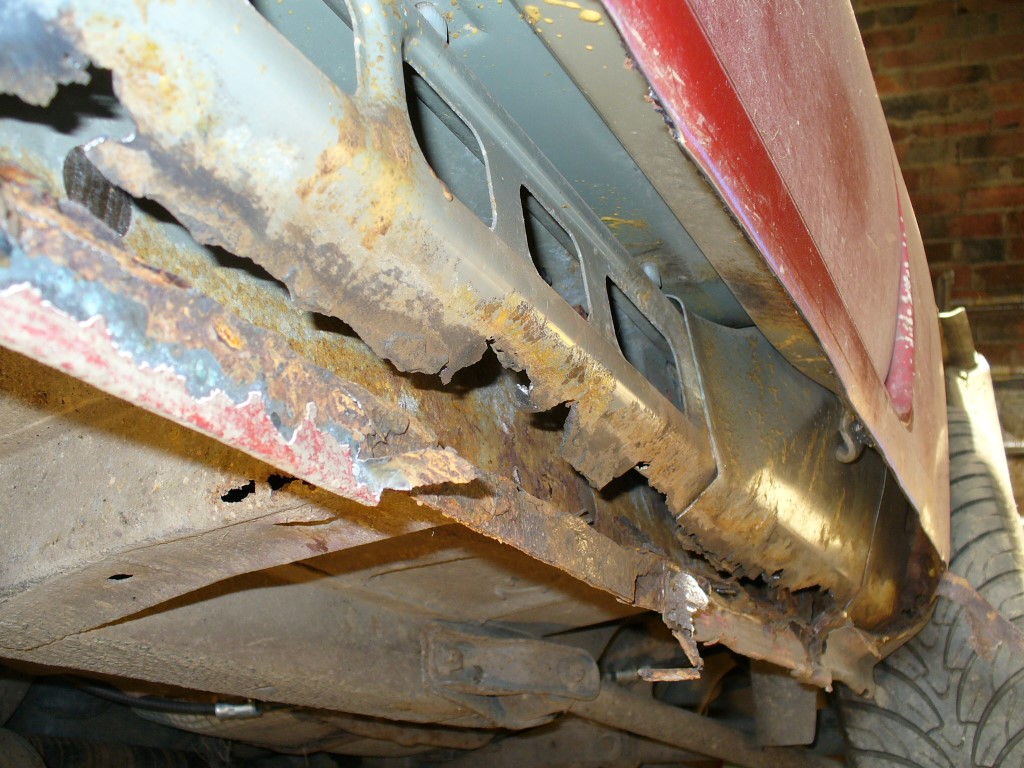
Without seeing pictures of the actual sills on your vehicle, to assess the sill's condition, I'm not sure how best to proceed, however I'm assuming that it's only the vertical faces that are goosed, and the floorplan and outer sill are still sound, I'd suggest you:
- Start in the interior of the car, remove the front seats, and carpets, plastic sill guards etc.
- carpets don't need to be completely removed, simply fold them intowards the centre line of the vehicle
- but any sound deadening underneath does need removed
- attack it with a bit of common sense and ask yourself one question, "is this bit of the vehicle going to get hot when I weld?", if you think it will, remove anything combustible / meltable from that area
- On the underside, remove the brake pipes that run along the inside of the drivers / offside sill
- Now grind off / cut out the old patches - leaving any solid metal between them, essentially creating picture frame / mail slot type holes in the inner sill
- Strip / clean 5 or 6 inches from the sills of the floor pan, and clean up the outer edges to shiny of these mail slots
- Cut big plates of new metal to cover the holes but leaving a bit of room for the welding onto the original metal
- if possible do the inner sill as one long strip of metal, welding it horizontally top and bottom, and vertically at it's forward and aft edges
- use any solid metal you left on the car as extra points to secure the sill plate
- transfer marks from the solid bits to the new metal where it will overlap the original metal
- drill some big holes in the plate with a hole-saw / step-drill where it will overlap some solid original metal
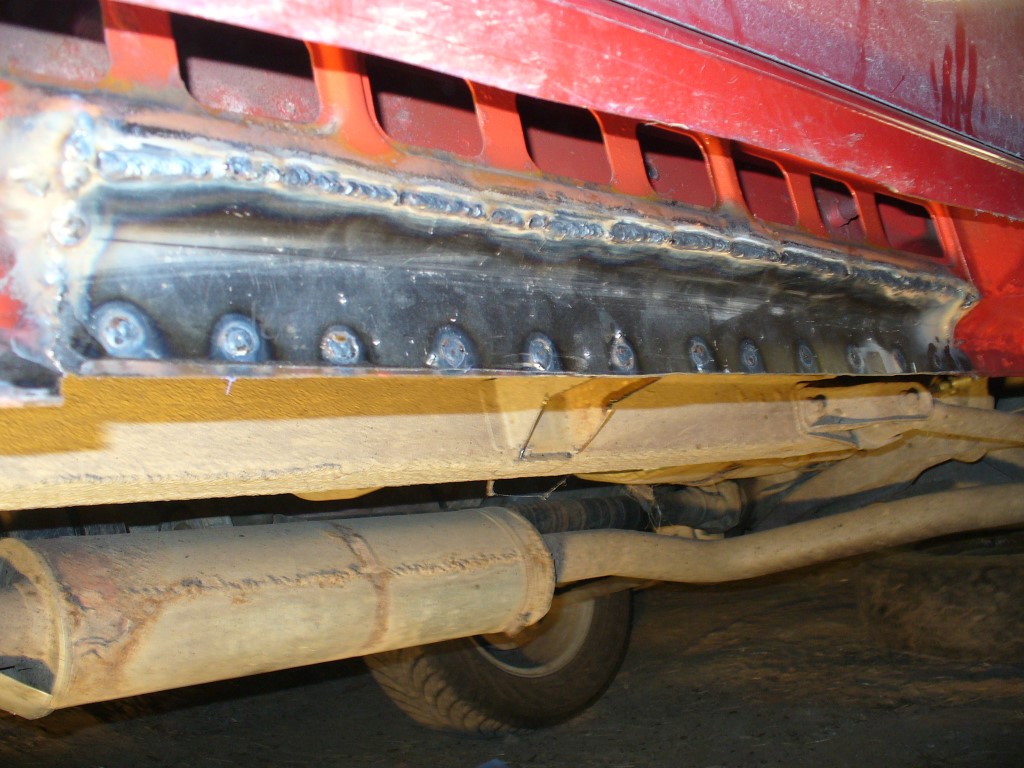
- tac weld the corners of the plates on
- weld the outer edges to the vehicle
- weld the edges of the overlapping holes to the original metalwork on the vehicle
- dress them down with a flap-wheel afterwards
- Once you are finished welding, its time to preserve the new metal
- spray the entire area with zinc primer to start preserving the metal
- if budget permits, upol raptor or other truck bed liner is a godsend for spraying on new metal
- with or without raptor / bed liner, paint over your welds with brushable seam sealer
- spray the entire area with stonechip - do this before shiny paint or else it falls off, don't ask me how I know this

- paint over the stonechip with anything really, hammerite or waxoyl is as good or bad a choice as anything
- Now replace those brake lines, cursing that Scottish beardy bloke who is now making you drill holes into your nice shiny new and heavily coated metal work for the pipe clips
- Refit anything you removed / displaced from the interior to keep it out of the literal line of fire
It wouldn't be horrendously difficult, but I may have made it sound like it is by going through all the potential pitfalls and sharing my lessons learnt in this post. However, if you learn from my mistakes you'd be able to do the sills in a weekend if doing it indoors, or about a week if doing it outdoors. The difference being if you are doing it indoors you can leave the welder set up and such like, if doing it outdoors you need to tidy away every night and rig up every day as if you don't your welder and such like will go walkies in the middle of the night.