Bede
Active Member
- Posts
- 153
- Location
- Stoke On Trent
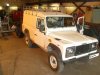
Today I have decided to do some repair jobs on my newly acquired 110.
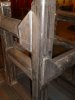
I found a bit of rot in the driver's side footwell last week so prodded it through with a screwdriver to see the extent. I have today and next week off work but am off to Wales on tuesday so I have four days (well, three now) to do the following jobs:
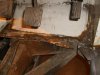
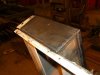
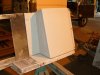
Plate in both footwells (I originally intended replacing both complete footwells but having today stripped out my floor the rot isn't too bad - it's mainly across the bottom fold and the wall below the pedals is still absolutely fine so I'm gonna cut out roughly the bottom 100mm or so and replace with 2mm folded sheet.) I don't have the time to totally replace the footwells and it's overkill really, for now. Plus the replacement wells are 1.2mm - a bit flimsy if you ask me.
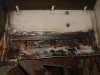
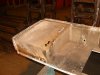
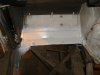
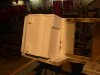
Replace the base steel sheet in the seatbox unit beneath the driver's side seat. The base of the battery box looks fairly solid but I'll fully clean it up tomorrow to examine the condition of the steel. What an absolute arse to remove the seat box. Most of the bolts & screws had to be cut off as it's a '92 plate so the fixings are corroded to hell. Some were really tricky to remove due to accessibility. Got there in the end though. It's taken me about 7 hours to remove the seats, seatbox, floorplates and do a bit of cleaning up around the parts I've removed.
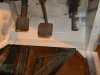
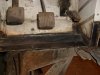
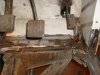
Rear offside outrigger. I was cleaning this up with a rotary wire brush and it disintegrated on top so this will have to be cut out and replaced whilst I have the seatbox off and can access it ok to fully weld. My only concern is trying to not melt the wiring loom within the chassis member. Any hints on welding new outriggers without damaging wiring?
There is also a bracket on top of the nearside rear outrigger that has corroded away so I'll knock up a new one from 3mm plate and weld that on and bolt to the tub.
I intend to have all welding and plating done tomorrow and primed, ready for a couple of coats of topcoat on sunday then need to have it all assembled and seam sealed on monday morning ahead of my camping trip to Wales on tuesday.
Does this sound doable? It'd better be!
I'd have taken pics but both my camera and iphone are currently knackered.
I found a bit of rot in the driver's side footwell last week so prodded it through with a screwdriver to see the extent. I have today and next week off work but am off to Wales on tuesday so I have four days (well, three now) to do the following jobs:
Plate in both footwells (I originally intended replacing both complete footwells but having today stripped out my floor the rot isn't too bad - it's mainly across the bottom fold and the wall below the pedals is still absolutely fine so I'm gonna cut out roughly the bottom 100mm or so and replace with 2mm folded sheet.) I don't have the time to totally replace the footwells and it's overkill really, for now. Plus the replacement wells are 1.2mm - a bit flimsy if you ask me.
Replace the base steel sheet in the seatbox unit beneath the driver's side seat. The base of the battery box looks fairly solid but I'll fully clean it up tomorrow to examine the condition of the steel. What an absolute arse to remove the seat box. Most of the bolts & screws had to be cut off as it's a '92 plate so the fixings are corroded to hell. Some were really tricky to remove due to accessibility. Got there in the end though. It's taken me about 7 hours to remove the seats, seatbox, floorplates and do a bit of cleaning up around the parts I've removed.
Rear offside outrigger. I was cleaning this up with a rotary wire brush and it disintegrated on top so this will have to be cut out and replaced whilst I have the seatbox off and can access it ok to fully weld. My only concern is trying to not melt the wiring loom within the chassis member. Any hints on welding new outriggers without damaging wiring?
There is also a bracket on top of the nearside rear outrigger that has corroded away so I'll knock up a new one from 3mm plate and weld that on and bolt to the tub.
I intend to have all welding and plating done tomorrow and primed, ready for a couple of coats of topcoat on sunday then need to have it all assembled and seam sealed on monday morning ahead of my camping trip to Wales on tuesday.
Does this sound doable? It'd better be!
I'd have taken pics but both my camera and iphone are currently knackered.