Wind your neck in TD4.
I did the repair several years back without any giudance from Haynes.
I didnt have a digital camera so couldnt take pics.
There is nothing crude about the brake cable fix, why replace the whole regulator when it is just a cable. Then the very same fitting breaks in the same way and you payed £90 for the part, more fool you.
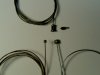
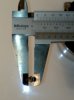
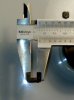
Here are some cables below, the top one is the original window cable, note the terminal ends. I replaced the smaller hex lug, this is the detached lug in the pic. Next two attachments show the size of the small hex lug, the new lug needs to be the same and clips into the spindle, which is driven by the regulator.
The lower two cables are a gear a brake cable from a bike, note the difference in the sizes of lugs. The brake cable is the same thickness as the window cable.
The cable slides through a sleeve so you have to assemble then crimp a lug on to the cable after assembly.
If you can change a brake cable on a bike then you can repair the window
")