Finally changed the viscous fan pulley bearing. You could feel it was on its way out by turning the pulley with the belt removed - felt like there was sand inside and made a slight rumbling sound when turned by hand.
The procedure, when you know it, is dead easy and takes about 2 hours.
I tried to remove the flange some time ago, but couldn't get it loose. Now I know why. Based on the image in Microcat I just could not understand how the assy was put together, and more important, how to remove the bearing from the front cover. I just ordered the parts involved, shaft, bearing, cir-clip and flange to better understand how it was put together.
I started by making a "special" tool that fitted inside the shaft (hex tool) so I could fit a ratchet on its end.
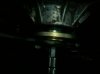
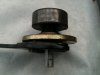
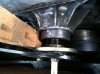
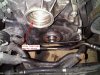
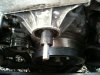
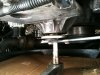
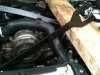
Then remove belt and pulley. I used Land Rover Tool LRT-12-093 and LRT-12-094 to undo the viscous fan and the three pully bolts. I will actually not refit the fan because a) it's winter here in Norway and soon temperatures will be minus 15 to 20 again, b) the fan has mostly no use at all so c) it will be replaced by a 2 stage automatic Kenlowe fan later.
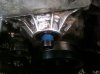
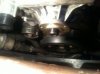
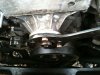
After pulley removed you use 3x 8mm bolts of about 25mm in length and bolt the LRT-12-093 tool back to the flange. Then rotate the tool CLOCKWISE and support it by a large piece of wood. Use a small torch for about a minute to warm-up the shaft as you have to soften the thread-lock that holds the flange in place. Now use the hex tool or home made adapter and a ratchet, I had to use a 1 meter extension pipe over the ratchet's arm to undo the flange. TURN THE RATCHET ALSO CLOCKWISE. It gave with a bang, I initially thought I'd broke the ratchet
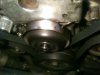
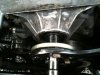
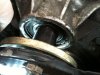
 Remove the flange. Remove the cir-clip. Put the flange including the LR tool back on, now support it with a piece of wood on the left (Counter Clockwise (CCW)) side of the engine bay and using different things, from wood, nuts, ratchet pipes, anything in your toolbox could do, to fill-up the space between flange and front cover. The bearing and shaft will slowly but surely come out by turning the ratchet CCW.
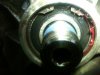
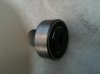
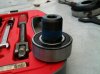
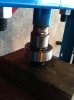
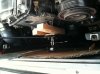
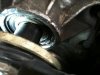
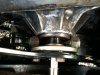
I used a press to install the bearing on the new shaft, since I bought it, but the old shaft can be re-used! Then put the shaft with bearing in the fridge at minus 20 for about 45 minutes. In the mean time clean the front cover opening where the bearing sat. Get the shaft + bearing and keep it cold with some camping ice blocks. Heat-up the surroundings of the front cover where the bearing will go back-in, including the inside, with a mild flame for about 3-4 minutes, spreading the heat all of the time, so never too long at one spot.
Then take the shaft and bearing assy and it will drop straight in.
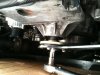
Put the cir-clip back in place and install the flange, holding the shaft with your hextool and using the LR tool attached on the flange with 3 bolts. Turn clockwise until the flange bottoms out on the bearing. Tighten. (I used 20Nm).
That's it! Apart from the Land Rover tools, the bearing required has p/n ERR5285.
The procedure, when you know it, is dead easy and takes about 2 hours.
I tried to remove the flange some time ago, but couldn't get it loose. Now I know why. Based on the image in Microcat I just could not understand how the assy was put together, and more important, how to remove the bearing from the front cover. I just ordered the parts involved, shaft, bearing, cir-clip and flange to better understand how it was put together.
I started by making a "special" tool that fitted inside the shaft (hex tool) so I could fit a ratchet on its end.
Then remove belt and pulley. I used Land Rover Tool LRT-12-093 and LRT-12-094 to undo the viscous fan and the three pully bolts. I will actually not refit the fan because a) it's winter here in Norway and soon temperatures will be minus 15 to 20 again, b) the fan has mostly no use at all so c) it will be replaced by a 2 stage automatic Kenlowe fan later.
After pulley removed you use 3x 8mm bolts of about 25mm in length and bolt the LRT-12-093 tool back to the flange. Then rotate the tool CLOCKWISE and support it by a large piece of wood. Use a small torch for about a minute to warm-up the shaft as you have to soften the thread-lock that holds the flange in place. Now use the hex tool or home made adapter and a ratchet, I had to use a 1 meter extension pipe over the ratchet's arm to undo the flange. TURN THE RATCHET ALSO CLOCKWISE. It gave with a bang, I initially thought I'd broke the ratchet
I used a press to install the bearing on the new shaft, since I bought it, but the old shaft can be re-used! Then put the shaft with bearing in the fridge at minus 20 for about 45 minutes. In the mean time clean the front cover opening where the bearing sat. Get the shaft + bearing and keep it cold with some camping ice blocks. Heat-up the surroundings of the front cover where the bearing will go back-in, including the inside, with a mild flame for about 3-4 minutes, spreading the heat all of the time, so never too long at one spot.
Then take the shaft and bearing assy and it will drop straight in.
Put the cir-clip back in place and install the flange, holding the shaft with your hextool and using the LR tool attached on the flange with 3 bolts. Turn clockwise until the flange bottoms out on the bearing. Tighten. (I used 20Nm).
That's it! Apart from the Land Rover tools, the bearing required has p/n ERR5285.
Attachments
-
 IMG_0189.jpg234.5 KB · Views: 6,973
 -
 IMG_0197.jpg234.8 KB · Views: 4,978
 -
 IMG_0196.jpg224.8 KB · Views: 5,074
 -
 IMG_0195.jpg233.1 KB · Views: 5,671
 -
 IMG_0194.jpg235.5 KB · Views: 5,020
 -
 IMG_0193.jpg242.2 KB · Views: 4,828
 -
 IMG_0192.jpg239 KB · Views: 5,552
 -
 IMG_0191.jpg235.7 KB · Views: 5,795
 -
 IMG_0190.jpg228.8 KB · Views: 6,141
 -
 IMG_0198.jpg235.4 KB · Views: 5,144