I've seen a cheap but new battery drop to under 9 Volts when cranking, which is a perfect scenario for waiting until the system check has completed before allowing it to start.Fair point, can,t be both........... possibly neither. Low battery causes lots & lots of ECU mayhem, all those 12v devices trying to run on 11v (during cranking)..you can even watch the battery voltage drop with live data OBD2
You are using an out of date browser. It may not display this or other websites correctly.
You should upgrade or use an alternative browser.
You should upgrade or use an alternative browser.
Fl 2 Engine Failure
- Thread starter Sanbuild
- Start date
This site contains affiliate links for which LandyZone may be compensated if you make a purchase.
I do suspect a wiring issue could be the problem but if that's the case not sure about the noise when it broke down. Looking at the DTC, s one by one it's common as a cause.
Still before I re-assemble and run DTC more thoroughly I have taken off the pump. My thoughts are to dummy run this connected to a drill in a vice with intake and high pressure connected to a reservoir of diesel just to check low and high pressure operates at least mechanically, mmm maybe a case of Freelander fever coming on?
Pump electrical connection has oil ingress it looks bad and needs cleaning but dry metal so maybe not the problem
Whilst engine parts stripped away I will remove the inlet manifold just for my own sanity that the muffling noise wasn't swirl flaps being eaten.
Thats a job for next week end.
Hi, yes I will do that, I, ll take a photo and post it, see if anyone can see anything out of place.With the pump off, its a good opportunity to check the fuel pump drive cam (on the engine) for damage.
I'll post a photo of the oily electrical connection too.
FYI
2 things I'm aware of that can effect the life of a diesel fuel injector pump:-
1. A car that has been mis fuelled in its lifetime (e.g. diesel engine car - ran with diesel/petrol mix), lowers diesel viscosity, which the FL2 pump pistons rely on to operate effectively and causes premature ware. Immediately draining off contaminated fuel from tank/lines avoid this.
2. Contaminants introduced into the post filter fuel line during fuel filter changes & fuel bleeds, again the pump pistons may pickup particulates in the fuel and metal galling occurs.
How to check for early signs of pump failure ?
The fuel pump has a "fuel metering solenoid", attached to it. (On FL2 this can be removed for inspection by removing 3 torx screws)
Check for metal particles on the solenoid innards and inside the pump solenoid port.
The pump solenoid also has a small O-ring on it, this should be inspected for integrity.
Should the pump display signs of metal swarf carried in the fuel, an overhaul kit or replacement pump. Swarf will also make its way to the pressure regulator, pressure rail and the injectors.
Last edited:
My step after below was the pump check as Coltron1's post
But..........
Possible Engine Rebuild Ahead!
Following my previous post I have removed the inlet manifold, as I wanted to check if it could be the swirl flaps
No its much much worse, see photos attached.
I will take off the head next week. Although I have re built a few engines before I don't know how bad the damage will be, but looking at the sizes of the metal I doubt if this could just be confined to the head. I suspect some piston head, and hopefully not but possibly bore damage?
However I have one query, although I have the head and crank locked with the pins how do you re-set the crank and cam if you have to remove them? If anyone has info or video link that would be helpful.
Attachments
I think both cam sprockets have markings on them to line up, better still I'm sure a digital version of the FL2 workshop manual is available to download somewhere on this site?
(EDIT no , as the file attachment feature won't allow large uploads, I've just tried)
(EDIT no , as the file attachment feature won't allow large uploads, I've just tried)
Last edited:
Is that a chunk of carbon or some form of metal? If it's metal, I'm curious as to where it came from. I found an EGR pipe flange nut in the combustion chamber of my FL2, which required a replacement head and piston, but the bore survived with just a hone.My step after below was the pump check as Coltron1's post
But..........
Possible Engine Rebuild Ahead!
Following my previous post I have removed the inlet manifold, as I wanted to check if it could be the swirl flaps
No its much much worse, see photos attached.
I will take off the head next week. Although I have re built a few engines before I don't know how bad the damage will be, but looking at the sizes of the metal I doubt if this could just be confined to the head. I suspect some piston head, and hopefully not but possibly bore damage?
However I have one query, although I have the head and crank locked with the pins how do you re-set the crank and cam if you have to remove them? If anyone has info or video link that would be helpful.
Timing the engine is easy. You simply use the pins. The cam chain is timed by lining the dots on the sprockets with the different coloured links on the chain.
The manual shows everything you need to know.
GrumpyGel
Well-Known Member
- Posts
- 27,895
- Location
- Christchurch, New Zealand
How did you determine that that alien mush was in fact an EGR pipe flange nut in a previous life?Is that a chunk of carbon or some form of metal? If it's metal, I'm curious as to where it came from. I found an EGR pipe flange nut in the combustion chamber of my FL2, which required a replacement head and piston, but the bore survived with just a hone.
View attachment 291527View attachment 291528
Timing the engine is easy. You simply use the pins. The cam chain is timed by lining the dots on the sprockets with the different coloured links on the chain.
The manual shows everything you need to know.

In 3 dimensions it's pretty easy to tell it was an M6 flange nut. The threads are still visible in the centre hole, the nut flats can just be made out, and the flange was also visible. One of the EGR nuts was also missing, being replaced by some random of nut, so this confirms the nut type and from whence it came.How did you determine that that alien mush was in fact an EGR pipe flange nut in a previous life?
Thanks Nodge the photos of your engine , along with pointers on timing has given me some hope.Is that a chunk of carbon or some form of metal? If it's metal, I'm curious as to where it came from. I found an EGR pipe flange nut in the combustion chamber of my FL2, which required a replacement head and piston, but the bore survived with just a hone.
View attachment 291527View attachment 291528
Timing the engine is easy. You simply use the pins. The cam chain is timed by lining the dots on the sprockets with the different coloured links on the chain.
The manual shows everything you need to know.
Obviously will see more when I remove the rocker cover.
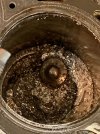
I thought it was pieces of aluminum but a closer look its a melted mix
Attachments
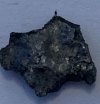
I'm not sure what that is, or how it got there. It won't have come through the intercooler, so can only have originated in the inlet manifold. My guess is it's probably part of the inlet manifold itself, maybe melted off through heat from the EGR system.Thanks Nodge the photos of your engine , along with pointers on timing has given me some hope.
Obviously will see more when I remove the rocker cover.
I thought it was pieces of aluminum but a closer look its a melted mix
Further investigation is needed, but I'm thinking it's related to your running issue.
Hi I'm sure it's the problem I will be removing rocker/camshaft cover this weekend now. Haynes say camshaft sprocket and seal need removing first, is that correct or just needed to remove the cylinder head?I'm not sure what that is, or how it got there. It won't have come through the intercooler, so can only have originated in the inlet manifold. My guess is it's probably part of the inlet manifold itself, maybe melted off through heat from the EGR system.
Further investigation is needed, but I'm thinking it's related to your running issue.
The camshafts cover is also the top of the head, camshaft upper bearing ladder and upper intake manifold too.Hi I'm sure it's the problem I will be removing rocker/camshaft cover this weekend now. Haynes say camshaft sprocket and seal need removing first, is that correct or just needed to remove the cylinder head?
The timing belt needs removing, so it doesn't pull on the exhaust cam, and all the injectors need to come out too.
I don't know what removing the top cover will tell you though. A compression test will be more revealing I think.
I want to check where the build up is from, hoping it will show. If not will take of the head to check top of the pistons.The camshafts cover is also the top of the head, camshaft upper bearing ladder and upper intake manifold too.
The timing belt needs removing, so it doesn't pull on the exhaust cam, and all the injectors need to come out too.
I don't know what removing the top cover will tell you though. A compression test will be more revealing I think.
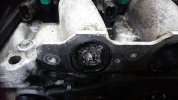
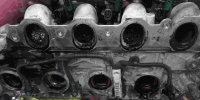
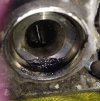
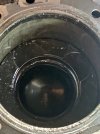
It probably don't show well in the photos but something big has given way it's metal not carbon. Someone has suggested Turbo collapse? Nonetheless all the debris needs to be removed.
Been a while but here it is....stripped engine down to the cylinder block, removed EGR, Rocker cover and found damage!!I want to check where the build up is from, hoping it will show. If not will take of the head to check top of the pistons.
It probably don't show well in the photos but something big has given way it's metal not carbon. Someone has suggested Turbo collapse? Nonetheless all the debris needs to be removed.
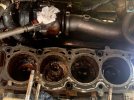
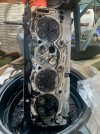
You'll see by the pics what a bad day it ended up.....
I was hoping to get 4 nice pistons as first pic......but What I really got was just one of pic 1, and three of the other!
The valve broke and the end of the valve is the shiny medal like object that wrote off the cylinder head.
Needs very little explanation other than more damage caused by trying to turn the engine over.
Thinking about spending some hours cleaning down the bottom half, re-building with kit and buying a re-conditioned head.
Attachments
I have 2 engines with bottom end failure, ( one 2012 with big hole in the block where con rod came through and second engine 2010 with a seized crank caused when breaker bar put on the bottom pulley bolt, without a pulley) ...both heads considered good, but still on the engines.
Similar threads
- Replies
- 5
- Views
- 520