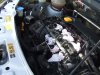
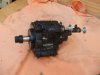
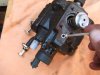
The pump took an age to remove. I couldn't do it without removing the starter motor first. I have no idea how any could do the job with it still in place.
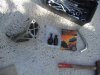
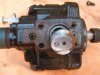
I stripped all three pump covers, removing & replacing the seals, including the conical in its correct position. The screws were so tight I needed to use a sharpish-ended chisel to crack their tension before I could unscrew them.
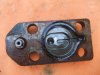
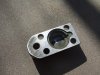
I have to add, that no-where did anyone state that the three pump covers were face-to-face, because they are not! There is a slight gap between the faces/surfaces. In point of fact, when the pump's three covers are removed (one at a time) there is a whole lot of crap to be cleaned away before any remedial work can be carried out.
I was under the impression these were mating-surfaces, but they are deffinitely not. I cleaned them and refitted them, with light shown between the upper & lower surfaces after they were screwed together again.
Jeez, I'm hoping all will be well tomorrow when after reconnecting everything the system is fuel-tight.
I will add this, one of the best tools you can have in your kit is a piece of piping/steel-tubing. It makes an excellent extension to most tools and gives you an edge when it comes to tightening.
Oh, the Torx screws are s**t (merde). They give no real amount of purchase and are easily rounded-off. Allen screws would be much, much better. So, if anyone knows the thread-size can they please pass it on. And if I learn what the size is I will have a dozen in stock (in my nuts & bolts box) just in case I need to do the whole thing again. Torx are really s**t. If you can, replace any you find as you go through a job. They are a pain.
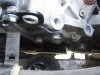
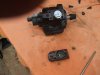
And... when I undid the pump, with all the correct extraction tools, etc, in place, the lower mounting nut, which you cannot see, fell into the void beneath.
I searched for this nut and couldn't locate it, using an LED torch and bent piece of 3mm (1/8th) wire. By the way, the wire ended up going through my right-hand's little finger - passing close to the bone, I reckon. My fault. The blood flowed like there was no tomorrow and splashed everywhere (Aztecs sacrificed blood for better times, I've done it for no-leaks, lol).
The good news is... after swelling, and being a bit stiff, my finger stopped leaking the red-stuff and the swelling quickly subsided. I'm left with no swelling or stiffness; only a slight oozing from both holes. The wire went through the muscle and has all but healed itself. I'll also say this, I have never taken any anti-biotics for over 17 years, so believe my immune system is up-to-scratch, no pun intended. My finger is working, bending as well as ever with no pain, numbness or stiffness at all. I just have this hole that passes through it.
Anyway, the pump and the blind-nut beneath? To refit it, I used a different nut as I could not locate the original. I had to use a mirror & torch to see where the stud was in relation to fitting the replacement. That worked well, and my wife helped by supplying a small mirror for the purpose.
All-in-all, this job is a real bugger. I hope I never need to do it ever again. I'm not religious, by any stretch of the imagination, but I'm praying the pump will not leak when pressure is applied.
I am aware others have done this and they say it's kind of easy or straightforward. I, on the other hand, have found it to quite strenuous, not forgetting bloody!
The drive belts too, are a pain in the proverbial. The smaller of the two was a trial, but turning the engine-over with a socket helped. If you can imaging fitting a tyre onto a bicycle rim the idea will give you an idea of how to do it.
The larger belt has been left for tomorrow. As well as fitting everything else that needs to be.
I have taken some photo's, but not as many as I meant to. These will be shown when all is finished.
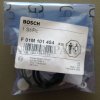
The seals, by the way. I bought them off Ebay.uk and the selling firm asked for the Pump Label numbers so they could send the correct kit. They did. I will also pass on their info too.
As for now, I'm off to bed, to dream of a sealed pump and a fixed finger.
I stripped all three pump covers, removing & replacing the seals, including the conical in its correct position. The screws were so tight I needed to use a sharpish-ended chisel to crack their tension before I could unscrew them.
I have to add, that no-where did anyone state that the three pump covers were face-to-face, because they are not! There is a slight gap between the faces/surfaces. In point of fact, when the pump's three covers are removed (one at a time) there is a whole lot of crap to be cleaned away before any remedial work can be carried out.
I was under the impression these were mating-surfaces, but they are deffinitely not. I cleaned them and refitted them, with light shown between the upper & lower surfaces after they were screwed together again.
Jeez, I'm hoping all will be well tomorrow when after reconnecting everything the system is fuel-tight.
I will add this, one of the best tools you can have in your kit is a piece of piping/steel-tubing. It makes an excellent extension to most tools and gives you an edge when it comes to tightening.
Oh, the Torx screws are s**t (merde). They give no real amount of purchase and are easily rounded-off. Allen screws would be much, much better. So, if anyone knows the thread-size can they please pass it on. And if I learn what the size is I will have a dozen in stock (in my nuts & bolts box) just in case I need to do the whole thing again. Torx are really s**t. If you can, replace any you find as you go through a job. They are a pain.
And... when I undid the pump, with all the correct extraction tools, etc, in place, the lower mounting nut, which you cannot see, fell into the void beneath.
I searched for this nut and couldn't locate it, using an LED torch and bent piece of 3mm (1/8th) wire. By the way, the wire ended up going through my right-hand's little finger - passing close to the bone, I reckon. My fault. The blood flowed like there was no tomorrow and splashed everywhere (Aztecs sacrificed blood for better times, I've done it for no-leaks, lol).
The good news is... after swelling, and being a bit stiff, my finger stopped leaking the red-stuff and the swelling quickly subsided. I'm left with no swelling or stiffness; only a slight oozing from both holes. The wire went through the muscle and has all but healed itself. I'll also say this, I have never taken any anti-biotics for over 17 years, so believe my immune system is up-to-scratch, no pun intended. My finger is working, bending as well as ever with no pain, numbness or stiffness at all. I just have this hole that passes through it.
Anyway, the pump and the blind-nut beneath? To refit it, I used a different nut as I could not locate the original. I had to use a mirror & torch to see where the stud was in relation to fitting the replacement. That worked well, and my wife helped by supplying a small mirror for the purpose.
All-in-all, this job is a real bugger. I hope I never need to do it ever again. I'm not religious, by any stretch of the imagination, but I'm praying the pump will not leak when pressure is applied.
I am aware others have done this and they say it's kind of easy or straightforward. I, on the other hand, have found it to quite strenuous, not forgetting bloody!
The drive belts too, are a pain in the proverbial. The smaller of the two was a trial, but turning the engine-over with a socket helped. If you can imaging fitting a tyre onto a bicycle rim the idea will give you an idea of how to do it.
The larger belt has been left for tomorrow. As well as fitting everything else that needs to be.
I have taken some photo's, but not as many as I meant to. These will be shown when all is finished.
The seals, by the way. I bought them off Ebay.uk and the selling firm asked for the Pump Label numbers so they could send the correct kit. They did. I will also pass on their info too.
As for now, I'm off to bed, to dream of a sealed pump and a fixed finger.
Last edited: