Disco 2 TD5

This site contains affiliate links for which LandyZone may be compensated if you make a purchase.

K9GDO

Member
Posts
22
Location
Plymouth
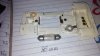
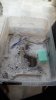
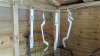
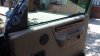
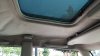
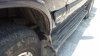
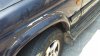
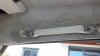
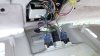
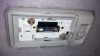
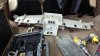
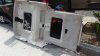
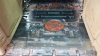
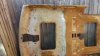
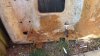
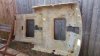
I have just bought a Disco 2 TD5. What I found out so far: soaked carpet in driver's footwell, mould forming on dashboard and headlining, rotten side steps, a few hinges, a fog light, driver's side mirror that need replacing.

I am not a very good mechanic but so far: the engine and the gearbox work fine, the hi-low gear change is a bit stiff but works. Still have HDC working, but no ACE (amber always on) .

I am planning to strip all the inside, seats, carpet, headlining first of all, and try to get rid of the mould and water problem. I will post some pictures with the project as soon as I start.

If anyone can recommend other things to be checked before I fit the interior back in, thay would be great, as I am a newbee Land Rover owner.
Not the best pictures, but this is the Disco now.
Thank you.
 

Attachments

  • 20160604_143734.jpg
    20160604_143734.jpg
    260.8 KB · Views: 142
  • 20160604_143723.jpg
    20160604_143723.jpg
    252.5 KB · Views: 147
  • 20160605_134955.jpg
    20160605_134955.jpg
    139.6 KB · Views: 172
.
 

Attachments

  • 20160605_134955.jpg
    20160605_134955.jpg
    139.6 KB · Views: 157
  • 20160605_134936.jpg
    20160605_134936.jpg
    184.6 KB · Views: 132
  • 20160605_135021.jpg
    20160605_135021.jpg
    248.9 KB · Views: 146
  • 20160605_135024.jpg
    20160605_135024.jpg
    192.2 KB · Views: 137
  • 20160605_135057.jpg
    20160605_135057.jpg
    206.6 KB · Views: 121
.
 

Attachments

  • 20160605_135057.jpg
    20160605_135057.jpg
    206.6 KB · Views: 114
  • 20160605_135051.jpg
    20160605_135051.jpg
    216.8 KB · Views: 111
  • 20160605_135117.jpg
    20160605_135117.jpg
    224 KB · Views: 102
Not any specific hints on a D2, but if you stick the headlining back up use "high temperature adhesive" rather than evostick as it won't peel back off on a warm day
 
As I was saying, I started to strip out the interior.

First objective: remove headlining.

I started with removing sun visors, central roof light console, rear roof light and sun roof control.
I then removed the seat belt covers, a bit tricky to find out how, but I did eventually. See pictures for details if interested. I have removed the plastic side panels and the plastic trim panels left and right of dashboard.
I have loosened up the headlining and then I have pushed it forward, I have pused the front down, twist the whole thing at a 45 degree angle, and there it is: done.

I have managed to take the back carpet out. I will end up taking it all out, but because I need the disco tomorrow I decided to only remove the rear half of the carpet.

I have removed the back seat belts bolts, the plastic back panels, the ones with storage spaces. What I have found out is, that in order to remove the top plastic pins inside the storage container, it is better to remove the plastic lids first. It gives you better acces to pins, and a bit more leverage to pull them out.

I have disconnected the lighter and the head unit controls for the rear passangers. I have removed the carpet trim at the back and I pulled out the carpet. Soaked and heavy but not too bad actually.

There is water coming under the back carpet. I will just leave it like this for aome time. I would like to see it in a rainy day.

I have inspected the back of the headlining for signs of water. I have also inspected the sun roofs. I think they are all ok. Rain will tell probably.

This is it for today.

Next on my list: remove seats and front carpet and find leakage areas. Fix leaks, re upholster headlining, probably find an alternative to the existing sponge like carpet, and fit them back in.

As I only have a limited amount of time, I will probably be avle to work on it once or twice in weekends.

The disco will be.like this for a while, so if anybody wants any picturesor info from under the headlinig, carpet or side panels, I am happy to help.

Have a good weekend all!
 

Attachments

  • 20160611_094452.jpg
    20160611_094452.jpg
    204.5 KB · Views: 156
  • 20160611_131502.jpg
    20160611_131502.jpg
    143.9 KB · Views: 126
  • 20160611_131511.jpg
    20160611_131511.jpg
    189.3 KB · Views: 115
  • 20160611_131821.jpg
    20160611_131821.jpg
    169.7 KB · Views: 121
  • 20160611_131953.jpg
    20160611_131953.jpg
    168.2 KB · Views: 129
.
 

Attachments

  • 20160611_132447.jpg
    20160611_132447.jpg
    141.5 KB · Views: 134
  • 20160611_133529.jpg
    20160611_133529.jpg
    216.8 KB · Views: 120
  • 20160611_133535.jpg
    20160611_133535.jpg
    179.9 KB · Views: 116
  • 20160611_133540.jpg
    20160611_133540.jpg
    149.1 KB · Views: 87
  • 20160611_140759.jpg
    20160611_140759.jpg
    235.6 KB · Views: 112
  • 20160611_140947.jpg
    20160611_140947.jpg
    167.3 KB · Views: 96
.
 

Attachments

  • 20160611_140850.jpg
    20160611_140850.jpg
    230.5 KB · Views: 118
  • 20160611_141412.jpg
    20160611_141412.jpg
    124.5 KB · Views: 103
  • 20160611_141417.jpg
    20160611_141417.jpg
    166.5 KB · Views: 104
  • 20160611_141517.jpg
    20160611_141517.jpg
    203.6 KB · Views: 112
  • 20160611_141614.jpg
    20160611_141614.jpg
    227.7 KB · Views: 107
  • 20160611_142928.jpg
    20160611_142928.jpg
    173.9 KB · Views: 115
Couldn't help it! : )
 

Attachments

  • 20160611_165050.jpg
    20160611_165050.jpg
    249.7 KB · Views: 145
  • 20160611_171158.jpg
    20160611_171158.jpg
    247.4 KB · Views: 121
  • 20160611_171203.jpg
    20160611_171203.jpg
    329.5 KB · Views: 111
  • 20160611_182728.jpg
    20160611_182728.jpg
    237.3 KB · Views: 109
Yes Headtester. It is really easy. The carpet is only held in place by the bins and the carpet trim near and parallel to the rear bumper. And a bit of glue. Easy.

Just remove the trim, tilt the bins and the carpet should come off easily.

Enjoy! :)
 
Remove the rubber gasket located along the.middle of the.metal trim. Use a screwdriver to pull it out. Start at one end.
20160611_150616.jpg


Then remove the screws underneath and lift the.metal trim

20160611_150616.jpg
20160611_150616.jpg
20160611_150810.jpg
 
I have cleaned all the plastic parts with warm water and washing liquid, using a scotchbrite and a toothbrush.

I am planning to respray them as some of them are stained or scratched.

I have separated the plastic light casing so I can wash it. I have washed the switch button separately, trying not to get water around the two little springs I have lost a little spring in the process, the one that holds the ball in place :) I bet a rusty one would work better than a non existent one! But...:)

I have taken a photo of the lamp, and the size. It could come in handy for another newbie.
 

Attachments

  • 20160612_130633.jpg
    20160612_130633.jpg
    292.3 KB · Views: 131
  • 20160612_130610.jpg
    20160612_130610.jpg
    299.7 KB · Views: 85
  • 20160612_130830.jpg
    20160612_130830.jpg
    274.5 KB · Views: 138
  • 20160612_131415.jpg
    20160612_131415.jpg
    249.8 KB · Views: 98
  • 20160612_135645.jpg
    20160612_135645.jpg
    146.3 KB · Views: 104
  • 20160612_132800.jpg
    20160612_132800.jpg
    252.3 KB · Views: 94
  • 20160612_135403.jpg
    20160612_135403.jpg
    153.8 KB · Views: 98
Another day of removing stuff from my Disco. I have removed pretty much everything on the floor so I can trace the leak. Best guess so far, leaking gasket at windscreen, driver side.

I cleaned all the plastic parts, I started spraying some of them.

The headlining striped, steam washed , bleached, washed again. Hopefully I will get rid of all the spores.

Next on my list: re upholster headlining, respray all plastic parts including console, rear top and rear bin panels, clean leather seats. Also get rid of rust on the floor, respray affected areas, change a few rusty bolts an baggage anchors.

I am also thinking to remove the dashboard. Any advice will be appreciated.

As always, if anybody needs info or photos of certain elements, while the car is stripped, I more than happy to help.
 

Attachments

  • 20160618_201040.jpg
    20160618_201040.jpg
    192.8 KB · Views: 156
  • 20160618_160741.jpg
    20160618_160741.jpg
    272.1 KB · Views: 123
  • 20160618_160728.jpg
    20160618_160728.jpg
    211.8 KB · Views: 122
  • 20160618_103905.jpg
    20160618_103905.jpg
    181.9 KB · Views: 101
  • 20160618_160724.jpg
    20160618_160724.jpg
    172.1 KB · Views: 119
Back
Top