Defender 110 CSW full restoration

This site contains affiliate links for which LandyZone may be compensated if you make a purchase.
A few more photos along the way,

image.jpeg


After everything was removed, all that was left was a rolling chassis to push outside and remove the axles for refurb.

image.jpeg


Old shocks and turrets fitted to aid centralising the front axle. TerraFirma set up going on soon

image.jpeg


I had problems at this stage as the panhard rod would not fit at all ! With no weight on the project the springs at full stretch meant the geometry of everything was wrong. I had to hope that as she was built up that all would be well. This was exactly what happened later on.

image.jpeg


Rear axle was overhauled with new half shafts, bearings and seals. Then given a coat of paint before hubs were built up with new calipers and discs etc

image.jpeg


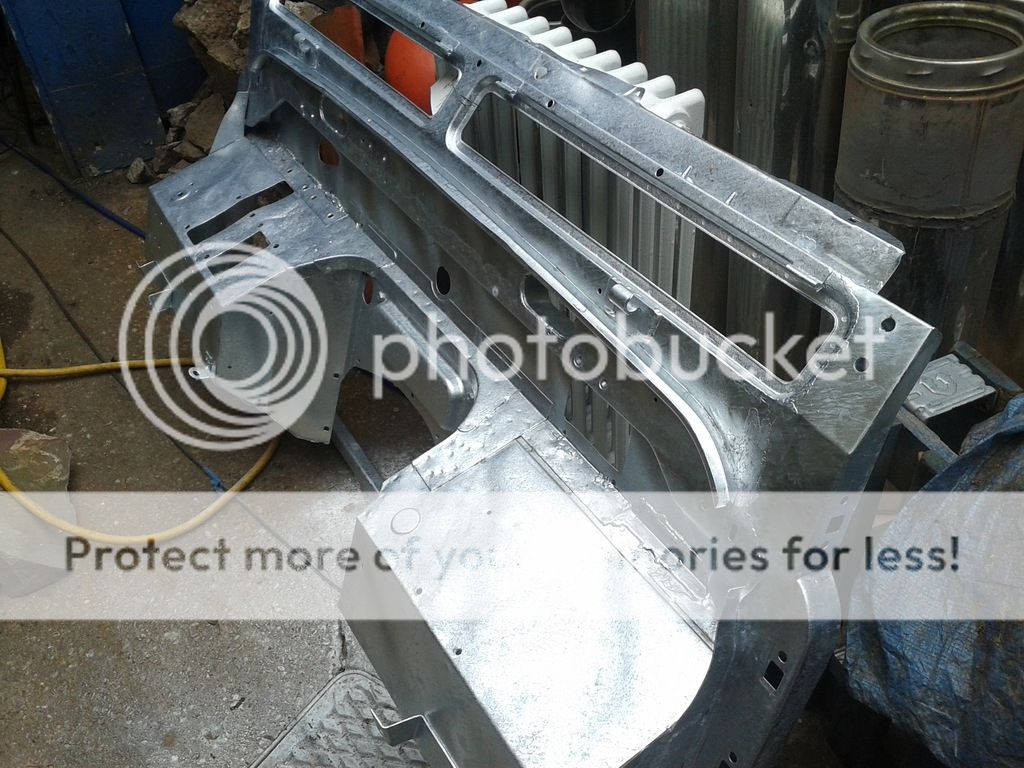
About this time the bulkhead I'd sourced had returned from galvanising and painting. Top tips here are, remove fly screens before galvanising, pack the wing vent hinge tubes with something easy to drill out before galvanising. I neglected to do this and ended up brazing a drill bit onto a long rod and then spent a whole day drilling out these tubes with a hand brace.
Lots of threaded holes to tap out and clear out and finally panel sealer before painting especially above the rain gutter (under bonnet).
Above all else though, fit the newly galvanised bulkhead to the chassis and check alignment ! These things do warp after galving and mine needed a bit of adjustment to get the outrigger bolts to fit smoothly, then once all else above has been seen to, send it for painting.


More to follow
Cheers
Chris
 
Oh yeah, I remember the hinge tubes now you mention it! I had a flexi shaft drive drill with a 1/4" chuck so found that bit quite easy tbh.
Most of my rivnuts spun cos I put bolts in the threads and they welded together!
Luckily I had a mate with a tool so just replaced them.
Don't put bolts or nuts on threads to protect them!
 
Just a quick comment -

If i ever have the rear floor out of mine, i will, without any doubt, buy the panel that the disco has in its boot floor, and cut a hole to match.

I dont like the madness of having to drop the tank to access it.


This is where im currently at with my 110 -

IMG_20160818_151901_zps05g8egsm.jpg


(i do have the rest of it also!)
 
Those tubes were a real pain for me Flossie ! They were filled solid with zinc ! My 18v hand drill couldn't get close enough so I made do with a hand brace and very long rod and bit.
As mine was a very rare new bulkhead it had no rivnuts fitted, which was easier to do afterwards. Any other threaded holes were left as is and retapped after the galving.
A lot of these bits like bulkhead, side frames, rear axle etc I'd found over the years and stored away in the shed hoping that I'd get around to this project at some point, I'd even bought the chassis a couple of years before I actually started the rebuild.
Good job I did too, as it allowed the cost to be spread over a long period.
 
Yep, i replaced the corners, and plated a bit in the footwells. And loads of small holes here and there.

Im a novice welder, so its not perfect, but it will do me. I had to get it hot-dipped twice, as i was not happy with the outcome the first time arround (i only paid once - the second time was not charged)
 
ps. you can see a bit of warping along the top edge, but, foolishly, i did not realise that the bulkhead was the earlier type with the narrow screen de-mister vents, whilst ill be fitting wide ones.

ive bent the warping back to shape alreddy, but ill need to trim a bit of the metal anyhow, for the larger vents.

im not perfectionist (some people wont touch a unit after its been dipped) - its not a high rust area, and ill do it before painting
 
While I tried my best not to touch any bits after galving unfortunately it's not practical, the outrigger tubes will need filing as they will have excess zinc in them and the bolts simply will not go through, same with the bonnet hinge scrolls. On those I did a bit of filing and then turned down the plastic hinge inserts the rest of the way.
Even the square plug holes will be too small after galving so need filing to fit the plastic screw plugs in, the bulkhead is covered in these.
We do our best I 'spose

After all, my thought process was, if it didn't rot there before, it won't now !? The areas I was most concerned about was top corners and footwells and luckily there's not too much to disturb there.

Cheers
Chris
 
I was quite anal with my bulkhead, it was in very good condition but I had doubts about the double skined footwells. I spent ages drilling out the spot welds to find extensive rust between the two but you couldn't see anything amiss from outside. I decided to cut the footwells completely out and fab new ones out of 3 mm plate all single skin to satisfy my anal worries.
I even plug welded the edges and tweaked the edge away between the plugs so galv would go down there, I then tapped them flat after galving and seam sealed them. can't find a pic of that bit only this one which shows nothing really except it looks red when it's really orange:rolleyes:
IMG_20160820_151717406.jpg
 
I've got a 2006 bulkhead complete sitting in the workshop which I have had since 2010. This will get stripped down, blasted, galvanised and then painted. Good to read the tips for dealing with the galv, mesh vents are simple to deal with but I hadn't worked out a method for the vent hinges yet.

What did you pack the hinge holes with to stop the galv Chris?

As my bulkhead is built up it will have rivnuts in place etc. - I am not sure whether it is best to drill them out and then replace after galvanising, or galv with them in and then drill/tap and risk them spinning. The former appeals for peace of mind but then you have to somehow get the back part of the rivnut out from the box section, and this wouldn't always be possible.
 
Hi Retro'
I didn't pack my hinge holes and they filled with galv, which is why they were a pain. Don't know what would work to be honest but after the fact I thought it would have to be something that could withstand the acid dip and then heat of the galving tank.
Thoughts anyone?
The rivnuts may spin as you try to retap them, like you say though removal could leave you with lumps rattling around in the bulkhead. There must be a way of taking them out, Flossie ?

Sorry I can't be more help

Chris
 
I honestly can't remember, sorry.
Although I 'think' I just wrenched them out with mole grips or something but mine had longish bolts stuck in them for leverage and I also 'think' that the replacement nuts were fatter so the slightly enlarged hole wasn't an issue.
I know riv nuts have different shapes on the external like round, square and octagonal and whatever my buddy came with is what we used.
I would fit bolts for the shot blasting though IF it was steel grit being used and remove them for the galv.
You could leave instructions with the galving guys to clear the flap pivots during the process, it's easy to do for them but I bet they'll forget:rolleyes:
 
Would certainly be easily blown through with an airline before the zinc set, but as you say likely to be forgotten. I know there's a substance they can apply to steel which stops the zinc adhering, for like stamped numbers and things, maybe that could work. Or I'll just drill them out as you guys have done, as much of a pain as it is it's doable.

For the rivnuts I think I'll remove them where I'll be able to get the back part out.
 
I've just remembered something else, not sure on the marsland etc chassis (mine was a brand new genuine one) but you'll need to fit rivnuts on the rear face of the front cross member to hold the power steering pipe clamps.
Unless the aftermarket guys fit them.
 
Mine was same Flossie, also the panhard rod bracket has two long bolts through chassis, these were different to my original ones, shorter, I think. Hard to come by so I sent a die down them then trimmed length, also, the holes in chassis for every plastic pipe clip were larger. And needed later td5 pipe clips, they worked perfect.
Another issue with Marslands replacement chassis was the need for a Td5 or later tow bar set up. My old 200tdi tow bar, which I'd had blasted and galvanised wouldn't fit at all ! Wish I'd checked
 
After the bulkhead returned the more rewarding part began, I tried to refurbish as much as possible but if any parts were beyond their best I had to replace.

image.jpeg

The original side frames were in a terrible state so I had managed to source some from a later Td5 vehicle, stored them away until this rebuild began. They're different from the frames on the tdi by way of bottom seal fitment. Otherwise a direct swap. Galvanised and then painted, they should last this time.

image.jpeg


Lots of body parts were returning from the paint shop, work could now begin on dressing these items and refit.

image.jpeg

Corner cappings were in good shape, so we're blasted and galved, the body cappings however were rotted in half, again I'd sourced a pair a while ago and the rear tub started taking shape.

image.jpeg

Wiring, fuel lines, tank and brake lines were all installed prior to rear tub fitting, the wiring was a bit of a nightmare but with some patience and much consulting of drawings, it was coming together.
 
Taking shape Chris, it's great when you start to add the freshly painted parts
Did you get some one to paint it or did you do it yourself ?

and just noticed a fellow Stokie
 
Back
Top