D2 body loom

This site contains affiliate links for which LandyZone may be compensated if you make a purchase.

Henry.adams

Active Member
Posts
111
Location
Kent uk
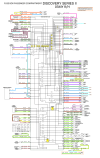
Coming towards the end of my d2 td5 challenge truck build and it’s come to the electrics now and I’m struggling big time. I have about a million questions but I guess my biggest one is can you simplify the body loom on a d2 removing stuff like electric Roofs ect. Or will the confuse the bcu ? I’ve change the factory front and rear lights and replace with after market ones that are not made for a d2 and just cannot get the drivers side indicators to work was wondering if I’ve confused the bcu but chopping bits out and moving earth points all onto one point.
All the wiring is a complete mess and I want to just cut out everything I don’t need but I don’t want to make things worse

Any help would be much appreciated know very little about 12v electronics.
 
Only reason really I want to keep the bcu is because of traction control. And it will be road registered so I need everything for mot too

If its only that side indicator I doubt the BCU is giving you issues. more likely the wiring changes. Have you gone LED?

I dont know the Disco well enough to say anymore sorry.

J
 
If its only that side indicator I doubt the BCU is giving you issues. more likely the wiring changes. Have you gone LED?

I dont know the Disco well enough to say anymore sorry.

J
Yeah leds . passenger side works half the time driver side never works. Headlights work fine just the indicators that don’t. If I can bypass the bcu and keep abs then I will definitely do that
 
Yeah leds . passenger side works half the time driver side never works. Headlights work fine just the indicators that don’t. If I can bypass the bcu and keep abs then I will definitely do that
You can't bypass the BCU, it's way too important, a D2 will simply not work without it... not as to pass a MOT anyway... did you fit resistors for the indicator LEDs? if not that's your problem, if you did means that you messed up something while botching the crcuits and i can't help in such cases only if a fault is on the original setup... unless you made clear diagrams of what you did
 
You can't bypass the BCU, it's way too important, a D2 will simply not work without it... not as to pass a MOT anyway... did you fit resistors for the indicator LEDs? if not that's your problem, if you did means that you messed up something while botching the crcuits and i can't help in such cases only if a fault is on the original setup... unless you made clear diagrams of what you did
 
what year is it as the harness changes from 2000 to 2003
 

Attachments

  • DISCOVERY II 03 SHOWING DIFFERENCES  TO 00MY MODEL.png
    DISCOVERY II 03 SHOWING DIFFERENCES TO 00MY MODEL.png
    522.6 KB · Views: 54
You can't bypass the BCU, it's way too important, a D2 will simply not work without it... not as to pass a MOT anyway... did you fit resistors for the indicator LEDs? if not that's your problem, if you did means that you messed up something while botching the crcuits and i can't help in such cases only if a fault is on the original setup... unless you made clear diagrams of what you did
I haven’t put a resistor or anything wasn’t aware I had to all the led headlights work. What type of resistor do I need ?

And basically all I have done so far to the loom is cut all the earths from the rear half of the car and re ran them into a bus bar.

I want to cut out all the unnecessary wires do you think it will be ok to do so I know the d2 is sensitive when I come to electronics

I also plan on cutting all the wires into the bcu and splicing them longer so I can relocate it . can you see any problems with doing this. I’m considered the the extra resistance could cause problems

Sorry for all the questions
 
I haven’t put a resistor or anything wasn’t aware I had to all the led headlights work. What type of resistor do I need ?
The D2's headlights have a simple feed through the switch no bulb failure warning while the indicators are through the BCU/IDM for the bulb failure warning as to flash faster if one indicator bulb failed cos it can be dangerous so when you put LEDs for indicators you have to use a resistor on each LED to emulate a bulb's load otherwise the system is mixed up , read this https://www.ozled.com.au/blog/our-blog/led-load-resistors/
I also plan on cutting all the wires into the bcu and splicing them longer so I can relocate it . can you see any problems with doing this. I’m considered the the extra resistance could cause problems
i have no ideea cos i didnt ever think of messing with the BCU's wiring but it's possible to generate some issues if there will be extra voltage drop on the power wires while there are data bus wires for digital signals too which definitely don't like any "intrusion". The Discovery Series II was simply not built as to accept radical electrical modifications IMO, maybe a LR Series II would have no issues with that :cool:
 
The D2's headlights have a simple feed through the switch no bulb failure warning while the indicators are through the BCU/IDM for the bulb failure warning as to flash faster if one indicator bulb failed cos it can be dangerous so when you put LEDs for indicators you have to use a resistor on each LED to emulate a bulb's load otherwise the system is mixed up , read this https://www.ozled.com.au/blog/our-blog/led-load-resistors/

i have no ideea cos i didnt ever think of messing with the BCU's wiring but it's possible to generate some issues if there will be extra voltage drop on the power wires while there are data bus wires for digital signals too which definitely don't like any "intrusion". The Discovery Series II was simply not built as to accept radical electrical modifications IMO, maybe a LR Series II would have no issues with that :cool:
Yeah I wish I had just put a td5 into a d1 would have been much easier lol . I’ve ordered the resistors and if I do re wire the bcu I will post the results in here.
 
try checking header connection on H289- 3 you may have disturbed it when chopping wiring
 

Attachments

  • HEADER C0289.png
    HEADER C0289.png
    1,020.3 KB · Views: 72
Back
Top