Bulletin Number - 0002
Issue - 2
Date - 06.02.2002
Model - Freelander
Affected Range - All KV6 and Td4 Automatic derivatives (i.e. JATCO Transmission)
Re-Issue Information - PROBLEM, CAUSE and ACTION text amended. Issue 2 of this bulletin has become necessary due to continuing reports of incorrect bolt removal.
Problem
INCORRECT IDENTIFICATION OF GEARBOX FLUID LEVEL PLUG
Cause
When checking the fluid level on the JATCO automatic transmission incorrect bolts are being removed / loosened, causing serious damage & malfunction.
Removal of the reduction gear brake band bolt can cause total loss of drive or a substantial reduction in the performance of the transmission.
Removal of the parking pawl rod plate retaining bolt (located next to the XYZ switch) will result in gear selection problems / gear lever movement restrictions.
Under NO CIRCUMSTANCES must these items be removed or loosened - doing so will invalidate any warranty claim made. In normal service, only the fluid level plug and fluid filler plug should be removed.
Action
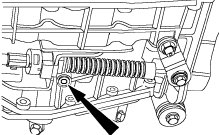
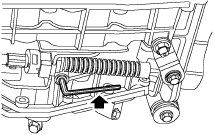
The level plug (arrowed) is fitted vertically into the underside of the gearbox casing, alongside the selector cable bracket and can be identified by its 5mm Allen socket head. The level plug closes the lower end of an internal level tube, therefore only excess fluid will be expelled when the plug is removed.
Observe due care when draining gearbox fluid as the fluid can be very hot.
An advance copy of a revised Workshop Manual check and top up procedure is attached to this bulletin. Please ensure that all workshop personnel are aware of this information, which will be added to the Workshop Manual at the next opportunity.
Parts Information
Not applicable, issued for information purposes only.
Warranty
Not applicable
Check and top-up fluid
Check
1. Position vehicle on ramp.
2. Apply handbrake and position chocks under front and rear wheels.
3. Remove underbelly panel.
4. Connect TestBook to monitor gearbox fluid temperature.
CAUTION: The gearbox fluid level must only be checked when the temperature of the fluid is between 35° and 45°. The reading obtained will be incorrect if the fluid is outside this temperature range.
5. Start engine, move selector lever from 'P' through all gear positions, pausing in each gear position for 2-3 seconds and return to 'P' position.
6. Clean area aroundlevel plug.
7. With the engine still running, remove level plug using a 5 mm Allen socket and allow any excess fluid to drain off.
WARNING: Observe due care when draining gearbox fluid as the fluid can be very hot.
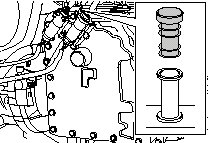
CAUTION: There are a number of similar fixings/plugs on the underside of the gearbox. It is imperative that the correct plug is removed prior to checking the level. Removing the wrong fixing/plug could result in internal damage to the gearbox.
Top-up
1. If no fluid loss is apparent when level plug is removed:
2. Remove filler plug and add fluid until it just runs from level plug aperture.
CAUTION: When topping up after a new air blast cooler (Td4 hot climates) has been fitted, an extra 420cc of fluid is required. The fluid must also reach a temperature of 80°C (176°F) to allow the switch on the cooler to open.
3. Move selector lever from 'P' through each gear position and return to 'P' , allowing any excess fluid to drain off.
4. Fit new level plug and tighten to 14 Nm (10 lbf.ft).
5. Clean and fit filler plug.
6. Disconnect TestBook.
7. Fit underbelly panel.