I got there in the end after lots of fiddling, I persuaded a very reluctant wife to hold the screwdriver keeping the intake high enough to access the bolt. This allowed me both hands to then position the ratchet with lots of extensions and UJ's to tighten it up.Those wing attachments are tricky a combination of extensions what ever can fit in there.
Sometimes it is helpful to walk away come back later with a new idea, let it cook overnight.
You are using an out of date browser. It may not display this or other websites correctly.
You should upgrade or use an alternative browser.
You should upgrade or use an alternative browser.
Burnt out - rebuild
- Thread starter dag019
- Start date
This site contains affiliate links for which LandyZone may be compensated if you make a purchase.
- Posts
- 5,080
Looking bvery good there @dag019 ....
Just a panel of butyl in each section will take the 'dwang' out of the roof.
If you use the Dodo fleece (or similar), it keeps the van cooler in summer and stops condensation in winter... https://www.dodomat.com/products/dodo-thermo-fleece-slimline
Just a panel of butyl in each section will take the 'dwang' out of the roof.
If you use the Dodo fleece (or similar), it keeps the van cooler in summer and stops condensation in winter... https://www.dodomat.com/products/dodo-thermo-fleece-slimline
Not much visual progress on the rebuild but I have been making progress on some of the little things and the endless amount of wiring that is required.
I have
I have
- made up a conversion loom so my TD fuel sender will connect to the 300tdi rear loom.
- connected up the x-fan thermostatic switch.
- done some more little bits of wiring on the dash center console so that is nearly ready to be fitted
- changed all of the fluids in the diffs, gearboxes.
- connected up the heater intake and the feed for the boost gauge
- finally finished connecting up the rest of the engine loom which has brought about an issue
Managed to find the source of my starting issues. It was a loose relay on the starter relay. Despite clicking as I mentioned it was not actually connecting to send power to the starter solenoid. So now I have some big progress and it will start on the key!


I have fitted the raptor center dash and as soon as I have finished increasing the mileage on the binnacle (5k more to go) I will be able to fit that and the dash will be done.

I have done a whole host of little jobs as well, I have finally finished connecting up the back end and have tested it so I have all rear lights working, and a rear wiper. This allowed me to fit the door card and light boxes and I can now say the rear of the vehicle is finished.
I have fitted the raptor center dash and as soon as I have finished increasing the mileage on the binnacle (5k more to go) I will be able to fit that and the dash will be done.
I have done a whole host of little jobs as well, I have finally finished connecting up the back end and have tested it so I have all rear lights working, and a rear wiper. This allowed me to fit the door card and light boxes and I can now say the rear of the vehicle is finished.
Although a productive weekend there have been some more setbacks as I did not have all the parts needed. I have completed sound proofing the roof and was ready to fit the roof lining. However I was not aware that the interior light has an additional loom! my replacement roof lining came with the interior light I came to fit them up and noticed that the socket was different. After a little research realized I needed part number AMR3158 So I have now ordered one of these and hopefully it will arrive sometime this week allowing me to fit the roof lining and basically be finished with the interior at which point I can refit the doors.

My to do list is getting smaller and a lot of it now is little finishing off job e.g. wiring in winch solenoid, securing the wiring loom across the engine bay. The only "major" job I have left to do is to work out how to refit my eclectic fans (twin fan setup form a Mondeo) I had previously mounted it on some aluminum tabs which have now melted away in the fire but I was never really happy with them. Although they did the job and happily went across the desert in morocco and did countless thousands of miles towing a trailers they were a little rough and ready. This time I will spend a little more time trying to make it a tidy job and hopefully make things a little more secure at the same time.
My to do list is getting smaller and a lot of it now is little finishing off job e.g. wiring in winch solenoid, securing the wiring loom across the engine bay. The only "major" job I have left to do is to work out how to refit my eclectic fans (twin fan setup form a Mondeo) I had previously mounted it on some aluminum tabs which have now melted away in the fire but I was never really happy with them. Although they did the job and happily went across the desert in morocco and did countless thousands of miles towing a trailers they were a little rough and ready. This time I will spend a little more time trying to make it a tidy job and hopefully make things a little more secure at the same time.
Some more progress today and some more drawbacks of course.
I have managed to wire in the winch controls to the dash switch and the wander lead socket under the bonnet. This all works as it should but I am going to complain about the poor design form superwinch on the husky which is otherwise flawless as far as I am concerned. In order to get the cover off to access the solenoid you need to remove the winch form the bumper which is most annoying!

I also finished painting and assembled the doors which are now just awaiting locks fitting. This signifies the last of my painting and bodywork which I am happy about. If only I could say the same about the electrics! For the rear door there was a foam gasket that sits between the lock and the door frame to offer some waterproofing. I never had these on the front doors is there something similar for them that I should be fitting?

I have managed to wire in the winch controls to the dash switch and the wander lead socket under the bonnet. This all works as it should but I am going to complain about the poor design form superwinch on the husky which is otherwise flawless as far as I am concerned. In order to get the cover off to access the solenoid you need to remove the winch form the bumper which is most annoying!
I also finished painting and assembled the doors which are now just awaiting locks fitting. This signifies the last of my painting and bodywork which I am happy about. If only I could say the same about the electrics! For the rear door there was a foam gasket that sits between the lock and the door frame to offer some waterproofing. I never had these on the front doors is there something similar for them that I should be fitting?
On doing some more testing of the electrics I also appear to have a front wiper fault (thread link). First fault is they will not park and just stop whenever the switch is turned off and secondly they do not have the intermittent function. I do not know if these two are linked and have yet to play around with a multimeter but I am assuming it is a safe bet to start with the park switch as this is a complete unknown that came with the donor motor?
I am planning on pulling a wiring diagram to check but assume there should be a permeant live to the motor somewhere to allow the park function to work. and similarly at the same time I can test for each of the three speeds (intermittent, normal, fast) at the motor as well?
Is there anything else I should be checking or some easy fault finding test i can do to diagnose rather than just guess and fit new parts?
- Posts
- 5,080
The locks are the same aren't they ?
I'd fit a gasket ....
Let me know on the wiper motor as I seem to have lost slow speed and want to check if it's the stalk or the wiring or the motor itself (I presume there is a resistor somewhere ?).
I'd fit a gasket ....
Let me know on the wiper motor as I seem to have lost slow speed and want to check if it's the stalk or the wiring or the motor itself (I presume there is a resistor somewhere ?).
That was my assumption as well. A job for the weekend after I have studied the wiring diagram. And then a lot of time checking wiring with the multimeter I think is in order.The locks are the same aren't they ?
I'd fit a gasket ....
Let me know on the wiper motor as I seem to have lost slow speed and want to check if it's the stalk or the wiring or the motor itself (I presume there is a resistor somewhere ?).
I have done some playing with the multimeter today at the motor end. I have permeant power so I am assuming that my lack of park is due to a faulty switch so will order a new one of those. The park swicth came with the motor fomr my donor bulkhead so is unknown. I assume thy are not all equal so if anyone has recommendations of a good brand it would be appreciated.The locks are the same aren't they ?
I'd fit a gasket ....
Let me know on the wiper motor as I seem to have lost slow speed and want to check if it's the stalk or the wiring or the motor itself (I presume there is a resistor somewhere ?).
Also on a quick search this looks to be correct but can someone confirm this is the correct way to wire the park switch to the motor?
My findings at the motor end are:
green - ignition 12V
green/red - medium speed 12V (switch on click upward)
blue - fast speed 12V (switch 2 click upwards)
brown - nothing (I assume this should be slow speed/one click down)
Tomorrow I will check the switch end to ensure I have output power. I am hoping that I don't as that would mean the switch is at fault and can be replaced. The switch came from my donor dashboard so is unknown whereas the loom is brand new form autosparks so I am hoping the issue is either switch or motor not the wiring/resistors/relays in between!
I might not have working wipers but I fitted the new roof lights today.

I went for the Hella Black Magic LED Mini Light Bar in the end and found the cheapest place to buy them was from Opie oils on ebay. I am impressed by the quality but that is to be expected form hella and having wired them up and fitted them they are definitely a long range spot light as the beam pattern on the door a few meters in form of the land rover is very focused. I will try and get a picture next time I am there but there is very little spread which is what I am looking for as the lights that will go on the bullbar are flood lights for short distance lighting.
I went for the Hella Black Magic LED Mini Light Bar in the end and found the cheapest place to buy them was from Opie oils on ebay. I am impressed by the quality but that is to be expected form hella and having wired them up and fitted them they are definitely a long range spot light as the beam pattern on the door a few meters in form of the land rover is very focused. I will try and get a picture next time I am there but there is very little spread which is what I am looking for as the lights that will go on the bullbar are flood lights for short distance lighting.
I have done some playing with the multimeter today at the motor end. I have permeant power so I am assuming that my lack of park is due to a faulty switch so will order a new one of those. The park swicth came with the motor fomr my donor bulkhead so is unknown. I assume thy are not all equal so if anyone has recommendations of a good brand it would be appreciated.
Also on a quick search this looks to be correct but can someone confirm this is the correct way to wire the park switch to the motor?
View attachment 284994
My findings at the motor end are:
green - ignition 12V
green/red - medium speed 12V (switch on click upward)
blue - fast speed 12V (switch 2 click upwards)
brown - nothing (I assume this should be slow speed/one click down)
Tomorrow I will check the switch end to ensure I have output power. I am hoping that I don't as that would mean the switch is at fault and can be replaced. The switch came from my donor dashboard so is unknown whereas the loom is brand new form autosparks so I am hoping the issue is either switch or motor not the wiring/resistors/relays in between!
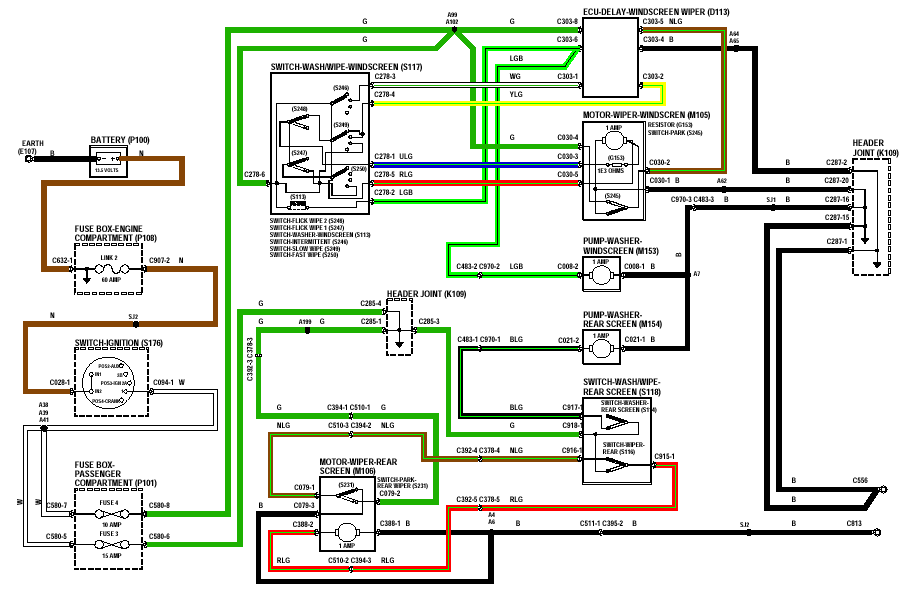
I cannot make sense of this wiring diagram. I am trying to work out what colours form the switch should be showing 12v in each switch positions. But I cannot work out the switch numbers in the diagram relative to the actual position of the stalk.
I have done some testing with the multimeter and I have the following at the switch:
Green - Ignition 12v
green black - 12v when the washer switch is pressed (the washers work)
green red - 12v when the stalk is one position up (the wiper work with no park)
green blue - 12v when the stalk is two positions up (the wiper work with no park)
green white - 12v when the stalk is one position down (no wipers)
green yellow - does not register 12v in any position
From this I am guessing the switch is at fault as if I understand the diagram above the green yellow should have 12v in more than 1 of the stalk positions?
Can anyone give me what wires should be live in each stalk position?
Also I assume I need more than just the 12v form the green white to get the relay to work for the intermittent (one positions down) wipers to work otherwise I would have working wipers in the slow speed as well I would just not have park?
Despite orderint the bulkhead harness cover AMR4741 I cannot for the life of me get it to fit.


I assume the loom is supposed to sort of fold up into id and secure along the bottom of the bulkhead overhang. There appears to me slightly too long a main loom where it passes through the bulkhead and does not readily fold up due to the thickness of the wire, but then at the same time there appears to be not quite enough length as when I do fold it up it then doe snot reach high enough for the the branches to reach the overhang.

The result is that with a lot of effort I can get the cover to site flat against the bulkhead but it is probably about 20mm too low and the holes do not line up. Also with the amount of force required to hold it flat against the bullhead I do not believe the plastic rivets would actually hold it in place. How important is this cover? I am looking at alternatives to secure the loom in this position and think some nylon p-clips riveted in place (with ali pop rivets not the plastic rivets) should secure the harness. Is there any reason this would not work, does anyone else have any solutions or experience or as the plastic cover look prime for breaking do most people just not have one and the loom is exposed and unsecured at this point?
I assume the loom is supposed to sort of fold up into id and secure along the bottom of the bulkhead overhang. There appears to me slightly too long a main loom where it passes through the bulkhead and does not readily fold up due to the thickness of the wire, but then at the same time there appears to be not quite enough length as when I do fold it up it then doe snot reach high enough for the the branches to reach the overhang.
The result is that with a lot of effort I can get the cover to site flat against the bulkhead but it is probably about 20mm too low and the holes do not line up. Also with the amount of force required to hold it flat against the bullhead I do not believe the plastic rivets would actually hold it in place. How important is this cover? I am looking at alternatives to secure the loom in this position and think some nylon p-clips riveted in place (with ali pop rivets not the plastic rivets) should secure the harness. Is there any reason this would not work, does anyone else have any solutions or experience or as the plastic cover look prime for breaking do most people just not have one and the loom is exposed and unsecured at this point?
mystery
Well-Known Member
- Posts
- 1,625
- Location
- BULKINGTON
tottot
Well-Known Member
- Posts
- 8,654
- Location
- west wales coast
It could be your replacement loom is stiffer [bit fatter]] than the original. I recon some P clips, stainless with plastic bed would do a good tidy job. My 1990 model still has the plastic bit but it has never been disturbed. As you say don't recon the plastic bracket has much chance in your case. Some times originality has to go.
mystery
Well-Known Member
- Posts
- 1,625
- Location
- BULKINGTON
as the cover is plastic it could easily be drilled to suit original holes and ether rivet nuts or just steel pin's and nut's and a metal strap over holes to strengthen plastic

Many thanks. That is just what I was looking for. As I am not getting anything from the green yellow which your diagram has as an input I assume the relay is at fault and is not giving an output back to the switch.
mystery
Well-Known Member
- Posts
- 1,625
- Location
- BULKINGTON
Haven't as yet any internal diagram of relay (delay ECU)

Parts arrived today for the wiper system so that is a job for tomorrow to try and get them going. I will start with the relay as that looks to be the issue from the diagrams provided and other experience. In the mean time I tried to get the roof lining fitted today and ran into a couple of issues. In true land rover style the "new" roof lining does not line up with the old holes in the roof for the Christmas trees so I will have to drill some new ones, this is not an issue other than I did not have my drill with me today! I did manage to get the front section fitted but it was the rear edge to connect to the middle section that did not line up.

However I also ran into a problem that the glue I used to re-stick the rear section reacted with the material. I was using impact adhesive which I have used before with the same technique with no issue but this time it appears to have "stretched" the fabric while curing. When first applied everything was smooth and weighted down so it would not move but it now appears to have reacted with the glue and relaxed the fabric despite the edges not moving and still being in the same position they were stretched to. Any suggestions for a remedy short of removing and starting again with a new piece of material? it is not that bad and I will just live with it if that is the case.

However I also ran into a problem that the glue I used to re-stick the rear section reacted with the material. I was using impact adhesive which I have used before with the same technique with no issue but this time it appears to have "stretched" the fabric while curing. When first applied everything was smooth and weighted down so it would not move but it now appears to have reacted with the glue and relaxed the fabric despite the edges not moving and still being in the same position they were stretched to. Any suggestions for a remedy short of removing and starting again with a new piece of material? it is not that bad and I will just live with it if that is the case.
- Posts
- 5,080
Sorry to see that .... i hate these weird reactions .... personaly i'd start again, it would annoy me every time I got in.
Similar threads
- Replies
- 7
- Views
- 676