- Posts
- 48,737
- Location
- East Dorset
God I remember them!Don't Halford's do some sort of "emergency fan belt" to fit any length?
Nasty orange looking things I seem to remember!
Takes me back!
(Never had one, always carry a spare!)
")
God I remember them!Don't Halford's do some sort of "emergency fan belt" to fit any length?
Oh dear, they are rubbish aren't they? AND they had to have a fairing. Remind me of the ones on my Marlin Roadster.I did tell the owner they don’t look correct. I thought they looked like of a trailer board
View attachment 267751
I do at least put it in a vice!!!That's a considerably more sensible bit of starter motor testing than I usually do. I tend to hold them against something solid like a doorstep with my foot and then apply the wires. I wouldn't advise anyone to copy me at home though.


Other than lots and lots of brake cleaner any suggestions on how to best clean it up for either to stick properly?Bugger .... yes you should be able to solder/braize that gap ...
Well I jinxed myself by getting ahead of things and beginning to talk about oil pressure switch's and getting ready for starting. I had a set of oil cooler pipes ordered and though it wuold be a nice easy job for this evening to fit them but not the case. The new engine is has the metric o-ring style fittings and everything I have is the old imperials conical style fittings. Thread started here (link) specifically about the oil cooler pipes and which adapters for the radiator I need to move to the later style metric o-ring oil cooler pipes.Yes the oil pressure is on the earth. make sure it goes out as you want oil round the turbo before starting


 .
.That would be very much appreciated. If you could post a photo that would be great.Think I have 1 part of oil cooler pipe if needed. I could drop it off as need a run out on the bike
Unsure which end but will post photo if needed
Many thanks for the photographs, the first one looks very similar to the pipe that I already have. I think what I really need is the radiator adapter to be able to take the o-ring style pipes. I just need to work out if ESR1262 which is the part the I need and is no longer available is the same as NTC3858 which all suppliers are claiming supersedes it (link). This thread on another forum (link) seems to suggest they are not the same and at £30 each I don't want to risk it without being sure.First pipe
View attachment 273530
Has the following ends
View attachment 273531
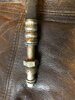
another pipe found… now old racer spares looks like this is the other pipe Does have adapter and may fit. They were zip tied together & never used(once fractured a pipe & always carried spares after) adapter goes into the oil filter plate
View attachment 273533
Welcome To LandyZone, the Land Rover Forums!
Here at LandyZone we have plenty of very knowledgable members so if you have any questions about your Land Rover or just want to connect with other Landy owners, you're in the right place.
Registering is free and easy just click here, we hope to see you on the forums soon!