Bhudda's 200Tdi Chassis Swap

This site contains affiliate links for which LandyZone may be compensated if you make a purchase.
Not updated this for awhile as progress has been really slow this is first weekend I've been able to get up to workshop since chassis was painted. Here's some pics off today's progress.
IMG_8322.JPG
IMG_8323.JPG
IMG_8324.JPG
IMG_8326.JPG
IMG_8329.JPG
IMG_8330.JPG
Had hoped to get more done but the apprentice(my dad) was hanging out his arse he'd been out drinking till 3am(63years old as well) :eek: Gave him it tight all day I'm usually the one with hangover on a Saturday so got my revenge today :D
 
Need to get the A-Frame bushes burned out and the frame arms cleaned painted but forgot to get gas for the blowtorch so that'll be next weekend now as I'm away to Morecambe next week for work.
What size are the bolts that hold the rear trailing arm bush to chassis? Got some from YRM but they are a tight fit. Had a few issues with the Stainless bolts I'm using galling up one the Radius arm bolts did this :( typical stainless steel
 
Not a lot of progress since last post. I got the A-frame bushes out cleaned and painted. It's now fitted with new bushes and ball joint sadly no pics I'll try take some tomorrow if it fitted. I now have a rolling chassis :D I now need to get VLAD my Defender into the workshop only problem is the doors weren't wide enough:eek: So that was today's job helping my auld faither and younger brother widen the doors.
IMG_8350.JPG
IMG_8351.JPG
3CF15857-5D24-45F2-88DA-5C4D62E4A3B5.jpg
IMG_8353.JPG
018C65EF-6637-4B03-8B1F-36BD7B0B8E1F.jpg
0860BB50-68D8-4D8E-8CD6-C5CF60B2192B.jpg
IMG_8350.JPG
IMG_8351.JPG
3CF15857-5D24-45F2-88DA-5C4D62E4A3B5.jpg
IMG_8353.JPG
018C65EF-6637-4B03-8B1F-36BD7B0B8E1F.jpg
0860BB50-68D8-4D8E-8CD6-C5CF60B2192B.jpg
Doors fitted bonus roof never caved in lol And now VLAD fits with plenty room to start stripping and fitting components to new chassis
IMG_8357.JPG
IMG_8358.JPG
IMG_8359.JPG
IMG_8361.JPG
IMG_8360.JPG
IMG_8362.JPG
 
Hopefully this weekend there will be a bit more progress I.e starting to strip VLAD! Not doing anything to Engine except for clean up and fix a couple minor leaks and give it a paint. Timing belt was done 18months ago everything else seems spot on. I'm thinking I may upgrade the turbo to VNT and get full size intercooler along with boost pin and ring.

I've also decided to find a cheap Discovery Auto to fill the gap whilst I do the work(for green road runs with club) has to be an auto as once VLAD is back on road I'll be giving it to my daughter
 
I recently bought an SGS 3 ton trolley jack .. feckin' awesome bit of kit, well over-engineered. If their compressors and other stuff are made the same then I'd thoroughly recommend them as suppliers. Very quick delivery too ... and so cheap, especially compared to Halfords, machine Mart et al!!!

Trolley Jack
i bought one of them sgs black 3 ton trolley jacks absolutly awsone no more lifting gearboxes in on my bloody chest :))
 
A bit of actual progress today after the doors getting widened on the workshop last weekend. I got VLAD in today and started the strip down.
IMG_8371.JPG
IMG_8372.JPG
IMG_8373.JPG
IMG_8374.JPG
IMG_8375.JPG
IMG_8376.JPG
IMG_8377.JPG
IMG_8379.JPG
IMG_8383.JPG
IMG_8384.JPG
IMG_8385.JPG
IMG_8387.JPG
Hopefully tomorrow I'll get Bulkhead off,Engine and gearboxes out and make a start addressing the oil leaks on transfer box and the leak around the engine sump and ladder frame.
 
I do like having a Friday off means I can get some more work done. :) 
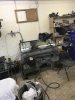
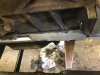
Managed to get the bulkhead and rear tub off aswell as a few other bits like steering box, drag link, exhaust and prop shafts no not a bad days work.
IMG_8436.JPG
IMG_8441.JPG
IMG_8435.JPG
IMG_8437.JPG
IMG_8438.JPG
Tomorrow I'll get the fluids drained out Engine, Gearbox and transfer box then remove the gearbox and transfer box. I've got some work to do on engine address a few leaks so going to leave that in place but surporrted for now.
 

Attachments

  • IMG_8436.JPG
    IMG_8436.JPG
    291.6 KB · Views: 129
not alot wrong with that chassis mind looks quite good ,ive seen worse lol
It looks not bad on outside but it's rotting from inside out especially at the front i dare say could have kept patching it for few more years. Might use chassis to build a ccv trailer next.
 
Well yesterday I removed the transfer box and gearbox. I split them to make it easier to fix a couple leaks unfortunately I seem to have some wear on the gearbox out put shaft :( 
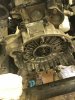
I took some pictures hopefully someone can tell me if it's gubbed.
IMG_8452.JPG
IMG_8453.JPG
IMG_8455.JPG
IMG_8456.JPG

IMG_8452.JPG
IMG_8453.JPG
IMG_8455.JPG
IMG_8456.JPG

Not sure if it really shows in the pics.
Anyway to day I dropped the sump and ladder frame gave them a clean up and refitted also changed the rear crank oil seal. Then mostly spent day cleaning bits I've taken off and getting them ready to fit to new chassis
IMG_8443.JPG
IMG_8444.JPG
IMG_8446.JPG
The old seal was a bugger to get out then I scratched around trying find something that I could use to knock seal in.
IMG_8448.JPG
My dad cut this out of bit MDF and it done the trick.
IMG_8447.JPG
IMG_8450.JPG
All fitted
 

Attachments

  • IMG_8449.JPG
    IMG_8449.JPG
    261.5 KB · Views: 125
  • IMG_8450.JPG
    IMG_8450.JPG
    314.2 KB · Views: 130
I put my new rear crank oil seal in once the flywheel housing was back on.

EDIT
No I didn't, just checked the pictures.:rolleyes:
 
Isn't the 300Tdi a different seal set up thought that bolted on? I wouldn't even attempt fitting seal with housing in place to easy to knacker it up.
That's right mate. I forgot yours is a 200Tdi. :oops:
Do those seals also come with a plastic 'sleeve' to help get the seal over the lip of the flange?
 
Back
Top