Bennehboy
Well-Known Member
- Posts
- 2,260
- Location
- Huddersfield
Balls, too late to post this tip, but if you run a 1mm slitting disk up the length of an old head bolt, it works as a perfect thread chaser.....
Can you please make a video of the first start and running
Thanks for that, yes I've used that one in the desperate past, but quite honestly the threads were very free, I ran an old bolt down to the bottom of the threads virtualy with my finger and thumb, I put just a little molyslip thread paste on it just to be sure the block threads were not dry.Balls, too late to post this tip, but if you run a 1mm slitting disk up the length of an old head bolt, it works as a perfect thread chaser.....
Mine were from LR direct.AMC head bolts are also very nice.

Today I continued to try and connect everything up, just plodding along trying to make it a bit neater under the bonnet.
I need a bit of help though.
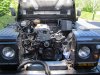
I put in the new loom and all seems quite OK but the starter has two heavy cables which look as if they connect to it, but there is only one terminal, I coupled them up and took a picture.
Just wondered if any defender TD5 person may help me out here, does your starter motor connect like this?
Photo is taken under the vehicle.
View attachment 190158
Also re your post about hearing the centrifugal filter spinning down, I've noticed if I go to the local autoparts shop and buy their fram filters, I have great difficulty in hearing the spinning down, if I buy a mahle one from the local Landy garage it's really very audible, and I think its certainly worth spending a few extra pennies on high quality filters than not... I only use coopers, mahle or Mann now on mine, peace of mind!
Great build thread BTW, easy reading in bed with a cuppa!
It's best to check with those cables. Nasty consequences if they're in the wrong placeThank so much for that, it's so embarrassing to suddenly think hang on was there one or two cables on here. it's nice to take your time and plod along if you have the chance but the memory isn't as sharp these days, with your picture I'm confident to go on.
Re the filter sounds like good advice I think the one removed was a mahle but I may try a LR one, in reality they should be good for two or three oil changes but I've been changing at 12 months.
Been a lot of hard work but if it runs a bit better then it's all been worth it.
BTW
Try a bosch FPR like the one on here seems much better and it has a pipe on it so that you can divert any spillage resulting from a failure.
Will try to find the source.
Found it:
https://rover.ebay.com/rover/0/0/0?mpre=https://www.ebay.co.uk/ulk/itm/332308717053
That's what was worrying me, a cable that size direct on the battery would cause the battery to explode if it was shorted.It's best to check with those cables. Nasty consequences if they're in the wrong place
Nothing wrong with a little bit of self doubt. Measure twice, cut once sort of thing. Far better than being blasé and seriously melting stuff.That's what was worrying me, a cable that size direct on the battery would cause the battery to explode if it was shorted.
In reality there is only the starter and the alternator, which have such heavy cables in that area, but a bit of self doubt was creeping in.
Funny thing no matter how many digital pictures you take, you never seem to have the one you need.
You can't take too many.Nothing wrong with a little bit of self doubt. Measure twice, cut once sort of thing. Far better than being blasé and seriously melting stuff.
When I did my rebuild I took so many pictures it was unreal. I still had a frustrating number of times when I had several pictures of an area, but they didn't quite show what I needed to see
Yes, I had a lot of masking tape labels. Should have used pen rather than pencil thoughAnd have a Cheat Sheet ...
Bits of masking tape labels ...
All of it ...
Yes, I had a lot of masking tape labels. Should have used pen rather than pencil though
I'm not allowed anything sharp.The Rise of the Sharpie ...
Welcome To LandyZone, the Land Rover Forums!
Here at LandyZone we have plenty of very knowledgable members so if you have any questions about your Land Rover or just want to connect with other Landy owners, you're in the right place.
Registering is free and easy just click here, we hope to see you on the forums soon!