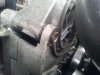
Cracked it (literally). I used a pry bar and some carpet tile to protect the alternator bracket on the easy side and it grudgingly moved (not bothered about damaging the alternator, I have a brand new one). Shoved the pry bar down underneath to stop the alternator pivoting on the bolt at the bottom then used another pry bar from the opposite side (carpet tile to protect what I assume is a water or oil pump) and out it popped.
This is where it all went horribly wrong. I decided I wanted to free up the seized bushes so I put the bolts back to force them through (I was going to thread some tube on) it worked on the top one but the bottom one was seized so hard it cracked the casting for the alternator bracket without budging.
That has stopped play.

I can imagine you all wearily shaking your heads at this point
Just to take something positive away from this, other than ignore the seized bushes, what should I have done?
I have lots of photos... is this worth a how (not) to?