6-Wheel Drive Discovery II - Am I totally mad ?

This site contains affiliate links for which LandyZone may be compensated if you make a purchase.

dave658

Well-Known Member
Posts
118
Location
Yateley, Hampshire
I vividly remember the handful of 6-wheel range rovers that used to float about in the early 80s, I was too young to drive at the time, but remember thinking how awesome they looked and how that’s what I would love to drive one day.

Fast forward a few decades, and just as my mid-life-crisis kicked in, I started to see Discovery vehicles based on these early chasses, notably from Trevor Alder and Adrian Goldie, and recalled with envy those heady far off days in the 80s.

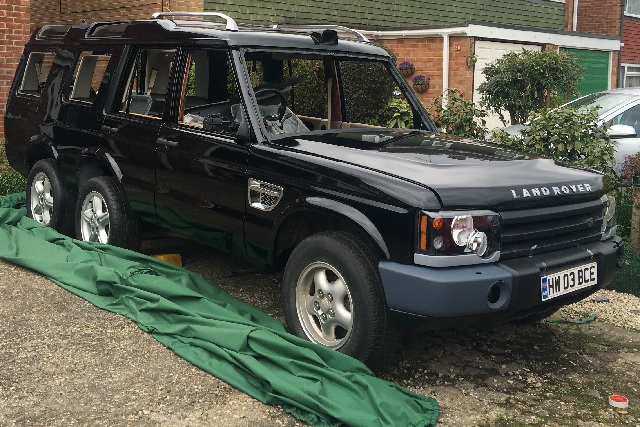
Having a bit more spare time and cash than I did in my youth, I took the plunge to create my own 6 wheel masterpiece, but being an engineer, I didn’t want to take the easy route with the relatively basic Discovery I, but rather I wanted a Discovery II with 6-wheel ABS, 6-wheel self-levelling air suspension, 6-wheel ACE and of course, 6-wheel drive, if I was going to do this, I was going to do it probably damn it !

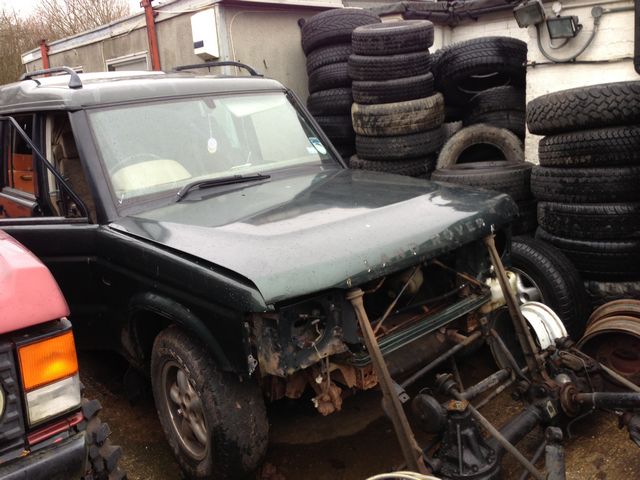
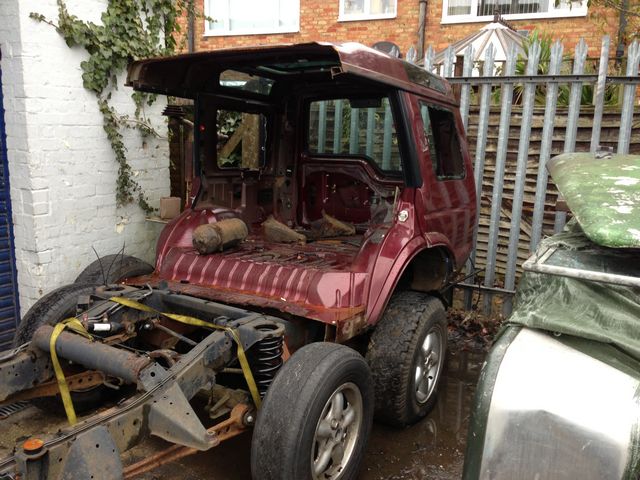
I invested in a 2003 rolling chassis and bought an additional rear half chassis from a vehicle that had suffered a frontal impact but was pristine at the back.

After speaking at length to the above mentioned Trevor and Adrian, and after taking careful measurements and taking into account the differences between disco 1 & 2, the magic figure of 41” as the distance between the 2nd and 3rd axles was arrived at and it was time to break out the MIG welder.

Actually, to be fair, although I can weld reasonably well, this was one of two welding jobs that I farmed out to professionals, in this case, as it is the structural integrity of the vehicle, I wanted to make sure that the 3rd axle didn’t drop off on the first speedbump due to my amateurish welding, so I enlisted the assistance of Safari Engineering, near me, who accepted the madness of the project and joined the two chasses

DSCN0173_TN.jpg


DSCN0165_TN.jpg


DSCN0174_TN.jpg


DSCN0160_TN.jpg


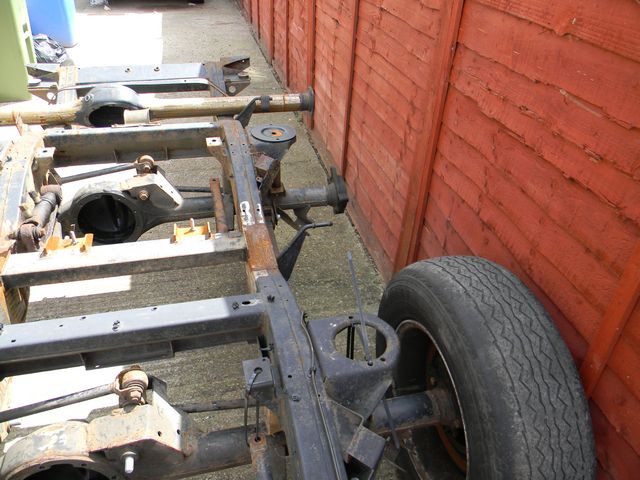
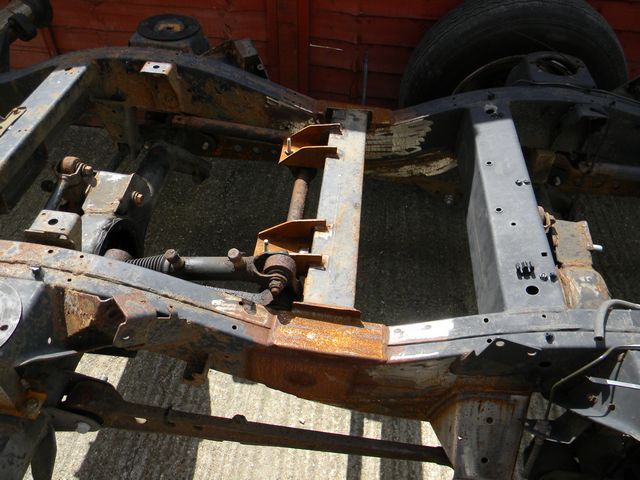
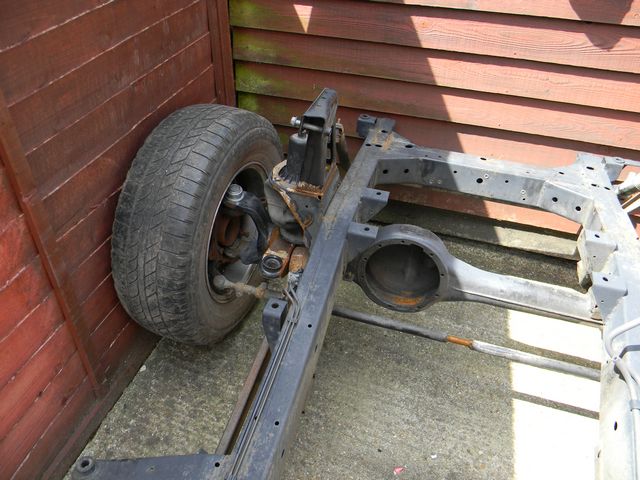
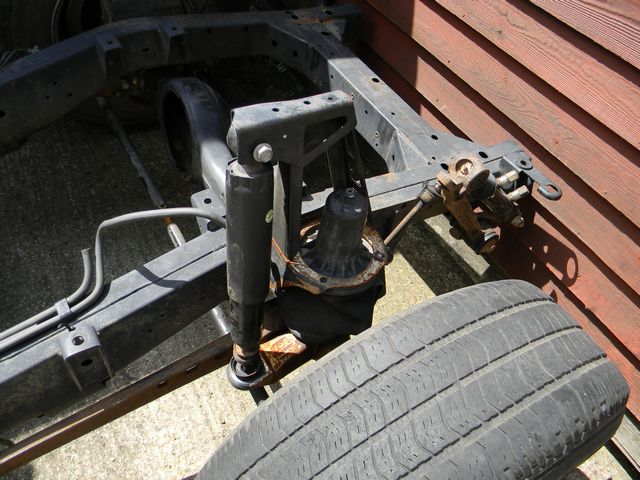
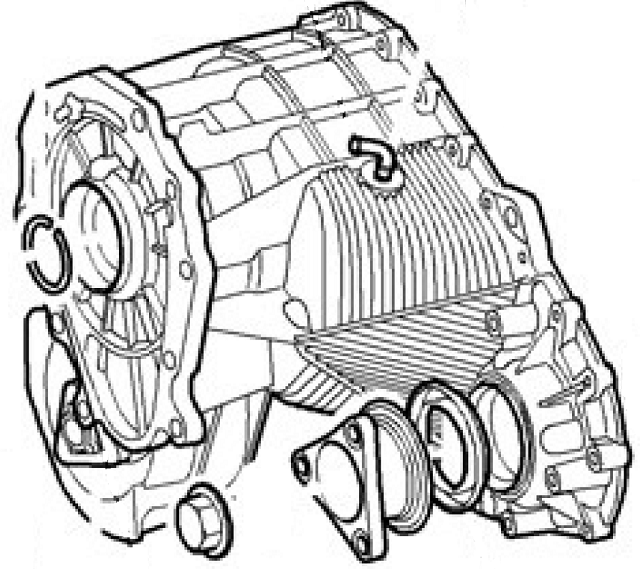
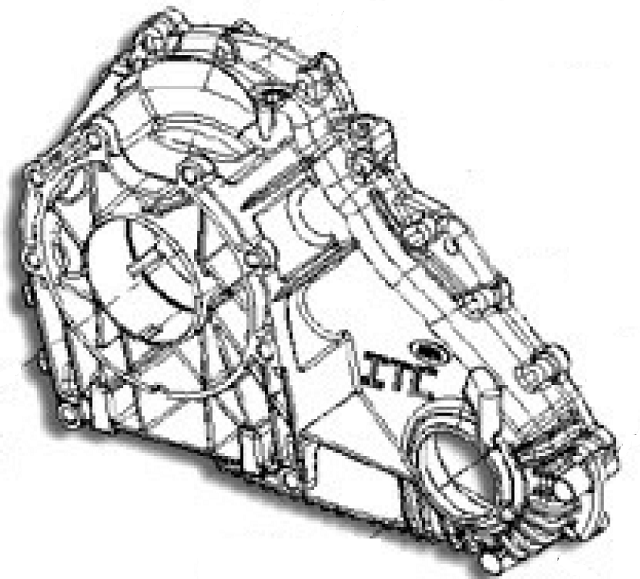
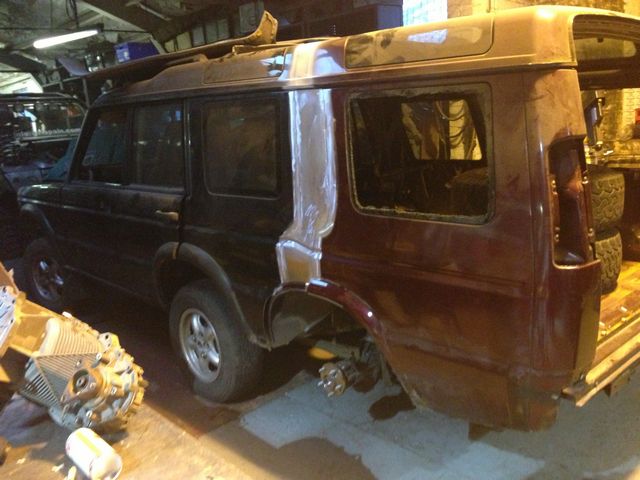
It was really hard to get the whole chassis into a single picture at this stage, as the combined structure is now over 19’ long, but you will see that the two rear axles are fairly conventional Discovery II setups, whilst the front axle is a Range Rover P38a item, modified to take Discovery II hangings, but it also has P38a turrets to allow air bags at the front in addition to those available on the rear for Discovery IIs. Those who are familiar with D2 chasses will recognise that this is a TD5 chassis, but I always wanted my baby to be a V8, so a change to the engine mountings was scheduled for the next phase
 
The next step was building a body onto the chassis. I first sourced a solid body with some minor rear end damage

IMG_0256_TN.JPG


IMG_0261_TN.JPG


To this was added the rear half body from the same vehicle that had provided the rear half chassis

IMG_0254_TN.JPG


Attachment was again the job of experts, because try as I might, I couldn’t weld the aluminium body without it looking like an advanced piece of Swiss cheese

IMG_0302_TN.JPG


After all this hard work, it was straight to the paintshop, where she received a beautiful coat of Land Rover Santorini Black, this is from later models and the micatallic finish looks wonderful in the sunlight, a great improvement on the period appropriate Java Black

IMG_0403_small.JPG


IMG_2318_TN.jpg


The eagle-eyed will also spot that the roof bars have been polished and coated in transparent powder coat (the same process used on alloy wheels) to prevent oxidation. The door handles are also currently in the US being chrome plated, so the final vehicle will be black with chrome accents.

The bumpers have not yet been colour-coded, nor the headlight trims, but that will come soon. The bump on the roof that looks a little like a London cab will be explained a little later in the electronics run-through.

And before I get too much grief for the gills on the wings with the “Supercharged” wording, let me assure you that the vehicle was always going to be supercharged, but the drivetrain has taken a major deviation from its original plan.

I originally sourced a 4.6litre Thor engine from a P38a. The 4.6 unit was never officially fitted to the Discovery, but because of the extra weight, I wanted a bit more grunt, so this 4.6 was stroked out to 5.0litre.

I also wanted it supercharged, and after a great deal of research, determined that the twin-screw supercharger was the only way to go. I sourced a 3.3litre Lysholm twin screw and tested them together on the bench.
 
It is worth discussing a bit about my background now. I am an electronic engineer, and it was while working for Bosch, that I got the bug to develop my own range of automotive ECUs. Car Hobbyists and kit builders frequently shy away from electronics like fuel injection as it is considered complex and troublesome. Some simple systems like megasquirt exist, but these are crude compared to factory fit.

What I wanted was a system of ECUs that could be set up by any competent home mechanic using nothing more than a laptop. A few basic system parameters should be enough to get you up and running, then the system should guide you through the fine tuning, with the option of a dyno run for the final touches if necessary.

This vehicle is to be my show car, in time I see it attending shows, and it will give potential customers the opportunity to see all the electronics I have and am developing. To this end, the more weird and out there it is, the better, as it will draw people in.

So this vehicle will get all the bells and whistles. All the original electronics have been ripped out and state of the art is in. The little bump on the roof I mentioned earlier for example is a combination forward facing camera, with high definition zoomable optical and infra-red thermal sitting side by side, the on board cameras can see in total darkness if necessary and can spot a human or other heat source at up to 5km away.

A few years back, I started on EMU (Engine Management Unit) and the prototype was promising, but flawed. The result was EMU II, which I fitted to my Disco 1 and it ran faultlessly for many years, with better response and better fuel economy than the Lucas unit it replaced.

For this vehicle however, I needed a new unit – EMU III, as EMU II couldn’t cope with supercharged or turbocharged setups.

So my bench tests of the supercharged 5.0L Rover V8 were done with EMU III, and were encouraging with approx. 300BHP realised

But then things changed. I changed my daily runabout to a jaguar XJ-R, this is fitted with the 4.2litre supercharged V8 as fitted to later range rover and range rover sports, and let me tell you, it is an AWESOME engine, I had always loved the Rover V8, but this was a whole other ball game.

The XJ-R has now covered some 250,000 miles and aside from some really basic stuff like the odd split hose or the need for a new ignition coil once or twice, has covered those ¼ million miles without missing a beat and still pulls like a train. The 6-wheeler had to have the Jag V8 !

And so, was born the most ambitious project I have ever undertaken, the drive train would now be petrol electric hybrid with a Siemens 3-phase AC motor driving the rear axle, and the latest generation AJ133S 5.0L supercharged V8 driving the front 4 wheels through the ZF 6HP28 gearbox.

I sold the old Rover V8 and supercharger and gearbox and transfer box and drew the new line in the sand

What I needed first was the engine !

$_57 (7)_small.jpg


This little beauty came up on EBay, this is the 550BHP unit but had suffered piston failure and had been swapped out under warranty. I got it for a bargain, and thought, piston swap – how hard can that be ?!?

I extracted the pistons, and was delighted to find, that despite some very obvious damage to a couple of the piston crowns, and some corresponding damage to the combustion chambers and valves, the cylinder bores were miraculously pristine! The heads were sent away to be resurfaced and to have new valves and guides fitted, so all I would need to do would be to hone the cylinders and fit new pistons !

Little did I know that Jaguar / Land Rover don’t want you messing with this engine, parts for the heads are fairly easily available, but anything in the block is not listed and Jaguar insist that you buy a new short engine ! That was never going to happen, so I took the plunge and had a whole new set of 8 custom forged pistons manufactured
 
IMG_0491_small.jpg


I also tracked down the ZF gearbox for the engine

IMG_0469_small.jpg


And the electric motor is on the way, so the powertrain is really taking shape.

The engine management has need to be upgraded to EMU IV now as EMU III did not support variable cam timing or direct injection, and the first EMU IV PCBs should be with me mid-July.

EMU is added to a range of 14 other ECUs I have developed to the extent that the only original Land Rover ECU left is the airbag one – I didn’t fancy messing with that.

The map of the vehicle now looks like this

ECU_Layout.png


FEC – Forward Electrics Controller, controls forward lighting and wipers etc., as well as split charge and front parking sensors
SAM – Security & Access Module, controls alarm systems and keyless entry, ultrasonics, auto window and sunroof closure, GPS tracking and engine authentication
SLABS – Steering, Levelling & ABS, controls electronic handbrake, electronic steering, 6-wheel air suspension, ABS and ACE as well as terrain response and tyre pressure monitoring
TRAMP – TRAnsmission Management Processor, interfaces to soft gear selection and steering wheel paddles, controls auto transmission and transfer box and interfaces to VMC
EMU – Engine Management Unit, as detailed above
HVAC – Heating, Ventilation & Air-conditioning Controller, controls front and rear heating and air conditioning zones, controls heated seats and auxiliary pre-heater
AVIC – Audio/Video/Infotainment Controller, Touch Screen control for on-board systems, Dual FM/DAB receivers, USB connectivity, Apple CarPlay support, Wi-Fi, GPS & Bluetooth, voice synthesis and recognition, capable of supporting up to 16 camera sources
VIP – Virtual Instrument Panel, provides rendered instrument panel on a high definition ultra-wide LCD screen
DCU – Door Control Unit, control of door locks, windows and mirrors, door open and window open sensing, interface to switch packs
IEC – Interior Electrics Controller, controls courtesy lights, sunroofs and steering column
RPEC – Rear-Passenger Entertainment Controller, provides touch-screen media control and internet access
IBC – Intelligent Battery Charger, compliant to J1772 PEV charging point, charging of hi-voltage LiFePO4 or lead-acid batteries as well as conventional 12V batteries, full battery management system, and load-balancing
AMS – Automotive Media Server, provides library of music and video to AVIC & RPEC
VMC – Versatile Motor Controller, control of AC & DC, single or multi-phase motors of up to 600V/60A, supports resolver, quadrature and sensorless operation, provides optional regenerative braking
REC – Rear Electrics Controller, Controls rear lights, wipers, heated screen, fuel flap(s) and reversing sensors.

Of these, EMU, FEC, SAM, VIP, DCU, IEC, VMC & REC and tested and working
SAM, TRAMPS, AVIC & RPEC are being tested right now
SLABS, HVAC, IBC & AMS are yet to be developed
 
Last edited:
Work Still To Be Carried Out

I've posted my progress so far, but there is still quite a lot to do,

The body is looking really good now, but the chassis is not quite finished, I need to lift the body off and modify the mounts for the new powertrain, it then needs blasting to remove the surface rust (it is structurally very good, which is rare in itself !) - I then need to decide how to protect and finish it. I had thought of galvanizing, but was told that galvanizing works well on new steel, but not so well on old. Electrophoretic plating is my current favourite I think, followed by either painting or powder coating - does anyone have any thoughts on this ?

I did put a post on the tech help forum of another site asking for some meaurements from a V8 chassis, as I stupidly sold my engine before taking some vital measurements myself, so if anyone can help out on that, please do take a look athttp://thed2boysclub.co.uk/viewtopic.php?f=5&t=50224

The axles and radius arms etc need similar treatment, all three axles are going to have ashcroft air lockers fitted, and entirely custom brakes - 330mm disc with 6-pot calipers at the front, 300mm disc with 4-pot calipers on the rear. The rear axle will also have handbrake calipers fitted, but I haven't decided yet whether to have an additional handbrake on the 2nd axle.

I will have the chassis fully built up with axles, engine, gearbox, propshafts, brake, air and fuel lines etc before re-marrying it with the body

The wiring is all done, but the interior needs finishing off, I have two new roofliners, which need cutting and joining, plus the trim and carpet needs completing. My fabricators are making new front seat bases as we speak, and the two front seats are from an L322 vogue. It has regular D2 bench seat behind and standard jump seats in the very back, but an additional rear facing 2 seater bench behind the regular bench making 9 seats in total. Not all seats are the same colour right now though, so some re-trimming is needed.

So how long is all this going to take ? I would love to complete it this year, but I suspect that's a tall order, but I really want it ready for the 2017 show circuit

If anyone local to me of a similar crazy mentality fancies helping out with any of the work, I can supply non-stop tea and biscuits and of course eternal gratitude !
 
Wow - this is very impressive.

Really looking forward to the progress on this - fantastic job so far!

Foz
 
Wow!!! - what will you be using it for....??
the thing is a beast!....what i love about it is its all done proffessionaly...!!!
 
Wow!!! - what will you be using it for....??
the thing is a beast!....what i love about it is its all done proffessionaly...!!!

That's a good question, I'd love to use it every day, but that's not really practical. It doesn't fit a standard parking space for example, so parking is always going to be an issue.

With 6-wheel drive, I'm going to bet that it will be awesome off road, but I don't know if I will ever find out, because I would hate to scratch it (or worse).

Mainly, it is just going to be a show vehicle, but I will try and use it where ever practical
 
Well damn, I just got informed by DVLA that I cannot retain my original registration number and they are going to assign me a Q plate :mad:

I probably should have seen that coming, and it's not the end of the world, but I kinda liked my '03 plate. Oh well
 
Wow just spotted this thread!
You my man are one clever little beaver ;-) keep us posted as we are all very eager to see how you get on...cant wait to see it in the flesh some day.
 
That was one of two questions that I had! The second is the location of the front diff - what's going on there then?

LOL, well as mentioned in the description, the front axle is from a P38a which has its diff on the left of the vehicle, rather than the right as is more normal on the disco.

When I was planning to use the Rover V8, I was matching it to the ZF 4HP24 with the borg-warner transfer box also from the P38a, this is belt driven rather than the geared LT230 unit on the disco and the front drive exits on the left rather than the right which is why I used the P38a axle. The reasoning behind this was that I wanted electronic high/low range selection rather than mechanical and this it what the borg warner unit offers.

This has kind of worked in my favour, as the front drive from the ZF 6HP28 is also on the left, so I'm already set up for that.

However I do have transfer box issues due to another reason. When the L322 was introduced, it had a BMW V8 and either a GM or ZF 5 speed transmission, this was coupled to an NV-225 transfer box from New Venture, but when Land Rover changed to the the 6-speed and later 8-speed box, they switched to an ITC DD-295 transfer box. I'm not sure what the politics were behind the change, they are both very good boxes and both have central rear drive out and front drive to the left, but there are two significant issues. First the mounting flanges for the two boxes are not compatible

New Venture NV225
NV225.png


ITC DD-295
ITC.png


The second difference between the two is that the NV225 had a neutral gear, something all disco drivers are familiar with, which allowed the vehicle to be towed without turning the automatic box backwards which is not recommended. This is done by fitting a 5-amp fuse into the fuse 37 position of the main fusebox, a position that is normally not fitted.

On the ITC DD-295, they removed this option, there is no neutral gear at all on the ITC box.

"So what ?" I hear you ask, well, it all comes down to the hybrid nature of the vehicle, when I am driving in electric mode, I need the gearbox disconnected from the drivetrain so as to not damage it. This has to be achieved through a neutral gear in the transfer box.

When I need the petrol engine, the ECUs start it, bring it up to speed so that the input shaft speed and output shaft speed of the transfer box are the same, then drop the transfer box back into high range and bob's your uncle.

To cut a long story short, I need the NV-225 transfer box on my ZF 6HP28 box, so I will need to make an adaptor plate to make them fit. Just another job to add to the list of tasks to do ! :rolleyes:
 
Last edited:
Back
Top