discomania
Well-Known Member
- Posts
- 6,949
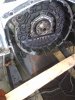
I did my rear crank oil seal last week since the body is off and access was easy.
I've noticed over the years that no one has ever posted any proper pictures of the seal and fitting process so thought I would take some pictures.
Attached are a selection of images which will hopefully help for those of you looking at doing the rear crank oil seal on a 300.
I might as well put a few words down about the process so it's all in one place.
Assuming gearbox is off or engine is out...
Remove clutch cover/torque converter then remove the flywheel or flexplate. To undo these bolts you can put two bolts into the flywheel/flexplate and then put a bar or spanner or something across some of the gearbox mounting studs to lock the engine in place. Undo the 8 bolts and remove (I used the two clutch cover bolts to rock the flywheel back and forth until it came off).
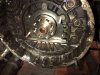
You can now undo the seal housing bolts, slide it off and discard.
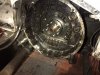
Clean up the back of the block, the crank shaft everything so it is oil free and generally just squeaky clean.
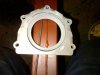
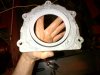
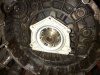
Fit two M8 studs into the block to act as guides when your pushing the new seal on. These stop the seal from being put on at a bad angle and possibly damaging it.
There is a plastic protector/expander on the oil seal, this stops the oil seal from being damaged and also expands oil seal over the end of the crankshaft as you fit it - DO NOT REMOVE IT.
Once you are ready to fit the seal put some RTV silicone round the seal housing, be careful not to get too much near the oil seal itself in case it squeezes onto the seal and contaminates it.
Unlike other seals DO NOT oil or grease the crankshaft or the seal, there is a Teflon coating on the oil seal (well the OEM ones anyway) this in itself will help the seal slide over the crankshaft, it won’t be as easy as an oiled or greased seal certainly but it won’t be terrible, the hardest part is getting the seal to open up enough and push the expander through. Oiling or greasing the seal or shaft will put a thin film between the crank shaft and the oil seal, the seal is designed to come into direct contact with the crank via the Teflon coating. Creating a film between the two will almost certainly cause it to leak.
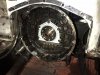
Put the seal housing onto the two studs and as squarely as possible push it up against the crankshaft, the expander will make contact first, keep pushing it will be quite hard and require a fair shove, if you maintain good pressure the oil seal will slowly glide over the expander and it will slide onto the crank, when it gives it may slip quite quickly (testament to the fact the Teflon is doing its job), but the studs will help to keep it straight and true.
Put in all the bolts and do them all up finger tight progressively and in opposites, then use a small ratchet and keep working progressively until the bolts are all reasonably tight, then use a torque wrench and tighten to 25nm. If you do not have a torque wrench, a small wrench (4 inches) done up pretty tightly will be about 25nm.
I then refit the flywheel and test ran the engine for a while to check for leaks.
I've noticed over the years that no one has ever posted any proper pictures of the seal and fitting process so thought I would take some pictures.
Attached are a selection of images which will hopefully help for those of you looking at doing the rear crank oil seal on a 300.
I might as well put a few words down about the process so it's all in one place.
Assuming gearbox is off or engine is out...
Remove clutch cover/torque converter then remove the flywheel or flexplate. To undo these bolts you can put two bolts into the flywheel/flexplate and then put a bar or spanner or something across some of the gearbox mounting studs to lock the engine in place. Undo the 8 bolts and remove (I used the two clutch cover bolts to rock the flywheel back and forth until it came off).
You can now undo the seal housing bolts, slide it off and discard.
Clean up the back of the block, the crank shaft everything so it is oil free and generally just squeaky clean.
Fit two M8 studs into the block to act as guides when your pushing the new seal on. These stop the seal from being put on at a bad angle and possibly damaging it.
There is a plastic protector/expander on the oil seal, this stops the oil seal from being damaged and also expands oil seal over the end of the crankshaft as you fit it - DO NOT REMOVE IT.
Once you are ready to fit the seal put some RTV silicone round the seal housing, be careful not to get too much near the oil seal itself in case it squeezes onto the seal and contaminates it.
Unlike other seals DO NOT oil or grease the crankshaft or the seal, there is a Teflon coating on the oil seal (well the OEM ones anyway) this in itself will help the seal slide over the crankshaft, it won’t be as easy as an oiled or greased seal certainly but it won’t be terrible, the hardest part is getting the seal to open up enough and push the expander through. Oiling or greasing the seal or shaft will put a thin film between the crank shaft and the oil seal, the seal is designed to come into direct contact with the crank via the Teflon coating. Creating a film between the two will almost certainly cause it to leak.
Put the seal housing onto the two studs and as squarely as possible push it up against the crankshaft, the expander will make contact first, keep pushing it will be quite hard and require a fair shove, if you maintain good pressure the oil seal will slowly glide over the expander and it will slide onto the crank, when it gives it may slip quite quickly (testament to the fact the Teflon is doing its job), but the studs will help to keep it straight and true.
Put in all the bolts and do them all up finger tight progressively and in opposites, then use a small ratchet and keep working progressively until the bolts are all reasonably tight, then use a torque wrench and tighten to 25nm. If you do not have a torque wrench, a small wrench (4 inches) done up pretty tightly will be about 25nm.
I then refit the flywheel and test ran the engine for a while to check for leaks.
Attachments
-
 IMG-20120605-00288.jpg864.1 KB · Views: 4,642
 -
 IMG-20120607-00296.jpg307.3 KB · Views: 7,531
 -
 IMG-20120607-00298.jpg292.9 KB · Views: 3,444
 -
 IMG-20120607-00299.jpg240.2 KB · Views: 3,486
 -
 IMG-20120607-00300.jpg260.8 KB · Views: 3,605
 -
 IMG-20120607-00301.jpg357 KB · Views: 4,212
 -
 IMG-20120607-00302.jpg332.4 KB · Views: 8,927
 -
 IMG-20120607-00304.jpg306.9 KB · Views: 8,586
Last edited:
 . Im not talking massive amounts, just enough to annoy. Im starting to wonder if its from where the gearbox bell housing meets the engine block, would this be likely? Its not dripping from the bellhousing drain which would suggest the rear crankshaft seal, its more from the outerside of the bellhousing where the block meets it, i get drips from the sump pan bolts closest to this. I have checked above, so far ive renewed exhaust manifold gasket, brake servo vacuum pump gasket (and replaced the riveted cover with bolts and sealed with RTV), renewed split diesel runoff loops, oil cooler pipes, so im absolutely sure the oil is not from anywhere above (ive jetwashed the engine too)