200tdi rebuild

This site contains affiliate links for which LandyZone may be compensated if you make a purchase.
Still busy cleaning as many parts as possible before painting. Removed the ball joint from the drop arm so I can do a thorough job of cleaning it up. I wasn't going to bother as it felt reasonably good but after pulling it apart I'm glad I did coz it was bone dry!!
65ef1fd3695b4d5577b484e2ea5af4c6.jpg

d79b62e934feb7621f257ab939cbed73.jpg

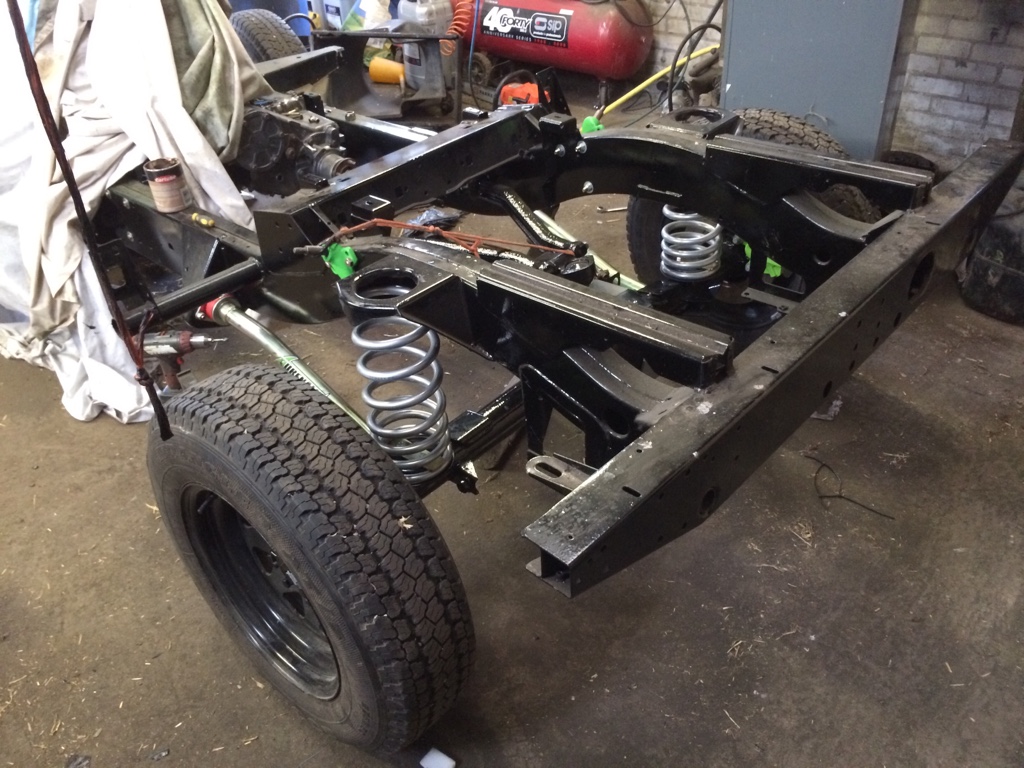
I also sorted a niggling issue with the a frame bushes. Being a new spec chassis from marshland it came with the later mounting brackets and smaller bolts. Marshlands solution to this was to supply an adaptor tube which I thought was questionable at best.
58e129e70112a3cff57a572efcbf87cf.jpg

Anyway I asked my local parts dealer about the size of the new spec bushes and fortunately it turned out that it was only the inner diameter which changed so I was able to reuse the old a frame without any worries 😊
9e605d3f107b6f358c442c32a62563a5.jpg


Going back to the ball joint, I noticed that there is a hole in the seat of the joint. Has anyone ever fitted a grease nipple into the top cap to help make it last longer or would I be just wasting my time?
 
Had a bit of a disaster today, just finishing getting parts ready for painting and assembling the A-frame only to strip the threads on both ball joint bracket bolts 😫😫😫
Can't believe it, local supplier is shut until Monday so that's my weekend plans buggered now. 😡😡. So just to clarify is 176Nm the wrong setting or have I got crap bolts?
 
Been busy doing other things but I've finally got some more painting done 😊
0cedbfb7fb7f5a2bbdeacf109ea930d6.jpg

I'll give it a day or so then I'll get it all topcoated then i can finish assembling the axle, paint the hubs and get the axle fitted finally, it's only been two years!! 😊
 
Another brief update, only been able to get the odd hour in here and there due to us TB testing the cows and sorting a misfire on my 'temporary' car.

Going to kick up the space heater again because it's gone too cold to paint now so I've just been sorting out other parts.

Tonite I had a bit of a play with the disco transfer box I bought a while ago. All I've done really is remove and check the input gear for wear. It's clearly not a cross drilled one and that shows with wear on the splines inside however the outer teeth look in good condition which is a good sign.

eff7fd8a0b425bee2f61d32f47fc5406.jpg

e3aa0b935a9be1feb25ee68fb1197699.jpg


Looking at the rest of the box it seems to be in good condition so I think a new input gear and bearings is in order before cleaning up the box ready for fitting.
 
Another update, along with the little bits i keep doing when i have a chance i have now started seriously looking at the wiring. The old loom and the diagrams i had for a 200tdi scared me off the idea for a while because it was too hard to follow. However after revisiting the manual i have decided to use the 300/td5 diagrams i have in the manual as they are much simpler to use and are closer to the setup i will be having such as the td5 dash etc. So god help anyone who may have my landy in the future (not like its going to happen soon though).

So im just starting by reading through all the wiring diagrams and noting the locations of all the components and adding any extras which im having. Once im happy with the list ill start using the td5 dash loom i have for reference and start noting down all the lengths before making a peg board to make the loom onto. I dont know the exact length ill need for a lot of the wiring so my plan is to get a rough measurment of how long they need to be and give myself plenty of excess. Any excess i cut off ill measure for future reference. The beauty of having an immaculate td5 wiring loom is that ill easily be able to pinch any easily available sections of wire to reduce the need for additional connections for the dash and the td5 switches.

Ill try to keep you all updated, im hoping to have a big push at it before christmas so wish me luck :)

Albert
 
After reading through the wiring diagrams I have come to the conlcusion that there is no point making a loom from scratch when i have a perfectly good td5 bulkead loom sat in the shed. Plan now is to work out what i dont need in the loom and remove it and to add in any extras. Ill also have to rejig the fusebox as a td5 has a few fuseboxes floating around so ill have to get it all fused in one place. As for the connections ive got plenty of weathproof connectors so ill be busy making up the chassis and engine looms which shouldnt be too bad considering its only a 200tdi :)
 
Just done a little more painting today, got the axle topcoated.
e87a8068294e2b658e4a8f50876e6241.jpg

Nowhere near as good as the front because there's a lot of pitting in the casing plus the wind has blown a load of crap through the rafters so there's a few bits of **** in the paint now 😞. Tried my best to remove it all but I think it's going to have to do as it is. At least the diff pan will be covered by a guard when it's fitted 😊
 
Hi, not been active for a while and now I'm having doubts over the future of the project. A new job and the current situation at home means I am working 7 days a week with little time to work on the 90. So I hate to have to ask this but as it stands how much do you lot think it's worth? If you've followed the thread then you'll know all the work which has gone into it. I would be selling everything which I removed from it originally with parts in various states of decay plus additional bulkhead and stripped td5 dash, one set of alloys, 4 eight spoke wheels, two with good 205 tyres and I have two like new 205s to go with the others loads of bits to list. So what are your thoughts on the current value of it?
 
How far have you actually got with it? Is it a rolling chassis, bulkhead issue sorted, or is it a pile of bits still?
 
Right, rough patch over...ish, getting stuck back into it again with support from a few mates. Having a bit more money from the new job is really helping out, got a refurb gearbox fitted and ive cleaned up and replaced the input gear on a disco transfer box and got that fitted. Plus I invested in a set of cranked radius arms cos I really wasn't happy with the position of the springs and the difference is massive!! No issues with springs now. Just looking at finishing the rear axle and getting my bulkhead repaired ready for galving.

I have also fitted some diff guards my mate has started making which I'm really pleased with and so is he considering they're the first he's fitted. Anyways enough talking here's a few piccies to keep the mob happy [emoji39]

2516fcdd3c1aa41e5116d6b0086153b5.jpg
aebfd2b637fe9b2bbf4e6b710f10b9d7.jpg
73c33027267b5b92b19d0bdda27f26a1.jpg
48c77899ef57758ae7fa67e34914f295.jpg
a8d70b1cd04bb2707b517eb6c1bee4f3.jpg
eec1fa66717f72748594e2ad8b570a01.jpg
e1dcb09461d22915b8a10cc01bc53511.jpg
61c14d11b27306862f4a5c9de8e955c1.jpg
98c79ce84d7f785f0a107bda3cb185b6.jpg
26fcd655429e9e89d83464b0735f6e42.jpg
cabc4b8a72797ead046181a26fdcb7c5.jpg
 
You're doing a mint job there, marra. Keep the faith, even when times get tough. You've done such a top quality job, it would be a shame for you not to finish it yourself.
 
Axles on!!!!

f2002517954cd3c78a22a613d710d073.jpg


Took a bit of manoeuvring but I got there in the end with some help [emoji4]

I started attacking the steering box ball joint again today after a disaster the other day where the top seat caught when installing and created a massive burr. So after machining the inside of the housing and the bottom retainer it is now in just about. It's a bit freer than I'd like but there's no play so it'll have to do. I've also fitted a grease nipple seeing as the original was bone dry when I took it apart.
 
Back
Top