1976 series 3 rebuild

This site contains affiliate links for which LandyZone may be compensated if you make a purchase.
looks great, quick question how are you finding the paddocks paint ? i seem to recall reading somewhere that the quality had gone down hill? would you recommend it. i will be after some green in the not to distant future for my series 2.
Sam :)
 
Right then today we managed to get the tub back on the chassis but not bolted down so we can adjust its position later. The wires in the back were also pushed up so the lights and things can get wired in :)

We put it on blocks first to make it easier to push the wires through


Where the conduit goes through the tub, we put a bulhead fitting in to hold it tight and seal the hole, looks quite neat I think


Before sticking the engine in, we fixed the conduit at the front to the bulkhead


And then we lifted the engine in :)


looks great, quick question how are you finding the paddocks paint ? i seem to recall reading somewhere that the quality had gone down hill? would you recommend it. i will be after some green in the not to distant future for my series 2.
Sam :)

i do a lot of painting, i can fully recomend alan ward in cannock, think hes called chase auto paints now, hes nr bridgetown (craddocks ) he mixed mine for me 90, series 2, tractor and many other customers jobs

 
looks great, quick question how are you finding the paddocks paint ? i seem to recall reading somewhere that the quality had gone down hill? would you recommend it. i will be after some green in the not to distant future for my series 2.
Sam :)

Hi Sam, we've found the paint to be pretty good, we've managed to get a pretty decent finish on the bulkhead using brushes and gloss rollers from wilko's. First time we've used them but from what we've used so far its good :) It goes quite a long way as well so 2 tins should hopefully be enough to do the front end and the tub. I think the only problem with the paddocks blue is that people say its a bit darker than the original factory blue which doesn't bother me in the slightest but I don't know if thats true, anyway the colour's good after 1 coat :)

Are you going to spray it or brush paint?
 
i was able to spray the whole thing inside and out with 3 coats all over using 5 ltrs, never used rollers , they always seem to leave tiny bubbles
 
thanks guys, yes the plan is too spray it. was that the finish straight out of the gun 90 truck cab, looks very nice and shiny do you remember what paint it was? ill look through your thread later to find out if not.
 
straight out the gun, cellulose paint, +10% thinners, had a polish first with wet and dry, the ally was primed with acid etch, 4 coats inside and out, then 4 buff cream coloured undercoats and 4 top coats, the hvlp deviblis gun i used was 300 quid it makes the difference , yer could see the hands of your watch moving in the paint job when it was done the paint was hmg i think, tis expensive but worth every penny
 
straight out the gun, cellulose paint, +10% thinners, had a polish first with wet and dry, the ally was primed with acid etch, 4 coats inside and out, then 4 buff cream coloured undercoats and 4 top coats, the hvlp deviblis gun i used was 300 quid it makes the difference , yer could see the hands of your watch moving in the paint job when it was done the paint was hmg i think, tis expensive but worth every penny

Brilliant cheers for the advice, and sorry Sam for hijacking your thread :eek: keep up the good work. :D
 
Right I'm back :) The engines been bolted in properly and the gearbox is back in. The wiring in the tub (lights, 12v charge point etc.) all works after we checked with bulbs. The servo unit from a 110 has been fitted to the bulkhead to replace the old brake tower and plumbed in so the brakes are essentially ready now. The photos are on my Dad's phone so I'll get them later and stick them on here :)
 
Right then, the tub's been primered with 2 pack aluminium paint (we didn't have etch primer and this works as a bit of a filler so should be okay) and we've put the first bit of soundproofing in (thick carpet underlay). There will be 2 layers of this with foil in between and carpet on top which will make a difference. I also sprayed the cappings with some silver paint we had spare


The homemade speaker boxes covered in foam in place at the back


I also put the starter motor back on, this works, it was the battery at fault when we tested it before


I also managed to paint the fly mesh vent things in silver and rivet them back into place


One of the little tabs had broken when we took these off so a new one was bent and rivetted so it holds the mesh against the bulkhead

 
Right, been spending a few hours in the garage tonight rubbing down the paint we used as a primer and tomorrow we should be getting a coat of blue on.

Heres a photo of the brake servo we've put on, hopefully everything will fit okay, it should fit under the bonnet

 
Cheers :) Tonight I got the heater fan cleaned up and given a coat of kurust and then me and my dad gave the tub a coat of marine blue using a brush and a gloss roller from wilkos.


Tomorrow, I'll start sorting the wings out and the windscreen can go back on (after painting the frame)
 
Last edited:
Your moving it forward quick! Looking good.
One thing I noticed....do those brake pipes run over the top of the clutch pedal bracket assembly? I recently had to replace my master on the clutch and the brake pipes ran around the bottom edge of the clutch bracket. this made it but it an absolute pig to remove the clutch pedal assembly. The brake pipes were just run about half an niche too close to allow sufficient movement. A hour to remove and the same to reposition!
 
straight out the gun, cellulose paint, +10% thinners, had a polish first with wet and dry, the ally was primed with acid etch, 4 coats inside and out, then 4 buff cream coloured undercoats and 4 top coats, the hvlp deviblis gun i used was 300 quid it makes the difference , yer could see the hands of your watch moving in the paint job when it was done the paint was hmg i think, tis expensive but worth every penny

I am starting my S 2 later this year, every where I have read says 50/50 paint and thinners , how did you get on using 10 % thinners is it the gun used?
 
More progress done today! The heater fan was given a coat of red oxide and then that and the battery tray (which is made so it can be removable) was given a coat of black gloss.


I masked up the windscreen (both sides) using newspaper and masking tape to cover the glass and sprayed it with some silver paint out of a rattle can.


My Dad started to have a look at the wings which are quite badly dented at the front and then I went and took the checker plate off by drilling through the pop rivets.


Tomorrows the day i get my a level results so if I have time i might try and take the door cards off and a few other odd jobs
 
Right then a bit of a progress report,

The seatbox was put in position ready to be bolted on but before that can be done, the sill needs to be added. The seatbox can probably be bolted up using the top holes but the 2 holes on either side are for bolts which are also for the sill so its easier to just do it all in one go I think.


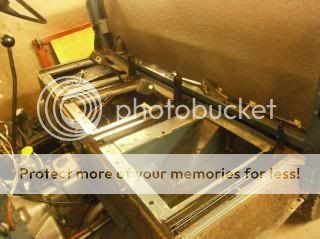
The sill was put on. There are 2 bolts on the bulkhead head which have a plate welded to each bolt head which theoretically should make them captive but you may need to hold them so they dont turn. (this is made trickier by the fact they aren't bolt heads you can get a spanner on as they are flat). Put the inner most bolt in first and loosely put a nut on the end so it wont fall off. This is because the sill has a slot on one side so you can slot it over this bolt and then tighten the nut so it wont fall off. Then its a bit easier to do the next one.

The rear most bolts weren't being put in until the seatbox is getting bolted up so to help support the sill, a long thin bolt was pushed through the holes to keep it up. Before bolting them on, the sills got a coat of red oxide and then underseal.


The pulley on the alternator was about 3/16"th too far forward out of alignment even at the position of the alternator where it was as far back as possible. So, solution was to take the pulley off and take it to stuart (who also welded the tub) who took off 3/16ths from the raised boss. Result is the pulleys are now in alignment properly :)

You may notice the alternator is a different colour, thats because we found one which sounded like it had better bearings and its smoother than the old one so that was fitted :)


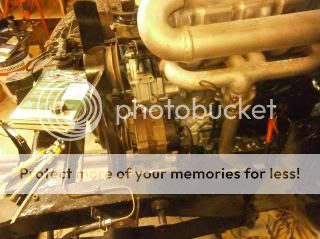
Starter motor was wired up


As were the glow plugs


I put some diesel in the tank and me and my dad bled the fuel system up to the pump. We also had a go cranking the engine over using jump leads to try and bleed the injector pipes. This succeeded in turning the engine over (The starter motor works well :) ) but ended up melting the metal end of the jump lead.

Then I bolted the handbrake in which still needs connecting. Because the seat box was in position, i went underneath and slid it up from there :)


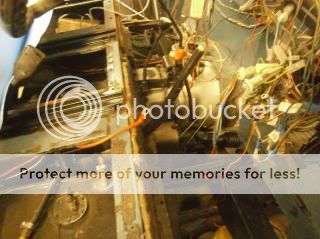
Today we were sorting wires out in the engine bay and put the screenwash mechanism back in. This works a treat, it has some bigger bore hose than it used to (6mm pipe and fittings) and the jets are pretty powerful things, going right over the windscreen and going halfway down the garage when we tested it :) Also the wiper potor and wiper spindles have been bolted on and we've started putting foam soundproofing on the bulkhead
 
Back
Top