1969 SR2A Rebuild

This site contains affiliate links for which LandyZone may be compensated if you make a purchase.
Did a bit more on the landy tonight.

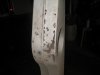
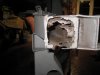
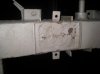
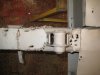
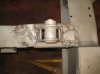
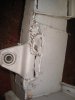
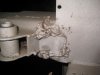
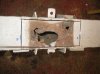
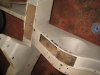
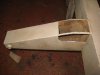
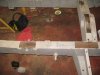
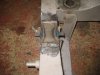
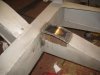
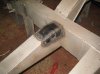
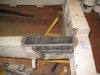
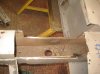
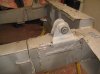
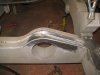
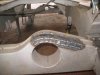
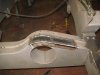
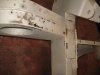
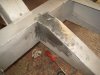
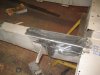
Started cutting out the passenger foot well. The rot went a lot higher than i though so will need to fabricate some sheet to repair what ive cut out.

At least all the rot is out now so when they shot blast it on wednesday it will be ready to weld to.

Ill post some pics tomorrow. Didnt take the camera round tonight.
 
With regards to your hazard switch, it's not mandatory to have one as it wouldn't have come with one as standard. Up to you if you want to try wiring one in though, might have a crack when I do mine but I'm making a complete new loom from scratch for that :)

As for your headlights 2a's had them in either depending on year so either way could be 'original' to yours, people seem to prefer the look of lights-in-grille though.
 
Thanks for finding that out.

The previous owner filled the front swivel's with one shot grease.

Is this a bit of a bodge to stop a leaking seal or is it normal?

Also shall i remove the top cover and check how full they are?

Thanks
Rob
 
Also,

Dropped the chassis and bulk head off to A1 Powder coating to be blasted today.

Hoping to get it back tomorrow and then start the welding on the weekend. Ill post some pics when its back.

Has any one here had there bulk head galvanized (dipped). The guy at A1 thinks that it will distort a lot and that i would be better having it hot zinc sprayed.

Only problem i can see with this is that you cant spray any return or inside sections with the metal spraying.

I was thinking about having it galvanized (dipped) and bolting a pice of angle iron between the bottom of the door posts and then between both footwells so when its dipped it wont warp as much.

Any advice would be appreciated.

Thanks
Rob
 
A few pics of what is left of the chassie after shot blasting.
 

Attachments

  • IMG_0202.jpg
    IMG_0202.jpg
    232 KB · Views: 308
  • IMG_0194.jpg
    IMG_0194.jpg
    117.1 KB · Views: 322
  • IMG_0198.jpg
    IMG_0198.jpg
    138.9 KB · Views: 292
  • IMG_0205.jpg
    IMG_0205.jpg
    230.6 KB · Views: 315
  • IMG_0197.jpg
    IMG_0197.jpg
    86.8 KB · Views: 270
And the award for the worst bit of welding ive ever seen goes to.............

It was hard to tell what was under all the paint. Didn't expect to find this.
 

Attachments

  • IMG_0207.jpg
    IMG_0207.jpg
    223.6 KB · Views: 295
  • IMG_0208.jpg
    IMG_0208.jpg
    225.9 KB · Views: 264
  • IMG_0193.jpg
    IMG_0193.jpg
    225.9 KB · Views: 279
  • IMG_0192.jpg
    IMG_0192.jpg
    227 KB · Views: 295
Wasnt sure where to start so got the grinder out and started cutting!!!
 

Attachments

  • IMG_0210.jpg
    IMG_0210.jpg
    237.4 KB · Views: 279
  • IMG_0212.jpg
    IMG_0212.jpg
    222.9 KB · Views: 306
  • IMG_0214.jpg
    IMG_0214.jpg
    232.5 KB · Views: 254
  • IMG_0218.jpg
    IMG_0218.jpg
    226.8 KB · Views: 277
  • IMG_0216.jpg
    IMG_0216.jpg
    238.4 KB · Views: 362
Went to metal super market and had some plate cut to the right width's then all i had to do was cut it to length.

For the bump stops,

Cut out the rot, cut the plate to size, welded in place then ground back weld.

Had some 3mm plate cut to size for the backing plates for bump stops.

Ive only welded this one on in a few places as that was all that the old ones were on with but think im going to run a solid line of weld round it tomorrow.

The front ones were a bit more fun as the chassie has a curve in it.

Put the plate in the vice and bent it to the rough shape then tacked it starting at the front and moulded it to shape with a hammer tacking it in place as i worked my way along.

Wont let me add any more photos. Ill try again tomorrow.

Rob
 
Also,

Dropped the chassis and bulk head off to A1 Powder coating to be blasted today.

Hoping to get it back tomorrow and then start the welding on the weekend. Ill post some pics when its back.

Has any one here had there bulk head galvanized (dipped). The guy at A1 thinks that it will distort a lot and that i would be better having it hot zinc sprayed.

Only problem i can see with this is that you cant spray any return or inside sections with the metal spraying.

I was thinking about having it galvanized (dipped) and bolting a pice of angle iron between the bottom of the door posts and then between both footwells so when its dipped it wont warp as much.

Any advice would be appreciated.

Thanks
Rob

:cool::cool:Quite a few years ago my brother-in-law galvanised his bulkhead and from what I can remember he made a jig up for it before it was diped and then removed it after minermising distortion :D
 
I phoned up wessex galvanising and spoke to someone about it. He said wether i make a jig or not putting metal in 450'c it will natrally move/distort a bit. He said you can never know how it will react but that they dip bulk heads and it should be fine.

Still think it a brace wouldn't do any harm.
 
Did a bit of welding today. Getting there slowly but still loads to do.
 

Attachments

  • IMG_0224.jpg
    IMG_0224.jpg
    240.7 KB · Views: 293
  • IMG_0216.jpg
    IMG_0216.jpg
    238.4 KB · Views: 294
  • IMG_0223.jpg
    IMG_0223.jpg
    238.4 KB · Views: 266
  • IMG_0222.jpg
    IMG_0222.jpg
    230.1 KB · Views: 280
  • IMG_0214.jpg
    IMG_0214.jpg
    232.5 KB · Views: 280
its coming along nicely there, will post pics of some horrors i have found, i am envious of your garage, rain stopped play on me again today, and couldnt do anything in my shed has all the roof sheets etc have taken a right battering. i want a garage or at least some shelter.
 
Its my mum and dads garage. Left home years ago bit dad never got his garage back. Always got a toy of some kind in.

Was looking out at the rain earlier thinking how nice it was being in the dry.

Im cant see how some people can cock up repairs so badly.
 
its coming along nicely there, will post pics of some horrors i have found, i am envious of your garage, rain stopped play on me again today, and couldnt do anything in my shed has all the roof sheets etc have taken a right battering. i want a garage or at least some shelter.

Get 8 scaffolding polls and a tarp. Works a treat :biggrin1:
 
Looking at the pics of other peoples chassis i think i got lucky with this one. Didnt really know what i was looking at when i brought it.

Did a bit more over the weekend. Just got to do the other side of the rear of the chassis and a bit on the dumb irons then time to start on the bulkhead!!!

Feel like sh*t today. Had a runny nose and sore throat all day. Think it must of been the fumes from the mig welder. Going to try and get a bit more ventilation in the garage from now on.
 

Attachments

  • IMG_0239.jpg
    IMG_0239.jpg
    226.5 KB · Views: 300
  • IMG_0236.jpg
    IMG_0236.jpg
    236.9 KB · Views: 268
  • IMG_0234.jpg
    IMG_0234.jpg
    230.3 KB · Views: 277
  • IMG_0233.jpg
    IMG_0233.jpg
    236.1 KB · Views: 292
  • IMG_0232.jpg
    IMG_0232.jpg
    226.4 KB · Views: 282
  • IMG_0231.jpg
    IMG_0231.jpg
    226.8 KB · Views: 283
  • IMG_0229.jpg
    IMG_0229.jpg
    227.1 KB · Views: 284
  • IMG_0211.jpg
    IMG_0211.jpg
    238.6 KB · Views: 276
  • IMG_0228.jpg
    IMG_0228.jpg
    221.8 KB · Views: 297
  • IMG_0240.jpg
    IMG_0240.jpg
    228.7 KB · Views: 304
Got a bit more done. Finshed the back of the chassie now and turned it over to start the dumb irons.

Cut the first one apart to get rid of the rot.

Going to weld it up tomorrow. Ill post some pics. Didnt have the camera today.

Also if any one needs an engine stand sealey have them on offer ES330 £43 +vat and ES550 £56+vat. Ordered a 550 for my self thinking the stronger one would be better. Just need to go over and pick it up now.
 
Last edited:
Very impressive! That chassis looked pretty sound to me until you had it blasted.. :eek:

Subscribing to thread to follow your progress!
 
Back
Top