110 Recent Purchase

This site contains affiliate links for which LandyZone may be compensated if you make a purchase.

Bussell

Member
Posts
18
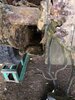
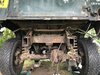
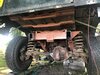
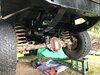
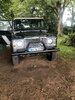
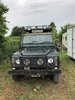
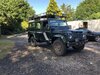
So I bought a 110, my first defender and the first time I’ve been under a Land Rover- other than to look for rust! So this week I have done;

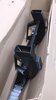
fixed melted electrics
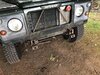
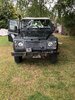
Removed nudge bar
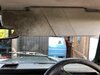
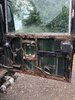
Removed rear panels covering side windows
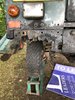
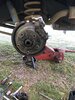
Replaced front drivers side wheel bearing (that was a bitch)
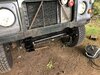
Replaced both rear half shafts
Drained and replaced oil in both diffs and transfer box
Cleaned up
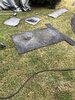
Removed spare wheel from back door before it falls off
spent a lot of money ordering bits-

but I love it!
 

Attachments

  • A009856E-8562-4103-9A36-002612A2CE5E.jpeg
    A009856E-8562-4103-9A36-002612A2CE5E.jpeg
    528.8 KB · Views: 211
  • A8BA7B5B-DC4A-40F7-A8BF-A2A0BD7E9758.jpeg
    A8BA7B5B-DC4A-40F7-A8BF-A2A0BD7E9758.jpeg
    637 KB · Views: 217
  • 2501C95D-EABF-4903-8CE8-C85ECD8FBF75.jpeg
    2501C95D-EABF-4903-8CE8-C85ECD8FBF75.jpeg
    552.6 KB · Views: 194
  • CBE2E2FA-ED5A-4121-9B2D-DEC0B8FACD64.jpeg
    CBE2E2FA-ED5A-4121-9B2D-DEC0B8FACD64.jpeg
    730 KB · Views: 207
  • 7E8B17A8-3D24-48C6-9060-06FFB97BEB17.jpeg
    7E8B17A8-3D24-48C6-9060-06FFB97BEB17.jpeg
    514.3 KB · Views: 203
Nice honest truck by the looks on things - have a look in sales and wants as there was a rear door in reasonable nick for £25 which might improve your current one.

Deffo bought the right one :D

i have bought a brand new rear door! They are reasonable- but will need to rebuild the front 4 as they are scary expensive.
Thanks she’s running really well!
 
Oh and I bought this- maybe next couple of weeks
 

Attachments

  • 73825DEC-F7F0-48C1-8932-CF7221706A05.jpeg
    73825DEC-F7F0-48C1-8932-CF7221706A05.jpeg
    126.2 KB · Views: 171
ah yes, been there. make sure it's been painted fully inside. it's a chance to see if you tanks got any holes too...... like mine did.

It’s got a 120l stainless steel tank on it, cost the last owners a fortune to buy it and have it installed!
 
ah yes, been there. make sure it's been painted fully inside. it's a chance to see if you tanks got any holes too...... like mine did.

Thanks I agree I noticed that the inside is bare metal and the outside is thin, so will take your advice and strip the outside when I paint the inside- then the whole chassis is being rubbed back, primed and painted and I will cavity wax the whole of it with a quality Dynax wax product as I believe they tend to go from the inside out and she’s crusty but solid from the rear springs forward
 
Update, Sunday cleaning day and pressure washed and shampooed the carpets and started on the head lining! Was so grubby
 

Attachments

  • 81A497F6-C205-45C3-9AEE-827BFDC33F91.jpeg
    81A497F6-C205-45C3-9AEE-827BFDC33F91.jpeg
    893.6 KB · Views: 176
  • 9B42DDD5-3F06-465C-B3A1-29233A76BD5F.jpeg
    9B42DDD5-3F06-465C-B3A1-29233A76BD5F.jpeg
    596.1 KB · Views: 144
  • FC3739A5-4395-405C-A6A8-B61A83DA65A6.jpeg
    FC3739A5-4395-405C-A6A8-B61A83DA65A6.jpeg
    312 KB · Views: 141
Update on progress- have worked to cut out the old chassis crossmember and wiring this weekend and seem to constantly be buying bits for it!
So next week will be a lot of cleaning, rust proofing the original metalwork and prepping for the new chassis!
 

Attachments

  • 07F5C2AA-2D0A-45DF-8722-4EF8063937D2.jpeg
    07F5C2AA-2D0A-45DF-8722-4EF8063937D2.jpeg
    504 KB · Views: 141
  • 4845DE21-6518-4D32-9103-A2D37AD63DD1.jpeg
    4845DE21-6518-4D32-9103-A2D37AD63DD1.jpeg
    393 KB · Views: 143
  • 29A81060-EF19-42A4-851B-E558BBFA4C04.jpeg
    29A81060-EF19-42A4-851B-E558BBFA4C04.jpeg
    374 KB · Views: 130
  • AFF51967-0815-4166-BB69-BA6FBB0D4742.jpeg
    AFF51967-0815-4166-BB69-BA6FBB0D4742.jpeg
    741 KB · Views: 136
Update, that took way longer than I was expecting, the crossmember is on fitted and she’s back on the road
 

Attachments

  • 94E1D6F0-4E7C-4B19-82C8-A9FEA5619C60.jpeg
    94E1D6F0-4E7C-4B19-82C8-A9FEA5619C60.jpeg
    417.9 KB · Views: 126
  • 863B6160-5198-40BE-AC69-14F321107F9C.jpeg
    863B6160-5198-40BE-AC69-14F321107F9C.jpeg
    573 KB · Views: 112
So now the rear is done, I thought I’d get the front bumper off, and found some rust, so it’s been cut out, treated and re welded and then cavity waxed on the rear chassis and front dumbirons
 

Attachments

  • 715CEBE1-B7CF-41C2-8DF9-478429F72FAE.jpeg
    715CEBE1-B7CF-41C2-8DF9-478429F72FAE.jpeg
    595.6 KB · Views: 87
  • 29A5E7CF-F616-45F4-91C9-7182D3F7302E.jpeg
    29A5E7CF-F616-45F4-91C9-7182D3F7302E.jpeg
    495.3 KB · Views: 89
  • E910318B-3678-4AD0-8282-3D3B315B4AEE.jpeg
    E910318B-3678-4AD0-8282-3D3B315B4AEE.jpeg
    582.3 KB · Views: 106
Back
Top