00KK53 - My Soft Top 12v GS TUL 90. So a soft top 90 then......

This site contains affiliate links for which LandyZone may be compensated if you make a purchase.
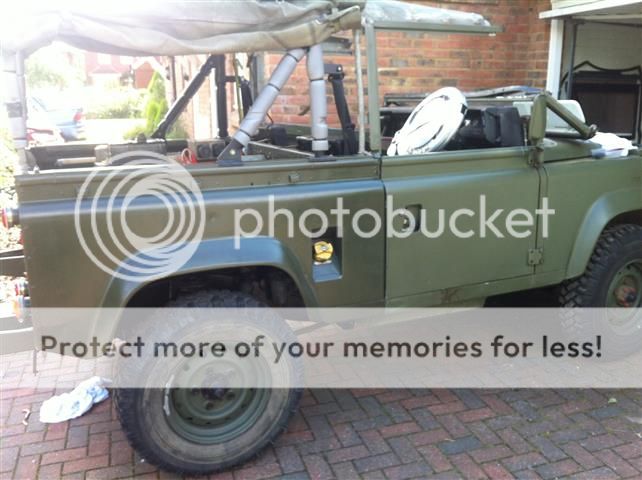
ok the weather might be **** in sept so i cracked on with the painting today and painted the entire rear of the vehicle.

Took me a while to get the hang of it in terms of streaks and orange peel but i found that if i left the paint to dry for a little while then ran over it again with a fresh clean roller it flattened it, i did this between the 2 coats i put on today. If it ends up patchy i will just key the surface and do it again.

Here is how far i got by 1600hrs.


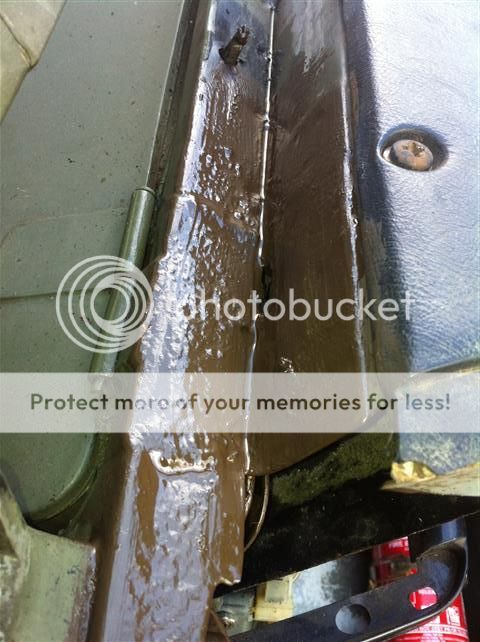
Unfortunately whilst dismantling i found a bit more rust, and some judicious poking made a slight hole in the rail below the windscreen - i cant weld this at the moment so i cut out the rust, treated and painted it. Will weld it up eventually..... The inside of the the bulkhead doesnt look to bad though from what i can see


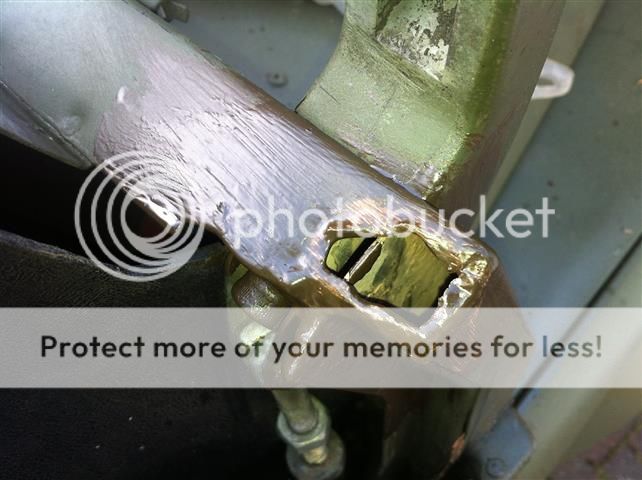
The other side had already been repaired by the MOD but it wasnt the tidiest and had some surface scale so i wire brushed it back, treated it and painted it. I did the same for the inside aswell


These will be sanded back and painted green sometime, i have ordered a new windscreen seal.

Ed
 
Last edited:
got the rest of the painting done friday when we had nice weather, then it got rained on today :roll: hope it isnt ruined.......


just need to do the stencils, paint the tow electrics hook up etc.

Looks much better now :D

Ed
 
ok, welded up the hole i found when i painted 00KK53 last month. My first time welding in anger since i learnt, and the first thing that wasnt a piece of flat plate on my workbench. Came out ok i think. Going to stuff the whole bulkhead and chassis with 6litres of dinitrol tomorrow.

Found a rust hole, cut it out


Made a plate to fill the hole


Tacked the plate in


and then welded round the edge. sealed and painted it.


Comments/critique welcome.

Ed
 
got the rest of the painting done friday when we had nice weather, then it got rained on today :roll: hope it isnt ruined.......


just need to do the stencils, paint the tow electrics hook up etc.

Looks much better now :D

Ed

Looks really good Ed. Nice work. Are you planning on refitting your spare to the bonnet?
 
nah its to much of an arse since the bonnet tried to kill me.

i am going to weld one of the side support bars for the rollcage to hold the spare wheel

I'll look forward to seeing that. Your just showing off your new welding skills now :) I ran around with mine in the back for a couple of months but I like the look of it on the front, so it came back.

I take mine off if I'm doing more than checking the oil.

Got to watch that bonnet - they are tricky. I came a cropper with mine without the wheel on one day. I had it propped against the windscreen and jammed in with a piece of wood. I had just taken the wood away to close it when it got caught in a gust at the wrong moment and came down really fast on my thumb hammering it down hard into the joint. I had my hand in a thumbs up position at the time. It hurt like hell! I had to go down on my knees to stupay conscious and I went as white as a sheet. I'm sure I broke my thumb - it was swollen right up for days and still aches now months on. Bloody Landy :)

Now I hold the keep the bonnet up with a bungee cord on either side secured to the camo net ties and when I'm removing them, I keep a hand on the bonnet until it's closed.
 
Sensible lol! I am going to chequer plate my bonnet and wing tops as they are a bit dented or have holes from the spare wheel thing.

I'm quite pleased with it though so far :)
 
well i have injected into the cavities not sprayed it on the outside aswell. I put it in the chassis, bulkhead, doors and all the cross members. anywhere i could get the wand i sprayed it. I got 5.5 litres in, i sprayed till i ran out the drain holes, then i left it for a bit and sprayed again till it ran out again. I reckon if i did the outside of the chassis it would have been around 8 litres give or take.


I tell you want its cool when you shove the compressor lance up the front dumb iron and spray and you see if coming out drain holes by the rear crossmember and vice versa lol

still what i have done is better than nothing and cost me £65 rather than £500. Might get my local garage to schutz the underneath as i dont fancy getting that messy lol

ed
 
Right, me broken leg is nearly mended after a long 3 months in plaster or other surgical stuff. Aircast boot comes off end of the month so i have started ordering bits :D

- Spare wheel is going back on the bonnet so ordered the buffers for that
- nato hitch has been dismantled and free'd up and reassembled so will refit that ( i didnt paint it as it looks great in beaten up red)
- plastic screw in things to hold passenger floor plate in place
- new front drive member to replace the worn clunky one
- finally found a replacement wiper motor cover for sensible money to replace my rusted away missing one.

when pay day comes i am going to get a CB sorted and a new MOT :D

Looking for a pair of defender front seats if anyone has any?

Ed
 
Easiest job ever.

Changed the front nearside drive member, replaced the dust cap and checked/adjusted and re-greased the wheel bearing.

Old drive member off, wheel bearing checked and re-greased
nearsidefrontdrivememberrenewal1.jpg


New drive member and dust cap fitted
nearsidefrontdrivememberrenewal2.jpg


Old drive member, doesnt look that worn but when on the drive shaft gave almost 5mm if movement. Drive shaft itself was fine.
nearsidefrontdrivememberrenewal3.jpg
 
Has anyone mentioned to you that your front side lights and indicators are upside down? The sides should be above the indicators.
 
Never noticed that. Although I have seen people do it in the past. Just to be different.

Has anyone mentioned to you that your front side lights and indicators are upside down? The sides should be above the indicators.

yeah i know, and i MAY do something about it but the driver side is all taped up to buggery and you know that if i fiddle something electric will never work properly again :D

All though thinking about it, is there any reason to not just leave them as they are, MOT wise i mean?

ed
 
Hi Ed,

What were the symptoms that indicated that you had a problem with the drive member?

Also, maybe you had not finished with the wheel, but I'm sure my wheel nuts go on a lot more than that!
 
Hi Ed,

What were the symptoms that indicated that you had a problem with the drive member?

Also, maybe you had not finished with the wheel, but I'm sure my wheel nuts go on a lot more than that!

I'm pretty sure that's how the wolf rims look with standard wheel bolts. The MoD just torque them up massively. My 110 had a sticker on it when I got it advising of correct torque for wolf rims.
 
I'm pretty sure that's how the wolf rims look with standard wheel bolts. The MoD just torque them up massively. My 110 had a sticker on it when I got it advising of correct torque for wolf rims.

thats odd, usually the mod fit different longer studs to compensate that meaning that you get the full thread, thats normally why people have ussues fitting wolf rims to standard axles as the studs are shorter
 
Hi Ed,

What were the symptoms that indicated that you had a problem with the drive member?

Also, maybe you had not finished with the wheel, but I'm sure my wheel nuts go on a lot more than that!

I had a bit of a clunk in the drivetrain, by working from the gearboxes out wards and changing suspect bits as i went. The worst clunk was the rear diff pinion wasnt nipped up :eek: it progessively became less as i worked around the vehicle tightening things, this was the last thing, the rest had no movement but this had about 5mm side to side on the drive shaft :eek:

nah they are fine, torqued up massive as per MOD recommendations


I'm pretty sure that's how the wolf rims look with standard wheel bolts. The MoD just torque them up massively. My 110 had a sticker on it when I got it advising of correct torque for wolf rims.

Yep so does mine, its in the handbook service thingy aswell, if longer studs are fitted its less torque, if normal shorter ones are fitted then its massive torque. It states that either are safe to use.

thats odd, usually the mod fit different longer studs to compensate that meaning that you get the full thread, thats normally why people have ussues fitting wolf rims to standard axles as the studs are shorter

there is still a good 10mm or more of thread holding the wheel on, MOD paperwork says either can be fitted. The newer XD (wolf) trucks has longer studs but the older non-wolf vehicles were just left with the normal studs and the MOD changed the torque setting to compensate, there is a big army document about it floating around the internet. I have never had any issues, i check them regularly to (its not a daily drive)
 
Cheers Ed. Mine must have loinger studs as the nuts are fully on. Is there a specific torque measurment for wolf wheels? I've never had to take mine off (yet).

yes mate my plate thing says 170Nm which is 125lbs/ft which is the approved torque by landrover using the shorter lugs with XD rims - so torque to this amount

Standard defender steel wheels are 108Nm or 80lbs/ft and alloys are 130Nm or 96lbs/ft
 
Back
Top