battenberg
Well-Known Member
- Posts
- 2,101
- Location
- Birmingham UK
Disco II Air suspension – the definitive guide!
It's about time someone put all this into one place... so here it is!
All you will ever need to know about Air Suspension.
Simply put, the air suspension on the disco II consists of a couple of balloons at each back wheel.
A way of inflating them independently and a computer to monitor the height of the car and keep it all level.
The Disco II air suspension consists of the following components:
Component Locations:
Modes of operation.
1. Normal driving mode: this is the normal operation height of the suspension
2. Extended height mode: (user controlled), this is activated via a button on the dashboard. Activation/dis-activation comes with a dashboard light and audio chimes. This mode raises the back end for extra off road ground clearance.
3. Dropped height mode:, (user controlled) this is for hitching a trailer or caravan and needs a remote key fob, although you can buy these keyfobs from ebay etc… This key fob accessory needs to be programmed to your car by a dealer. This mode drops the back end down below ‘normal’ operation levels.
4. Grounded Chassis Mode: (automatic) this mode is automated by the SLABS ecu. If it detects that the chassis is grounded using the traction control sensors. It automatically raises the chassis beyond extended height temporally in an attempt to jack the chassis out of its grounded situation.
5. Transport Mode: (dealer only) This is only available to a dealer or someone with a ‘testbook’ computer, it lowers the suspension right down, for use when the car is on a transporter.
Quirks and safety.
The suspension will rise about 20mm once the engine is started and all the doors closed. This is normal.
The suspension will drop about 20mm once the engine is switched off and all the doors are closed after exiting the car. You can usually see this happen and hear the air rushing out. This is normal.
The ‘extended mode’ will return to ‘normal mode’ once the car drives over 18mph. lights will flash on the dash and you will hear the chimes. This is normal.
For safety, all the doors including the bonnet and boot must be shut to allow any changes in the suspension height. (Remember this if you are making a repair!)
Troubleshooting.
Land Rover recommend that the air bags be changed every 5 years as they become porous with age – so if they haven’t been changed, change them..!
Sinking on one side or the other is a sure sign of an air leak on that side, if it regains normal height after running the engine (remember doors closed!) then the compressor is ok and you should be looking at replacement air bags. Replace them in pairs!
Spraying soapy water on them when in ‘extended height’ mode is a good telltale for an air leak. Find the bubbles and you have found the leak!
Expect to pay around £90 each for Air Bags and £0.50p for the clips – you’ll need two clips for each air bag. The clips are reusable, but may break when getting them off. Get some anyway to be sure.
Very few people have had an air pipe wear through by rubbing on the chassis, this is not a common fault. If this happens then the compressor will be constantly on (when the engine is running) and the car will not lift on that side.
Over inflation on one side or the other is a sign of a defective ride height sensor; this will pump the air bag to the max and will cause the front to dip down on the opposing side. DO NOT DRIVE THE CAR if this happens, Get it recovered and replaced immediately! Air bags have exploded due to over inflation. At any road speed this could be lethal... believe me, they go with a bang!!!
Replacing them is an easy job, but for safety sake must be done with caution given the fault. Expect to pay about £25 for a ride height sensor and a further hour or two costs for calibration at the dealer
Sinking on both sides and not able to regain height is probably a failed compressor or faulty valve block. Some people have claimed to source just the valve block, mostly the compressor and valve block come as one unit. The Compressor is very easy to change. Expect to pay about £200 for a new unit.
When attempting to do any repair on the suspension, pay attention to whether to support the chassis or the axle or both.
Replacing the compressor unit:
1. Secure and chock the car
2. Jack the car slightly at the back and place axle stands under the chassis rails, taking the weight of the car off the axle.
3. Locate the compressor and remove the cover using the two turn buckles and a penny.
4. Undo the two bolts that hold the compressor to the chassis.
5. Get a couple of house bricks or similar block of wood and place them under the compressor on the ground.
6. lift the compressor unit as a whole onto the bricks (there should be enough slack in the pipe work)
7. Undo all the electrical and pipe work connections and swap out for the new unit.
8. Hook compressor back into place on chassis rail and bolt back on.
9. Jack car and take axle stands away, remove jack.
10. Spray soapy water onto the valve block to check for air leaks.
11. Replace cover.
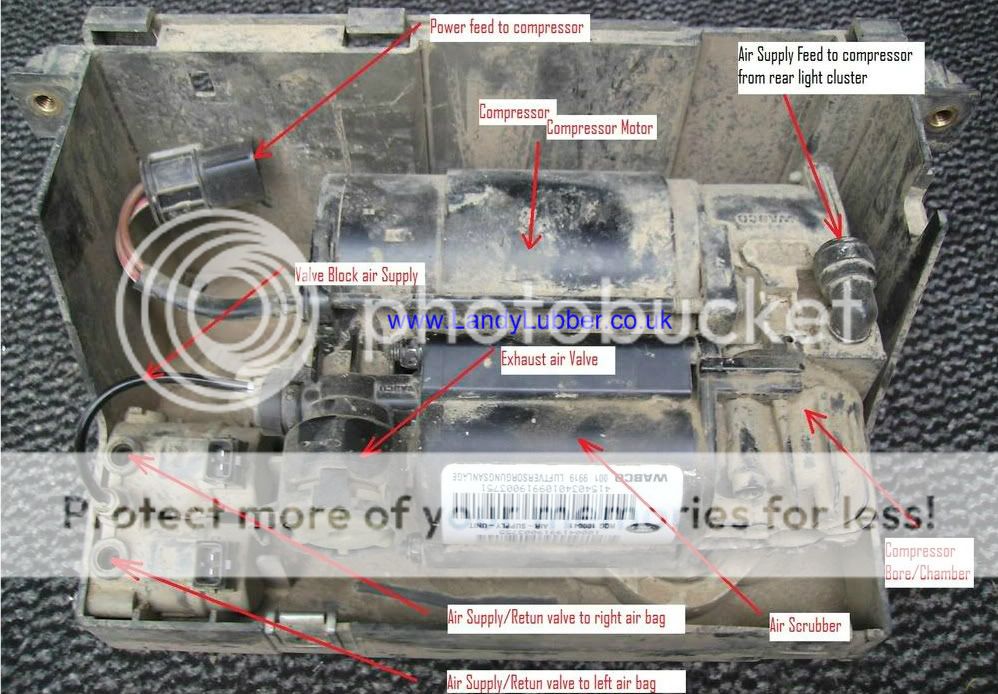
Inside the compressor unit:
Replacing an Air Bag
1. jack car really high put stands under chassis letting axle dangle
2. remove jack and put under diff pan.
3. take off wheel, jack axle slightly
4. carefully take off two air bag retaining clips at mounting at top and remove air supply pipe.
5. remove bag like light bulb
6. lock new bag in
7. use jack to raise axle and get pipe on.
8. put clips back on
9. jack up axle really high to fool sensors into low ride height
10. close all doors including boot and open drivers window.
11. start car through drivers window and run for a few seconds to put just a touch of air in the bag
12. stop engine and check that bag is inflating properly and square
run engine again till bag inflated
13. put on wheel
14. take off stands and jack
Replacing a faulty ride height sensor.
Converting the Air Bags to Coil springs.
There are conversion kits for about £100 to convert from Air to Coils.
Many people consider this option if the air is proving problematic.
Bear in mind the following if you are considering this…
...thats about it
It's about time someone put all this into one place... so here it is!
All you will ever need to know about Air Suspension.
Simply put, the air suspension on the disco II consists of a couple of balloons at each back wheel.
A way of inflating them independently and a computer to monitor the height of the car and keep it all level.
The Disco II air suspension consists of the following components:
- Air bags (balloons)
- Pipes that join the air bags to the valve block and supply air to the compressor
- A valve block to control independent inflation/deflation of the air bags
- A compressor to supply compressed air
- Air scrubbers/filters to clean and de-moisturise the air
- Ride height sensors to feedback levelling and height information to the computer
- A computer to control the valve operation and activation of the compressor
Component Locations:
- Air bags:There are two air bags, one at each back wheel (there is no air suspension on the front)
- Air Pipes: the supply air to the compressor runs along the chassis to the compressor from behind the top light cluster at the rear left hand side of the car. The supply to the air bags runs from the compressor valve block along the chassis to each of the rear air bags. There is a supply to the valve block that runs from the compressor.
- The valve block: this is contained in the compressor unit black box on the outside of the chassis rail under the passenger seat (UK models)
- Compressor: this is contained in the black box on the outside of the chassis rail under the passenger seat (UK models)
- Air Scrubbers/Filters: there is an air scrubber on the compressor unit and the filter is behind the light cluster on the end of the supply pipe.
- Ride height sensors: these are small matchbox size boxes with a plastic arm. They are attached to the chassis rail on each side at the front of the rear wheel arches and have a link bar which attaches to the rear arm to the axle and an electrical connection.
- Computer: this is the SLABS ecu (‘Self Levelling’ and ABS ecu) and is found behind the dashboard glove box.
Modes of operation.
1. Normal driving mode: this is the normal operation height of the suspension
2. Extended height mode: (user controlled), this is activated via a button on the dashboard. Activation/dis-activation comes with a dashboard light and audio chimes. This mode raises the back end for extra off road ground clearance.
3. Dropped height mode:, (user controlled) this is for hitching a trailer or caravan and needs a remote key fob, although you can buy these keyfobs from ebay etc… This key fob accessory needs to be programmed to your car by a dealer. This mode drops the back end down below ‘normal’ operation levels.
4. Grounded Chassis Mode: (automatic) this mode is automated by the SLABS ecu. If it detects that the chassis is grounded using the traction control sensors. It automatically raises the chassis beyond extended height temporally in an attempt to jack the chassis out of its grounded situation.
5. Transport Mode: (dealer only) This is only available to a dealer or someone with a ‘testbook’ computer, it lowers the suspension right down, for use when the car is on a transporter.
Quirks and safety.
The suspension will rise about 20mm once the engine is started and all the doors closed. This is normal.
The suspension will drop about 20mm once the engine is switched off and all the doors are closed after exiting the car. You can usually see this happen and hear the air rushing out. This is normal.
The ‘extended mode’ will return to ‘normal mode’ once the car drives over 18mph. lights will flash on the dash and you will hear the chimes. This is normal.
For safety, all the doors including the bonnet and boot must be shut to allow any changes in the suspension height. (Remember this if you are making a repair!)
Troubleshooting.
Land Rover recommend that the air bags be changed every 5 years as they become porous with age – so if they haven’t been changed, change them..!
Sinking on one side or the other is a sure sign of an air leak on that side, if it regains normal height after running the engine (remember doors closed!) then the compressor is ok and you should be looking at replacement air bags. Replace them in pairs!
Spraying soapy water on them when in ‘extended height’ mode is a good telltale for an air leak. Find the bubbles and you have found the leak!
Expect to pay around £90 each for Air Bags and £0.50p for the clips – you’ll need two clips for each air bag. The clips are reusable, but may break when getting them off. Get some anyway to be sure.
Very few people have had an air pipe wear through by rubbing on the chassis, this is not a common fault. If this happens then the compressor will be constantly on (when the engine is running) and the car will not lift on that side.
Over inflation on one side or the other is a sign of a defective ride height sensor; this will pump the air bag to the max and will cause the front to dip down on the opposing side. DO NOT DRIVE THE CAR if this happens, Get it recovered and replaced immediately! Air bags have exploded due to over inflation. At any road speed this could be lethal... believe me, they go with a bang!!!
Replacing them is an easy job, but for safety sake must be done with caution given the fault. Expect to pay about £25 for a ride height sensor and a further hour or two costs for calibration at the dealer
Sinking on both sides and not able to regain height is probably a failed compressor or faulty valve block. Some people have claimed to source just the valve block, mostly the compressor and valve block come as one unit. The Compressor is very easy to change. Expect to pay about £200 for a new unit.
When attempting to do any repair on the suspension, pay attention to whether to support the chassis or the axle or both.
Replacing the compressor unit:
1. Secure and chock the car
2. Jack the car slightly at the back and place axle stands under the chassis rails, taking the weight of the car off the axle.
3. Locate the compressor and remove the cover using the two turn buckles and a penny.
4. Undo the two bolts that hold the compressor to the chassis.
5. Get a couple of house bricks or similar block of wood and place them under the compressor on the ground.
6. lift the compressor unit as a whole onto the bricks (there should be enough slack in the pipe work)
7. Undo all the electrical and pipe work connections and swap out for the new unit.
8. Hook compressor back into place on chassis rail and bolt back on.
9. Jack car and take axle stands away, remove jack.
10. Spray soapy water onto the valve block to check for air leaks.
11. Replace cover.
Inside the compressor unit:
Replacing an Air Bag
1. jack car really high put stands under chassis letting axle dangle
2. remove jack and put under diff pan.
3. take off wheel, jack axle slightly
4. carefully take off two air bag retaining clips at mounting at top and remove air supply pipe.
5. remove bag like light bulb
6. lock new bag in
7. use jack to raise axle and get pipe on.
8. put clips back on
9. jack up axle really high to fool sensors into low ride height
10. close all doors including boot and open drivers window.
11. start car through drivers window and run for a few seconds to put just a touch of air in the bag
12. stop engine and check that bag is inflating properly and square
run engine again till bag inflated
13. put on wheel
14. take off stands and jack
Replacing a faulty ride height sensor.
- take your keys out of the ignition.
- DO NOT RUN THE ENGINE until you have completed the job
- if the car is up on one side due to over inflation, release air pressure at the valve block on the appropriate side by slowly slackening off the pipe union. DO NOT WORK IN THE WHEEL ARCH until correct ride height has been restored.
- chock, jack, put chassis on stands and remove road wheel.
- locate electrical connection on sensor and unplug, unbolt sensor and replace.
- restore electrical connection
- replace wheel
- with all doors closed run engine and observe.
- use a tape measure to compare sides, measure from the hub of the wheel to the top of the wheel arch. If it is wildly out, go see a dealer for a suspension calibration.
Converting the Air Bags to Coil springs.
There are conversion kits for about £100 to convert from Air to Coils.
Many people consider this option if the air is proving problematic.
Bear in mind the following if you are considering this…
- The air suspension is a European Standard for a 7 seater, if you go to coils you may invalidate your insurance for a 7 seater.
- The conversion to coils requires the re-programming of the SLABS ecu to turn off the air function, an additional cost at the dealer!
...thats about it
")