130 dcpu rebuild

This site contains affiliate links for which LandyZone may be compensated if you make a purchase.

Cps

Active Member
Posts
63
Location
North Yorkshire
Joined hear as thought I would share my 130 rebuild
Been looking and gathering info
20191227_151956.jpg
20191222_144157.jpg
20191227_144427.jpg
20191227_151956.jpg
20191222_144157.jpg
20191227_144427.jpg
for many years so though I would try and put something back in
Bit of history first. Been a landy driver since passing rest 30 years ago all defender 110 un till I bought this 130 new in 2006 as a chassis cab and bult my own drop side back with a 6ft pull out draw underneeth was in daily service as my work truck till last year when she failed mot .l run an engineering welding fabrication business
Had decided a while back that I was going to do a full nut and bolt job on her (engine excluded as runs like a champ)
And have got a v6 amarock as my daily driver to replace it for work duty
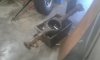
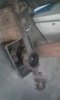
Few pics of strip down and is now all in bits I did start this in 2017 but another project took over last winter
20191227_151956.jpg

Chassis not to bad so getting striped will do some repairs. New rear crossmember them get it galved
Bulkhead is at the strippers now needs both footwells and a bit of repair inside at sides of vent flaps .top rack end under windscreen frame had disapeard into rust as well
20191222_144157.jpg
Fabed up a frame to stand engine on as have an oil leek or two to sort out . Exhaust studs to sort as well as 5 have sheared off so may upgrade manifold while I'm on
Running a big cooler with remap and egr blanked off opinions on vari noxzil turbos welcome as turbos shot seized up so needs sorting anyway
Once chassis is back from galve will be t wash and paint with 2k
Advice on springs welcome as would like a mild lift was fancying ome but I need to retain retain the helper springs in rear end and not seen anything other than standard hight with helper springs
Would guess she is 2750 kgs in normal trim full of tools and with custom rack and bar work
Will post some more as it happens
Cheers Chris
 
Did look at a few 130 but could not get into the rear garage.
Make sure you photo(may be too late now) all the truck cab to chassis brackets to help in the rebuild.
I slightly drilled all the holes even on the outriggers so when it was galved they were perfect fit.
Good security tip put ID marks onto the chassis before galved if it goes you have a better chance of recovery as any grinding will ruin the chassis.
Keep us all posted on the build.
Thanks for the tip but one of the reasons I stated the 'rebuild was rear cab suport member and brackets had rotted out door channels were in poor shape as well
Odd as chassis is almost perfect
Down side of living 100 yards from the sea
Once I change rear cross member chassis will be pretty obvious its mine . May plasma company name in it befor i bend it up if there's room
I'll try and find some photos of when I built her in 2006
 
landrover rack 001.jpg
DSCF0078.jpg

one of when it was new and another couple of years ago ,yes bit embarasing on end of a tow rope to a ranger but was a 3 tonne cable laying plough in trailer at point i got bogged front and rear lsd going in when i get to rebuilding axils
my 2 boys in first pic are asking if ill have it done befor they are driving in 2 years time
no faith lol
 
When you start to build think for the future.
Any modifications that may need to be done like a galv bulkhead ;) this is the only other panel you would need to weld.
Once you start it will flow together,get the kids involved they will need to know how to help fix it.
Yes mine looks like a shed but it hides it’s uses

207C4BD6-A44E-4263-AEBD-E71686B8B234.jpeg
 
20191228_194702.jpg
Well all about in bits now apart from hubs and a few axil related bits
20191228_194652.jpg

The two Milwaukee impact gun were invaluable nothing beat the 3/4drive one once or twice was sat on for a good while but all gave in in the end and came lose
20191228_194729.jpg

Think I've only cut about 10 bolts in all of the strip down .Will day have sheared an awful lot off though thankfully most were nuts and bolts go not a problem
Off Monday to drop chassis of at prostrip for stripping with it being a 130 was bit of a struggle to find anyone with a stripping oven big enough
Time to start and spend some coin and start ordering some bits
Anyone any thoughts on springs ?
Funny thing is one front spring is 1 inch longer than the other .
Factory like it or saged over the years ?
 

Attachments

  • 20191228_143305.jpg
    20191228_143305.jpg
    131.6 KB · Views: 255
  • 20191228_194640.jpg
    20191228_194640.jpg
    383.9 KB · Views: 267
Not much progress this week as waiting for chassis to get stripped so I can do repairs
Decided to gave the axils so cut some rings out to mask of areas where I don't want damage from blasting or the galve to get
Found best way is to make plates up and use fire clay as a sealer between plate and face that dosent doesn't want galve . Done this many times on structural stuf In my day job
20200104_143530.jpg
plasma in action . Bit tricky drawing the bits as holes are not a standard pcd so as stubs and difs only go on one way
20200104_143851.jpg

Buy a ready to bolt on
20200104_160622.jpg

Ready to take to blasters next week
Once done I'll slap the fire clay in desired areas . Lucky for me as have blaster and powder coaters next door to my unit
 
Few bits back from galve, fire clay and cover plates worked well no galve on mating surfaces at all
20200123_173524.jpg

Got chassis and bulkheadback from stripping
Seems the wire worms have had a go at footwells. Don't look to bad befor it went to get stripped .
Will take some picks when I get it jiged up ready to start choping to bits
 
Love the work, but the pics are truly awful (no offense intended). Clean the lens or get a newer camera, it is like looking through a chiffon scarf. ;)
 
stuck the sill channels back on the b posts today so can go for galve next week as i have a load going hopefully
20200322_160506.jpg
20200322_160457.jpg
20200322_160450.jpg
will get chassis repairs finished next week and get that away for galve
looking at the way the county is going i may need something to pass my time if we get all work shut down
had to stick a small bit at the rear end of the near side sill channel as the wire worms had eaten it a bit , rest was in decent nick for all the rust that was on them when i sent them to be stripped
sorry for the sub quality pics but lenses on my phone is scratched a bit
 
Back
Top