charliedurrant
Member
- Posts
- 96
- Location
- Broadstairs, Kent, UK
Okay, here’s my take on replacing the steering angle sensor in a L322 2003 Range Rover.
There are other threads detailing the procedure but without photos:
http://www.fullfatrr.com/forum/topic12324.html?view=next
http://www.rangerovers.net/forum/6-...22/33038-replacing-steering-angle-sensor.html
Here are the symptoms of a faulty steering angle sensor:

It’s like the Christmas tree lights are being put on early! The same lights can occur after a battery change. You need to turn full lock right and full lock left after changing the battery (or a flat battery). If the warnings don’t got it’s likely it’s the steering angle sensor.
The lights 'can' be caused by other things such as ABS sensors, ref: https://www.landyzone.co.uk/land-rover/steering-angle-sensor.232571/
...so it’s best to check the fault codes before going ahead and assuming this is down to your steering angle sensor.
I have the AllComms sofware (I have used it sooo many times!)
http://www.rswsolutions.com/index.php/range-rover-mkiii/mkiii-all-comms
This gives you live steering angle sensor data. Mine showed nothing was coming back from the sensor, so I was pretty sure it was the darn sensor.
The previous threads linked to above start with full dash removal then it becomes clear that you can disconnect the steering column and replace the sensor without removing the dash.
I didn’t invent the following procedure but I did take some pictures which will hopefully help others:

Now here comes the tricky part. Working under the footwell. This is a right pain in the back, neck, arms and fingers. The picture below shows the area looking up above the footwell:

Now came the trouble, reattaching the pinch bolt. The steering column has grooves and they need to align with the U joint. Also the column has a notch taken out which the pinch bolts aligns with, if the notch is not aligned the bolt will not go in. I kept on thinking I had everything right but the bolt would not go in.
The column had in fact gone too far into the U joint. It doesn’t go in as far as you would think. The way to line it up is to get right 'in there' with a torch and use your eyes. It hurts, but get it lined up and all will go smoothly. I did all this on my own and you don’t need someone to hold the steering column – I’m sure it would help though!
In conclusion, the procedure is pretty simple but only once you've done it! It took me about 2 hours and most of that time was spent getting the pinch bolt back.
My replacement sensor was not OEM but a Febi Bilstein 36081
Amazon product

£160 and all that was wrong with the old was a worn out contact.
Charlie
There are other threads detailing the procedure but without photos:
http://www.fullfatrr.com/forum/topic12324.html?view=next
http://www.rangerovers.net/forum/6-...22/33038-replacing-steering-angle-sensor.html
Here are the symptoms of a faulty steering angle sensor:
- HDC Inactive dash warning message
- Air suspension inactive dash warning message
- Yellow dash light warning –Triangle with a circular arrow
- Yellow dash warning light – ABS
- Yellow dash warning light – looks like the ABS light
It’s like the Christmas tree lights are being put on early! The same lights can occur after a battery change. You need to turn full lock right and full lock left after changing the battery (or a flat battery). If the warnings don’t got it’s likely it’s the steering angle sensor.
The lights 'can' be caused by other things such as ABS sensors, ref: https://www.landyzone.co.uk/land-rover/steering-angle-sensor.232571/
...so it’s best to check the fault codes before going ahead and assuming this is down to your steering angle sensor.
I have the AllComms sofware (I have used it sooo many times!)
http://www.rswsolutions.com/index.php/range-rover-mkiii/mkiii-all-comms
This gives you live steering angle sensor data. Mine showed nothing was coming back from the sensor, so I was pretty sure it was the darn sensor.
The previous threads linked to above start with full dash removal then it becomes clear that you can disconnect the steering column and replace the sensor without removing the dash.
I didn’t invent the following procedure but I did take some pictures which will hopefully help others:
- Steering column black trim off (3 torx screws). Two are the same size, one smaller. The smaller one is very deeply recessed in the trim. I had to use a very lock socket extension. The trim does come out (it does require some pulling), you can leave this until after the steering column retaining bolts are removed.
- Side center console trim off – one torx screw in the footwell area and then pull the wood toward the door, it’s held on with two of those clips / poppers.
- Black trim under the dash off – a series of torx screws, you’ll need to completely remove this piece so disconnect all the wires.
- Make sure the steering is centered
Now here comes the tricky part. Working under the footwell. This is a right pain in the back, neck, arms and fingers. The picture below shows the area looking up above the footwell:
- Disconnect the pinch bolt – it’s a nylock nut, great but understandable! Completely remove the bolt. Access is hard, depending on the way the bolt is orientated. Much grumbling from me!
- Diconnect the steering sensor plug and feed it through the large black cable tie.
- Now remove the 4 bolts holding the steering column. Luckily these go into aluminium and are not hard to turn. I used various socket extenders but only to initially loosen the bolts. After that the socket ratchet is not required.
- Now pull the steering wheel towards you when in the seat. I tugged hard, I didn’t need to. It separates easily around where you removed the pinch bolt.
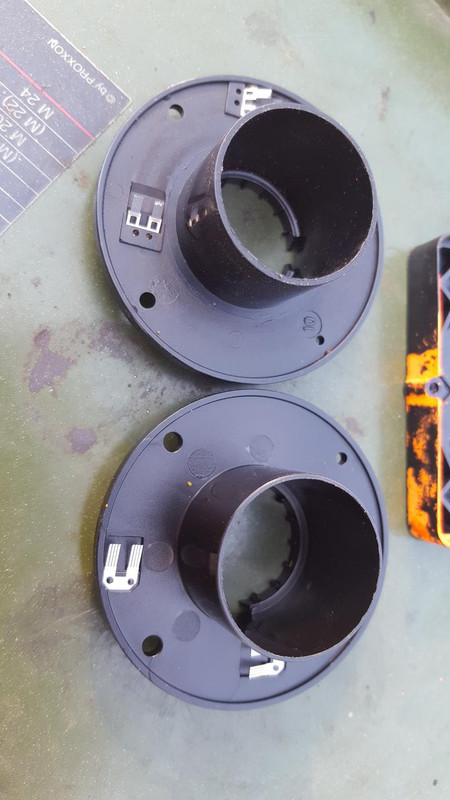
- Slide off the old sensor noting it’s orientation
- Oh no, I compare it to my new sensor and the hole where the steering shaft goes it too big! Fear not, in the old sensor there is a plastic plug that can be removed and put into the new sensor. Now, if you don’t have the appropriate diagnostics software you can’t just swap in a new sensor. The new sensor needs to be coded to the vehicle. Allcoms can do this:
- But if you don’t have AllComms you can swap out the moving parts of the sensor and retain the electronics. My sensor had a worn contact (see pic at the end) so it would have been okay but with AllComms I could procced as per the youtube link above.
Now came the trouble, reattaching the pinch bolt. The steering column has grooves and they need to align with the U joint. Also the column has a notch taken out which the pinch bolts aligns with, if the notch is not aligned the bolt will not go in. I kept on thinking I had everything right but the bolt would not go in.
The column had in fact gone too far into the U joint. It doesn’t go in as far as you would think. The way to line it up is to get right 'in there' with a torch and use your eyes. It hurts, but get it lined up and all will go smoothly. I did all this on my own and you don’t need someone to hold the steering column – I’m sure it would help though!
- Refit the pinch bolt – not sure of the torque, I just did it tight
- Refit the 4 retaining bolts – by hand first then with the ratchet, I didn’t do them crazy tight.
- Thread the sensor wire back under the cable tie
- Reconnect the sensor
- Use allcomms to recode the car to the sensor if you have complete changed the sensor
- Replace trim - the steering column trim was awkward to get back.
In conclusion, the procedure is pretty simple but only once you've done it! It took me about 2 hours and most of that time was spent getting the pinch bolt back.
My replacement sensor was not OEM but a Febi Bilstein 36081
Amazon product
£160 and all that was wrong with the old was a worn out contact.
Charlie
Last edited:
")