ReadySalted
Active Member
- Posts
- 444
Hi all,
This may be quite a longwinded post so if you don't fancy reading all my drivvle, then just scroll on down and I've attached a few pics to explain the design better.
I've always liked the idea of a landrover camper, especially the old carawagons. That mix of a go-anywhere vehicle, with the homelyness and self sufficiency that a camper offers you. There's plenty of cracking designs for overland discovery 1s, and all kinds of storage systems, but I wanted something quite specific for mine.
It had to:
-Not stand out too much or require altering the vehicle too much, as it's my only vehicle.
-Retain alot of it's load capacity when in normal use ie. me and my other half with a basset hound, and a labrador. (Bear in mind that when using it as a camper I will add a roofrack, to ensure the sleeping area is relatively empty)
The limitations were:
-My limited DIY ability
-The size of the discovery boot at the longest possible point (ie. front seats as forward and tilted as will allow)
-Cost (I didn't want this to cost too much considering there was a fair chance it could go tits up, and never by used/ I might hate it)
So I scoured the forums and most of the info from 4x4 forums I found, I have linked below. I basically decided to pretty much copy a design from the safaripacific forum, because it seemed cheap, sturdy, and was made from scratch with simple design of timber.
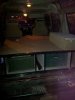
I used 12mm shuttering ply for the base, and 18mm for the dividers, noggins, and lids.
How I did it:
I started off by removing the rear seats, and the dickie seats. With these removed I had a much better idea of the space I was working with, and realized the full size of the discos spacious interior. After being unable to undo the seatbelts from the centre of the boot floor I gave up and began measuring up.
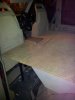
Once measured, I cut the base to size and cut holes in it to allow the seatbelts to come through. This was no biggie, and just means that there's one less thing to refit, should I ever want a 5 seater again.
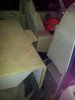
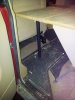
Next I cut the dividers to size. The two outside dividers were cut slightly shorter and extended from the rear door, all the way up the disco, to where the floor drops away into the 2nd row footwell. I made a taper on the dividers here, to allow side access to underneath the platform from the 2nd row doors.
The two inside dividers extended slightly further, going almost all the way up to the cubby box.
This gave me three channels running from the back door up to the front seats. The width of the two outside channels was dictated by the size of some plastic boxes I had to use, and the interior channel was left quite thin, which lends itself nicely to long thin items such as tent poles, camping chairs, jack handles etc. I also divided the two outside channels into a front compartment and a rear compartment. This is important so that my boxes don't slide around under the platform, but also added rigidity.
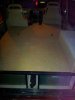
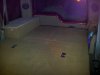
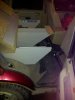
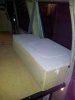
Next I made the lids. The rear lid which covers the back half of the platform is designed to lift on and off as necessary, and the front lid, is hinged to allow access to the forward compartments. There are also two flaps hinged to the front lid directly behind each front seat. These fold upwards when the front seats are tilted and pushed right forwards and allow the platform to be extended to it's full length for being used as a bed. The total length is around 180-182 cm. (Almost exactly 6 foot).
Once the lids were cut to size, I covered the platform in carpet tiles from B&Q. After several days of being annoyed by the shineyness/ visible joins/ colour of the carpet tiles, I removed them and recovered each lid individually with a thin table protector (around 1mm of foam), and then a cocoa brown suede to match the interior. The overall effect I am very pleased with, and although in the pictures, the colours don't appear to be a great match, in person and in normal daylight it fits in well with the beige interior.
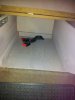
Finally I knocked up a little unit which covered the recess on one side where there was once a dickie seat. As you can see, the lid of the unit is yet to be covered properly, but it is fitted with a sink which will have a plug, and waste pipe attached. The waste pipe when needed can simply be poked out of the back door and then when not needed any more can be plugged and poked back into the disco out of sight and out of the way. The unit has a removable lid which means I can still use the old dickie seat recess as a storage area, most likely for food and small cooker. The unit also allows a bit of a raised surface for anything from resting my laptop on, to cutting vegatables, and resting the cooker on.
I have yet to test out the platform for real but it happily holds my 14 stone with no creaks so I'm confident it's strong enough.
I still have several jobs to do, including a rear door shelf, curtains, an inverter, and possibly an awning, so will post pics of those up when done.
Anyways, hope this has been interesting and please let me know what you think!
References:
Sleeping in a D1 - Page 3 - Australian Land Rover Owners
Forum - Safari Pacific - View topic - Travis' Land Rover Discovery I (MX5)
Disco Sleeping Platform Photos by dSIco | Photobucket
Difflock :: View topic - discovery sleeping arrangement
Sleeping platform for Discovery
This may be quite a longwinded post so if you don't fancy reading all my drivvle, then just scroll on down and I've attached a few pics to explain the design better.
I've always liked the idea of a landrover camper, especially the old carawagons. That mix of a go-anywhere vehicle, with the homelyness and self sufficiency that a camper offers you. There's plenty of cracking designs for overland discovery 1s, and all kinds of storage systems, but I wanted something quite specific for mine.
It had to:
-Not stand out too much or require altering the vehicle too much, as it's my only vehicle.
-Retain alot of it's load capacity when in normal use ie. me and my other half with a basset hound, and a labrador. (Bear in mind that when using it as a camper I will add a roofrack, to ensure the sleeping area is relatively empty)
The limitations were:
-My limited DIY ability
-The size of the discovery boot at the longest possible point (ie. front seats as forward and tilted as will allow)
-Cost (I didn't want this to cost too much considering there was a fair chance it could go tits up, and never by used/ I might hate it)
So I scoured the forums and most of the info from 4x4 forums I found, I have linked below. I basically decided to pretty much copy a design from the safaripacific forum, because it seemed cheap, sturdy, and was made from scratch with simple design of timber.
I used 12mm shuttering ply for the base, and 18mm for the dividers, noggins, and lids.
How I did it:
I started off by removing the rear seats, and the dickie seats. With these removed I had a much better idea of the space I was working with, and realized the full size of the discos spacious interior. After being unable to undo the seatbelts from the centre of the boot floor I gave up and began measuring up.
Once measured, I cut the base to size and cut holes in it to allow the seatbelts to come through. This was no biggie, and just means that there's one less thing to refit, should I ever want a 5 seater again.
Next I cut the dividers to size. The two outside dividers were cut slightly shorter and extended from the rear door, all the way up the disco, to where the floor drops away into the 2nd row footwell. I made a taper on the dividers here, to allow side access to underneath the platform from the 2nd row doors.
The two inside dividers extended slightly further, going almost all the way up to the cubby box.
This gave me three channels running from the back door up to the front seats. The width of the two outside channels was dictated by the size of some plastic boxes I had to use, and the interior channel was left quite thin, which lends itself nicely to long thin items such as tent poles, camping chairs, jack handles etc. I also divided the two outside channels into a front compartment and a rear compartment. This is important so that my boxes don't slide around under the platform, but also added rigidity.
Next I made the lids. The rear lid which covers the back half of the platform is designed to lift on and off as necessary, and the front lid, is hinged to allow access to the forward compartments. There are also two flaps hinged to the front lid directly behind each front seat. These fold upwards when the front seats are tilted and pushed right forwards and allow the platform to be extended to it's full length for being used as a bed. The total length is around 180-182 cm. (Almost exactly 6 foot).
Once the lids were cut to size, I covered the platform in carpet tiles from B&Q. After several days of being annoyed by the shineyness/ visible joins/ colour of the carpet tiles, I removed them and recovered each lid individually with a thin table protector (around 1mm of foam), and then a cocoa brown suede to match the interior. The overall effect I am very pleased with, and although in the pictures, the colours don't appear to be a great match, in person and in normal daylight it fits in well with the beige interior.
Finally I knocked up a little unit which covered the recess on one side where there was once a dickie seat. As you can see, the lid of the unit is yet to be covered properly, but it is fitted with a sink which will have a plug, and waste pipe attached. The waste pipe when needed can simply be poked out of the back door and then when not needed any more can be plugged and poked back into the disco out of sight and out of the way. The unit has a removable lid which means I can still use the old dickie seat recess as a storage area, most likely for food and small cooker. The unit also allows a bit of a raised surface for anything from resting my laptop on, to cutting vegatables, and resting the cooker on.
I have yet to test out the platform for real but it happily holds my 14 stone with no creaks so I'm confident it's strong enough.
I still have several jobs to do, including a rear door shelf, curtains, an inverter, and possibly an awning, so will post pics of those up when done.
Anyways, hope this has been interesting and please let me know what you think!
References:
Sleeping in a D1 - Page 3 - Australian Land Rover Owners
Forum - Safari Pacific - View topic - Travis' Land Rover Discovery I (MX5)
Disco Sleeping Platform Photos by dSIco | Photobucket
Difflock :: View topic - discovery sleeping arrangement
Sleeping platform for Discovery
Attachments
-
 20140324_184912.jpg172 KB · Views: 2,614
 -
 20140324_185026.jpg187.4 KB · Views: 2,721
 -
 20140324_185450.jpg129.5 KB · Views: 2,602
 -
 20140324_184756.jpg156.7 KB · Views: 2,569
 -
 20140324_185243.jpg173.1 KB · Views: 2,568
 -
 20140324_185123.jpg184.3 KB · Views: 2,925
 -
 20140324_185231.jpg224.2 KB · Views: 2,061
 -
 20140324_185220.jpg192.6 KB · Views: 2,025
Last edited:

")