P38A Window switch pack tear down

This site contains affiliate links for which LandyZone may be compensated if you make a purchase.

Datatek

Well-Known Member
Posts
44,030
Location
Near Poitiers SW France
P38 window switch pack repairs.
The switch pack is held in by 2 screws at the top, visible when the cubby lid is opened.

With the screws undone the pack lifts up and out, there is just one electrical connector to disconnect. The interesting bit is removing the rubber grip from the hand brake, a lot of tugging and twisting is needed.
upload_2020-5-11_16-47-7.png

upload_2020-5-11_16-47-31.png


Time to move to the work bench. The switch pack is held to the fascia with 8 spline head screws which should be removed and the fascia put to one side.
Now the back of the switch pack can be removed, it is held by two little tangs at one end, they both broke on mine when I flexed them to remove the back, it's not a serious problem.
Here is the switch pack rear cover, screw holes and broken tangs can just be seen.
upload_2020-5-11_16-49-16.png

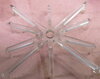
Next the illumination spider can be removed and along with the back put to one side.
Warning DO NOT TOUCH the pins on the large integrated circuit as you may damage it.
upload_2020-5-11_16-50-16.png


The switch pack is basically the same with or without sun roof there is just a dummy switch fitted if no sun roof is present so either switch pack can be adapted for use with or without sunroof. The switch pack is also the same for left hand or right hand drive, only the fascia is different.

Looking at the side of the printed circuit board with the switch rockers, you will see that there is a plastic film stuck to the board, the film actually covers the switch contact pieces making cleaning difficult. I have found that in many cases with the board laid flat, flooding the switch body with Aeroclene 50 or Servisol Super 10 allows enough cleaner to seep in so with a vigorous toggling of the switch will clean up the contacts.
If that fails, there is no option but to remove the switch body. This is done by nipping off the black plastic pimples on the back of the board, super glue or such like will be needed for replacement.
upload_2020-5-11_16-51-42.png

upload_2020-5-11_16-52-12.png

With the body off, you can see the actual switch mechanism, a convex snap action metal disc under the plastic film. Prise up the film from the edges just enough to get some switch cleaner in and gently activate the disc from the centre with the end of a Biro or similar. The switch can be tested by plugging the panel into the car and operating the up/down discs. If all is OK, refit the switch body and retest BEFORE fixing the body with glue (Edit) I did not make this clear, the glue should be applied to the the ends of the locating pegs on the back of the board, a small spot of super Glue gel or hot glue is sufficient so it can be easily removed if necessary, I only do it to 4 of the 7 pegs. Double sided tape does not work, there is insufficient surface area on the underside of the switch body to retain it, plus dust and dirt sticks to the tape. Repeat for any other switches that are not working.
upload_2020-5-11_16-58-9.png

Leave overnight and retest, if all is OK the switch pack can be reassembled, don't forget the illumination spider, and re attached to the fascia. Check that the illumination bulb is working at this stage and replace if needed. The whole lot can then be reinstalled in the car. Job done.

I'm no expert at write ups or photography and my good camera is broken, but I hope this helps. Additions and corrections welcomed.
 

Attachments

  • IMG_1177.jpg
    IMG_1177.jpg
    251.2 KB · Views: 113
  • IMG_1187.jpg
    IMG_1187.jpg
    275.3 KB · Views: 129
Last edited:
I find that if you have to remove a switch pack to clean the contacts. After removing switch pack, you cut away the plastic film holding the contacts in place around the area of the switch pack then remove and clean contact points on board and contact plates themselves. Then replace contact plates and use double sided tape to hold them in position over the board contact points, then peel the covering from the double sided tape pierce at pin points and push switch pack back into position there is no need for superglue as the tape holds the switch pack in position. If the job needs doing again at any time removal is easy. It would not be using super glue.
 
I find that if you have to remove a switch pack to clean the contacts. After removing switch pack, you cut away the plastic film holding the contacts in place around the area of the switch pack then remove and clean contact points on board and contact plates themselves. Then replace contact plates and use double sided tape to hold them in position over the board contact points, then peel the covering from the double sided tape pierce at pin points and push switch pack back into position there is no need for superglue as the tape holds the switch pack in position. If the job needs doing again at any time removal is easy. It would not be using super glue.
Double sided tape potentially restricts the movement of the discs, I have never found the need so far to either cut the plastic or remove the discs, maybe I have just been lucky, For sure double sided tape does not hold the switch body in place for long.
 
Double sided tape potentially restricts the movement of the discs, I have never found the need so far to either cut the plastic or remove the discs, maybe I have just been lucky, For sure double sided tape does not hold the switch body in place for long.

No it doesn't, The discs do not move other than the centre going in and out, they are convex and just sit on the three outer contact points and contact to the centre contact point is made when the switch is pressed. That is what i did on the two units i have repaired and they are still working.
 
No it doesn't, The discs do not move other than the centre going in and out, they are convex and just sit on the three outer contact points and contact to the centre contact point is made when the switch is pressed. That is what i did on the two units i have repaired and they are still working.
You go your way, I'll go mine, the discs are supposed to be free under the plastic. I have had hundreds of keyboards manufactured using this type of switch for my industrial control systems. In addition dust and other contaminants will stick to the double sided tape.
 
You go your way, I'll go mine, the discs are supposed to be free under the plastic. I have had hundreds of keyboards manufactured using this type of switch for my industrial control systems. In addition dust and other contaminants will stick to the double sided tape.

Why are you arguing the toss when you have never done it. The double sided tape holds the plates in place over the three contact points, as does the plastic you remove and also secures the switch pack in place. Even if you used single sided tape the switch pack is so tight on the pins it would more than likely never come loose. Using double sided tape just ensures that it doesn't.
 
Why are you arguing the toss when you have never done it. The double sided tape holds the plates in place over the three contact points, as does the plastic you remove and also secures the switch pack in place. Even if you used single sided tape the switch pack is so tight on the pins it would more than likely never come loose. Using double sided tape just ensures that it doesn't.
 
Why are you arguing the toss when you have never done it. The double sided tape holds the plates in place over the three contact points, as does the plastic you remove and also secures the switch pack in place. Even if you used single sided tape the switch pack is so tight on the pins it would more than likely never come loose. Using double sided tape just ensures that it doesn't.
I have tried it and I have done several switch packs, double sided tape is not appropriate IMO. As I said you go your way and I will go mine, I have had many hundreds of similar switches through my hands, I doubt you have done many.
 
I have tried it and I have done several switch packs, double sided tape is not appropriate IMO. As I said you go your way and I will go mine, I have had many hundreds of similar switches through my hands, I doubt you have done many.

IMO it is and has proved to work. End of story.
 
If you can get contact cleaner anywhere near the depression plates the plastic seal is compromised and the reason they have failed in the first place. ;):D
Pfft I have automagic doncha know?
They go up and down without me having to do a thing ;)

Climate control ;)
 
I've probably repaired 30+ switchpacks now. I did 7 of them the other week, and have another 3 or 4 sitting in a pile here waiting for me to get the enthusiasm to pull them apart...

I take the switch contacts off the board, only because I've found a few where the pads on the PCB have surface corrosion on them, and I've had a few of the actual metal dome switches be tarnished aswell. These days I actually have replacement metal dome switches, so I just chuck the old ones out and replace with new. A strip of clear sellotape over the top to hold them in place over the contact pads on the PCB and prick the holes for the switch body with a sharp knife.

I refit the switches with the bits of plastic that I've removed (these days I melt them off with a sharp tip soldering iron). I keep them when they come off, and then re-melt them back in with a pointed tip iron, and the squish them flat with a metal spudger. Seems to work alright, though glue would most likely do the same job.

Good to see someone else pulling one apart though! :) Other than the plastic bits holding the switch bodies on, they are pretty simple devices!
I've not done that many P38 switch panels, but done many using the same technology in industrial control. I have only had a couple of individual switches where I've had to remove the disc, I was able to lift and just re-lay the existing plastic. I have also tried melting the ends of the mounting pegs, it also works well but many do not have a suitable soldering iron, that is why I tried glue. I'm not very good at write ups, what I have in my mind does not always make onto the paper in a comprehensible form.:(
Sorry if I'm affecting your business, I do this stuff for fun.
 
I've probably repaired 30+ switchpacks now. I did 7 of them the other week, and have another 3 or 4 sitting in a pile here waiting for me to get the enthusiasm to pull them apart...

I take the switch contacts off the board, only because I've found a few where the pads on the PCB have surface corrosion on them, and I've had a few of the actual metal dome switches be tarnished aswell. These days I actually have replacement metal dome switches, so I just chuck the old ones out and replace with new. A strip of clear sellotape over the top to hold them in place over the contact pads on the PCB and prick the holes for the switch body with a sharp knife.

I refit the switches with the bits of plastic that I've removed (these days I melt them off with a sharp tip soldering iron). I keep them when they come off, and then re-melt them back in with a pointed tip iron, and the squish them flat with a metal spudger. Seems to work alright, though glue would most likely do the same job.

Good to see someone else pulling one apart though! :) Other than the plastic bits holding the switch bodies on, they are pretty simple devices!

Yeah that,s how i do it but use double sided tape to hold the switch pack in position. Someone will be along shortly to correct us. :D:D
 
I've not done that many P38 switch panels, but done many using the same technology in industrial control. I have only had a couple of individual switches where I've had to remove the disc, I was able to lift and just re-lay the existing plastic. I have also tried melting the ends of the mounting pegs, it also works well but many do not have a suitable soldering iron, that is why I tried glue. I'm not very good at write ups, what I have in my mind does not always make onto the paper in a comprehensible form.:(
Sorry if I'm affecting your business, I do this stuff for fun.

I know what you mean - I often have trouble getting the thoughts that seem organised in my head, out onto paper/typed up! never seems to quite come out the same!
Not affecting my business at all! If anyone is wanting to repair their own then I'm all for it - which is why I did my write up on rangerovers.net years ago - as it seemed to be a somewhat common problem and fairly easily repairable. I still get a fair number of people who want repaired ones because they aren't comfortable pulling the switchpack apart on their own - but for people like us who like pulling stuff apart, it's always nice to have some pictures to reference to! I have various soldering iron tips, for various things - but what glue did you use? I'm now wondering if I try that, as whilst re-melting the plastic is sturdy, it is time consuming and a bit tedious if I've had to take 3 or 4 switches off the board.

Yeah that,s how i do it but use double sided tape to hold the switch pack in position. Someone will be along shortly to correct us. :D:D

I only use single sided tape - that's all that was on there to start with - so a standard piece of clear sellotape to hold the buttons in place, and then the switch body sits on top of that, with the plastic lugs melted back into place to hold the switch body to the PCB, as it originally was - except maybe not as pretty as the original! If double sided tape works for you, then good stuff - I haven't tried it before - I just went with what was on there originally.
 
I know what you mean - I often have trouble getting the thoughts that seem organised in my head, out onto paper/typed up! never seems to quite come out the same!
Not affecting my business at all! If anyone is wanting to repair their own then I'm all for it - which is why I did my write up on rangerovers.net years ago - as it seemed to be a somewhat common problem and fairly easily repairable. I still get a fair number of people who want repaired ones because they aren't comfortable pulling the switchpack apart on their own - but for people like us who like pulling stuff apart, it's always nice to have some pictures to reference to! I have various soldering iron tips, for various things - but what glue did you use? I'm now wondering if I try that, as whilst re-melting the plastic is sturdy, it is time consuming and a bit tedious if I've had to take 3 or 4 switches off the board.


I only use single sided tape - that's all that was on there to start with - so a standard piece of clear sellotape to hold the buttons in place, and then the switch body sits on top of that, with the plastic lugs melted back into place to hold the switch body to the PCB, as it originally was - except maybe not as pretty as the original! If double sided tape works for you, then good stuff - I haven't tried it before - I just went with what was on there originally.
Super Glue Gel works and is available to all, but I prefer a spot of hot glue, both can be cut off if the need arises.
It gets hot down here, there is insufficient surface area on the underside of the switch body to hold it with double sided tape, it may work in cooler climes but also will get a lot of dust collecting on the exposed surface.
 
Back
Top