Tips on How to remove the Viscous fan

This site contains affiliate links for which LandyZone may be compensated if you make a purchase.
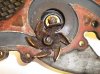
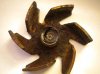
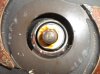
I'm getting nowhere with this. Tried the rag between the pully and the belt to try and jam the pully but no matter what I do or how hard I clout the wrench I just can't get the nut to budge. I have even managed to get a 10mm ring onto one of the pully studs so I could get some more purchase but still to no avail. Is it worth applying a bit of heat to the nut?

At the risk of playing devils advocat....

Are you trying to turn it the right way ?? ;)
 
At last I got it. Had to resort to a good size chisel but a couple of cracks with that did the job.
Got the pump off and holy sh1t - the impeller is completely torn from the shaft. Check out the pictures. New one just been ordered so fingers crossed we will be back on the road by the weekend.

Thanks for all the advice.
 

Attachments

  • Water Pump.jpg
    Water Pump.jpg
    114.9 KB · Views: 524
  • Impeller.jpg
    Impeller.jpg
    59.8 KB · Views: 377
  • Impeller shaft.jpg
    Impeller shaft.jpg
    99.7 KB · Views: 396
At last I got it. Had to resort to a good size chisel but a couple of cracks with that did the job.
Got the pump off and holy sh1t - the impeller is completely torn from the shaft. Check out the pictures. New one just been ordered so fingers crossed we will be back on the road by the weekend.

Thanks for all the advice.

Might i suggest this could cause waterflow problems.:D:D:D
 
At last I got it. Had to resort to a good size chisel but a couple of cracks with that did the job.
Got the pump off and holy sh1t - the impeller is completely torn from the shaft. Check out the pictures. New one just been ordered so fingers crossed we will be back on the road by the weekend.

Thanks for all the advice.

Check your anti freeze, that looks from the photo's as though it's sheared off due to being frozen solid:eek:
 
I have a W reg 2000 discovery td5 and guarantee the viscous is normal thread i.e stand at the front of the car and smack it to the left.
 
Having read all the various ways and failed, this is how I did it.
P38 2.5 DSE
Remove the plastic cover (front piece only, 3 socket screws)
Undo the cable carrier underneath, 10mm and 13mm, and clip back. You can now see the rabbit:)
32mm spanner or adjustable will now fit.
Try to undo as described elswhere. LH thread, i.e. move the top of the spanner to the right.
If it comes undone go to the last bit, if not...
Make the special tool.
1/8" plate, 4X12mm holes and a slot to go over the spindle and weld to a piece of 1/8"X1" ribbon.
TO SAVE YOU TIME, THE CENTRES ARE 45MM AND 35MM APART (NOT A SQUARE)
Undo as normal, easy no hammers, no blood.
Lastly prize off the two clips holding the rad cowl in place and remove fan through the gap.
Hope this night help some one.

Damn fine necromancy there sir!
 
Back
Top