The 110.

This site contains affiliate links for which LandyZone may be compensated if you make a purchase.
It's supposed to be the proper conversion pipe kit that costs a bloody fortune! It doesnt need much cutting and shutting on the foot well just a bit of a pain!
 
I fully sympathise, mate!
These types of 'straight forward' jobs took the most time on my 300 conversion.
It's very demoralising at the time but walking away for a bit helps clear the head and devise a cunning plan!
It's then very satisfying when you overcome the challenge!!
Chin up!
Rich
 
Oh I am way too far into this project to walk away from the bugger now!
Its not a big modification, I just need to move one corner back about 30mm.
After what I have been through with this I don't worry anymore! I just walk away and do one of the many "house" jobs that are on the list ;)
 
Wheel Alignment.
The 110Posted by Nicky Smith Fri, November 18, 2016 16:38:31
After feeling sorry for myself for a while after realising that I was going to have to make some structural alterations to the passenger foot well so the 200tdi's exhaust does not hit it constantly I wandered back outside to have a look at the motor that seems to be the project destined to last for ever.

The steering is sort of half replaced so I took a closer look at what was left to do. As I was hunkered down I recalled that the front wheels needed setting up straight before I would be able to do a great deal. This would save me having to take off/adjust the track rod ends later on in the rebuild.
Now I do not own any fancy wheel alignment equipment but what I do own is a long length of rope. I tied this around the rear axle then ran it down the side from wheel to wheel which showed me which way to adjust it.

www

www

With the first side done and wedged into position I made short work of the other. Afterwards I did a quick double check and great stuff they are both nice, straight and in line now.

Then I set the steering box to its centre position and started to fit on the new drop arm. I was advised to do a bit of a mod here so the drop arm is a Discovery one and the new front steering bar I bought did not have any fittings for the steering damper.

www

A quick search on the internet showed that although opinions are split on whether a damper is needed or not it does make the drive a bit better when hitting pot holes etc.
Looks like a trip will be needed to exchange some parts that have already been bought but there was a niggling at the back of my mind to check the spares shed out.
A quick rummage through a shelf full of junk and a heavy duty front steering bar that came as part of a job lot of stuff was soon found complete with a damper mount already welded on!

A quick rub down, removal of the old tired track rod ends then a coat of black paint and shiny new ends is problem solved for me.

www

I do still need to pick up a Discovery 1 steering Damper to fit but the parts I have to return to Paddocks will more than cover the cost of that!
All in all it has been a productive day on the old boy.
 
Nice job!:)
Like your technique for aligning the wheels!
Sounds like your shed is an aladdins cave !! Could do with a shed like that myself!!
My job yesterday was mopping the water out of my Land Rover after mondays rain! :eek:
It would seem that I need to replace the hard top side to tub seals :mad:

Rich
 
LOL Rich I think most Land Rover owners were mopping out yesterday!
The spares shed isnt that impressive, it just has a few years of accumulation of parts in the bugger. There has been a few job lots bought to get one or two things that I needed ;) Could do with a clear out really!
 
Doors & Dampers.
The 110 Posted by Nicky Smith Thu, November 24, 2016 23:18:33
Unfortunately The 110 is not my only project, you see Wifey did insist that we bought a house now so we could hopefully grow old and grey in it as the years go by. The thing is that she does insist on putting her own mark upon this new home we shall spend out autumn years in so there is now a "list" of improvements that need to be done.
She is one in a million though and is in no great rush to get it all done particularly quickly. That said would not want to impose upon her good nature and just focus upon my own toys all of the time so this afternoon I set to taking down the last pair of 1970's dark brown and shiny doors off of the living room and study.
I wish I had taken a picture of them in situ but I forgot if I am honest and trust me here you are not missing anything at all. These types of cheap formica doors were all of the rage with their highly modern smooth mass produced surfaces. The ones in this house have been here since the place was first built.

It didn't take long to get to get them down and in all fairness it was no time at all before the replacements were up in place. As always it took longer to sort out the catches and door furniture than the time to hang the actual doors but the overall effect is quite pleasing, even if I do say so myself.

www

It is nice to keep doing these little jobs putting our own stamp on the new home.

That done along with a hearty dinner in my belly and I sat down to chill out for the evening. Yea that lasted all of thirty minutes. I am not one to sit around just looking at the TV so I pondered what to do next.
Well I have had some shiny sun shine bright LED lights fitted under the car port so I could work on The 110 these long dark evenings.
Best try them out then eh!

If you recall I was about half way through sorting the steering out on the Land Rover so why not get on with getting it finished? I had popped out at lunchtime to pick up the steering damper so best get on with it eh!
I grabbed the front steering bar, fitted it then attached the damper. I had to go back around all of the front end including the replacement steering box to make sure I had tightened all of the bolts and fitted all of the split pins. Would not want any nasty surprises once we get the old bugger back on the road.

www

www

The only drawback I can see at the moment with working outside in the evening in Winter is that it is damned chilly to say the least!
Best dig out that thick old babygrow of mine eh!

nickysmith.me
 
Wheel Alignment.
The 110Posted by Nicky Smith Fri, November 18, 2016 16:38:31
After feeling sorry for myself for a while after realising that I was going to have to make some structural alterations to the passenger foot well so the 200tdi's exhaust does not hit it constantly I wandered back outside to have a look at the motor that seems to be the project destined to last for ever.

The steering is sort of half replaced so I took a closer look at what was left to do. As I was hunkered down I recalled that the front wheels needed setting up straight before I would be able to do a great deal. This would save me having to take off/adjust the track rod ends later on in the rebuild.
Now I do not own any fancy wheel alignment equipment but what I do own is a long length of rope. I tied this around the rear axle then ran it down the side from wheel to wheel which showed me which way to adjust it.

www

www

With the first side done and wedged into position I made short work of the other. Afterwards I did a quick double check and great stuff they are both nice, straight and in line now.

Then I set the steering box to its centre position and started to fit on the new drop arm. I was advised to do a bit of a mod here so the drop arm is a Discovery one and the new front steering bar I bought did not have any fittings for the steering damper.

www

A quick search on the internet showed that although opinions are split on whether a damper is needed or not it does make the drive a bit better when hitting pot holes etc.
Looks like a trip will be needed to exchange some parts that have already been bought but there was a niggling at the back of my mind to check the spares shed out.
A quick rummage through a shelf full of junk and a heavy duty front steering bar that came as part of a job lot of stuff was soon found complete with a damper mount already welded on!

A quick rub down, removal of the old tired track rod ends then a coat of black paint and shiny new ends is problem solved for me.

www

I do still need to pick up a Discovery 1 steering Damper to fit but the parts I have to return to Paddocks will more than cover the cost of that!
All in all it has been a productive day on the old boy.
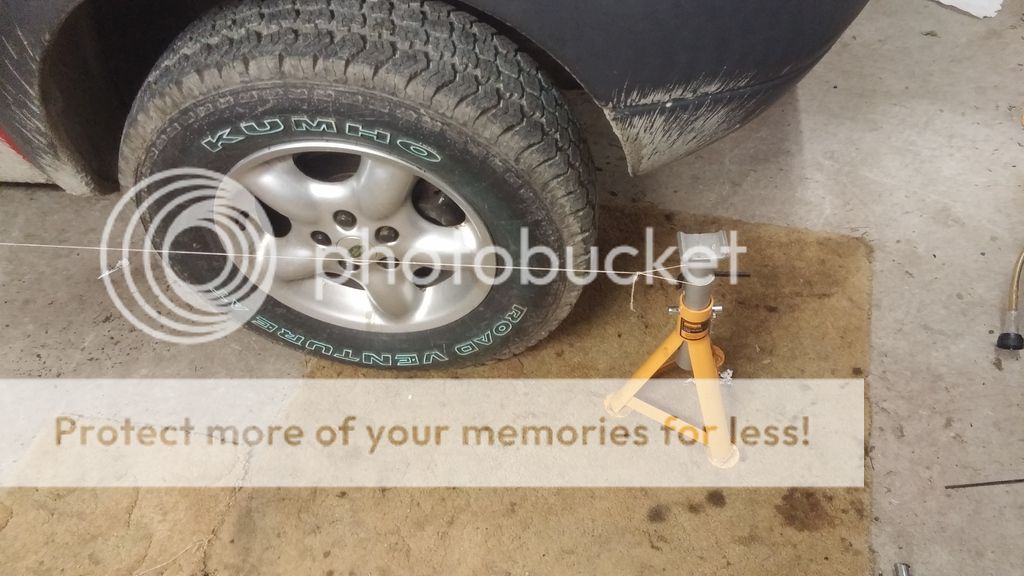
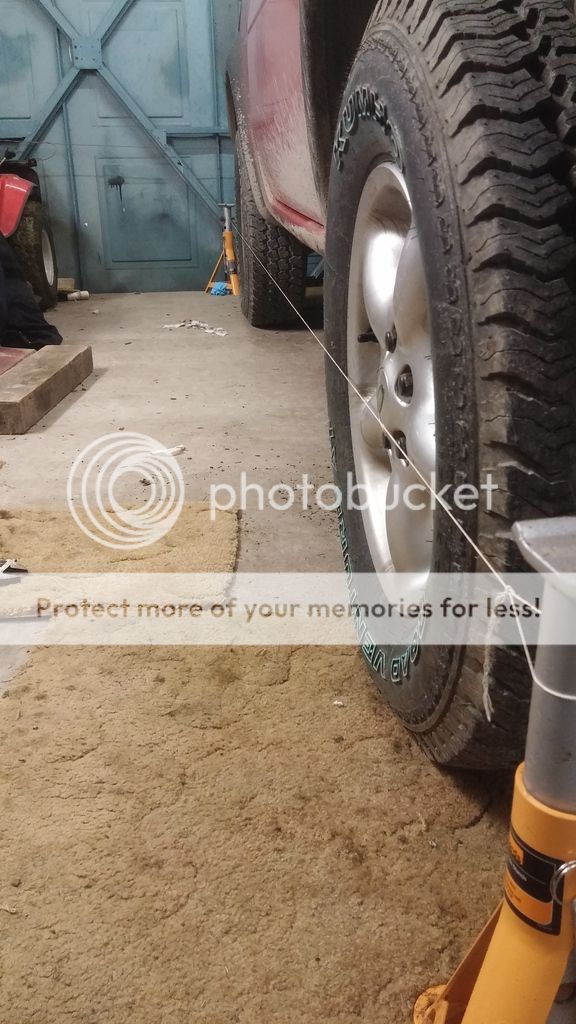
Hi mate, had a laugh seeing you do exactly the same thing as me as in tying a rope around the back wheel and stretching past the front to align them. Only issue is it doesn't work that well, I found the handleing was a bit odd so tried this way and it worked much better for me.
20161122_200332_zpsamyi6asi.jpg

20161122_200314_zpsxlbkj4ne.jpg
 
Stats & Pumps.
The 110 Posted by Nicky Smith Sat, November 26, 2016 18:26:57
My youngest was at work. Wifey was out Christmas shopping with her friend for the day, so what does a chap do when the day that lays before him is his own to do with as he pleases? Well what he does is go and grab his friend who's Mrs was out shopping with mine and head off to look at boys stuff all morning!
We hit an Army surplus store then headed off to get the bugs for my Dragon looking at all the other impressive reptiles while we were there of course and to top it off we headed to KFC to have a fat git bucket meal for one as lunch!

We were home soon enough though so my attention was soon attracted back to the 110. There are a pile of parts kicking about so in the continued fashion of working from the front backwards I dug out some of the easier parts to fit to the engine.
First up was the thermostat change over. It has been known in the past that anytime I touch the bolts on a thermostat housing, they tend to just snap off leaving half the stud behind.

www
Today though was a good day! They all came lose with a satisfying crack! I soon had them out and the thermostat looked a little past its best.

www

www

While this was off I took out the Discovery temperature thermostat then cleaned up the whole area scraping off the area to give a good surface to mate up too.

www


It is nice when you line up and look at the new and old bits you are about to fit...

www

Or is that just me?
Everything soon dropped back into place so job one was finished.

www

Next up was the old fuel pump. I don't know what was going there before I bought the engine but an old style series engine fuel pump was loosely bolted into place. Off that came and I quickly fitted a shiny new 200tdi one. I found the easiest way to do this believe it or not was to stand on top of the bumper with one foot on the front wheel reaching in with the spanner and socket from above.

www

Now seemed like a good time to start to reattach all of the wiring to the engine so I steadily worked my way through them adding the odd new end here and there to tally things up nicely.

www

I have come across one problem though. You see I meticulously put tape onto each wire and wrote on it where that wire went to so as to save confusion much much later on when I came to refit them all. Well there is just one left over on the nearside that still does indeed have its hand written label on it but the problem is that it has got more than a little mucky. I cannot know read what it says so feel free to have a look at the picture and see if you can decipher it.

www

I will be needing an alternator plug for the loom as well because the old one disintegrated when I took it off of the old engine.

www

As I sat back warming myself with a well earned brew I decided I may as well hook up a battery and see if the old unit would turn over.
So I removed the seat then opened up the battery box, in dropped the battery and I pushed the keys into the ignition. At this point I thought how disappointed I would be if nothing happened here. It would mean that I had done something wrong with the wiring or the starter was past it's best.
With a shrug of my shoulders to myself I turned the key around.
To my immense delight the engine turned over without hesitation, what a sound! I don't think I have ever been so pleased to here an engine not starting before!

This feels like a huge milestone to me. I have had this motors guts out and replaced them with the spec I wanted and blow me it seems to be working! I am so much closer to the end of this project than the beginning it is starting to feel like it may be finished sometime soon...

nickysmith.me
 
Last edited:
A very satisfying end to the day!
Can't help with the wire though!
Does it go from the bulkhead, round behind the engine to the near side or does it go from the off side of the bulkhead, round the front of the engine to the near side?
The engine only needs a wire to the stop solenoid, another to the heater plugs, one for the temp sender, one for oil pressure switch and a trigger for the starter solenoid.
If you have all those accounted for, your spare wire may be for an oil temp gauge if you had one fitted (my ex mod 90 did but it's not used since the tdi went in. It was on the off side though, and I can't remember what colour it was!)

Anyway, good work! :D

Rich
 
Fuel Lines & Fiddling.
The 110 Posted by Nicky Smith Sat, December 03, 2016 12:54:51
December has arrived. That means, in my house anyway, all of the decorations that have lain boxed up in a dusty loft for eleven months of the year now see the light of day once more. What that means for me is a great deal of work putting up decorations, hanging lights on trees and this year it comes with the new experience of putting lights up on the outside of the house.
The only problem with hanging lights up on the outside of your home is the fact that you have to get right up the outside wall balancing on a ladder whilst holding onto the long length of dormant lighting simultaneously hammering in the wall clips to keep it all in place.

Ten years ago this would not of bothered me but these days I am not overly keen on balancing on one foot on the top rung reaching as far as I can with a hammer wondering why I don't have two pairs of hands because that would make the job so much easier. My daughter asked "Are you scared of heights Dad?" to which I answered "The heights don't bother me kid, it's the falling from them that does"
Funny how as you get older you realise you would much rather not do some of the things you used to do without thinking. I recall running up and down the same extended ladder cleaning windows on three storey Victorian houses in the wind without batting an eyelid. You literally could not pay me enough to do that now!
Still the lights are up and it will be at least a month before I have to climb the ladder again to take them down again, or I could just leave them up until next year...

Progress is being made again on The 110. This week has seen me still focusing on the 200tdi lump I popped in earlier. I decided to have a stab at re-piping the fuel lines and it is here that I must admit that I got it completely wrong.
It looked good with all bases covered but there was just one snag, I had not run in the from and returning to the fuel tank. This may have caused the odd running issue so I posted my bad pipe work online with a big help attached to it and quickly got a large number of responses. I seemed to keep getting this relatively simple task tangled up in my head so I popped around to have a look at a friends motor and as soon as I saw underneath the bonnet I had a "Of course you tool" moment.
It was a tad dark and cold when I got home so the following morning I rearranged the spaghetti pipework and it all now proudly sits where it is supposed to.

I could not find a diagram to easily explain it so I have tried to make one up. Feel free to tell me I have got it wrong!

www

As I stood with my wolly hat on drinking a brew convincing myself that it was not quite as chilly as my body was trying to tell me I was getting I thought I may as well tackle plumbing the the meagre heater once again. Lets face it some heat is better than no heat at all! I knew I did not have the correct 200tdi pipework but what I did have was a tub full of old pipework, so I dug that out and soon mackled together a system that would work. Its not the prettiest looking set up and I no doubt will return to it in the future to redo the whole system but for now it is functional and lets face it, you don't look under the bonnet when you are driving along. That and this old beast is not going to be winning any beauty contests any time soon.

www

The only thing left to do really on this engine is to change the cambelt over. Now I have never done this before and there have been offers of help that I will happily accept as not to bugger up the lump before I begin using it.
First up though was to remove the water pump and those swine bolts that like to snap off inside the engine.
Lessons have been learnt in the past of trying to force rusted bolts then ending up weeping quietly in the corner before having to drill out and re-tap the threads, so caution was the buzzword of the day.

Nearly all of the bolts cracked off and out easily enough but there was of course the two that did not want to move, at all. Off I toddled into the garage to get the long bars and with more force put onto the bolt heads than I ever wanted to use they started to move slowly. I then kept gently moving them back and forward clearing their threads of the rusty crud that was helping to keep them in situ.
Patience was the name of the game even when I started to get a little bored with this game but I was rewarded ten minutes later with every bolt having come cleanly out of the water pump! A rarity indeed!

www

I did put all of the different length bolts in a piece of cardboard so as to recall where they all go back into so as not to repeat the transfer bolt mix up!

www

The ease of teh bolts coming out and the fact there is no play at all in the water I have just removed leads me to think it could not have been on the engine for too long before the whole lump was removed. I will still replace it with the shiny new one I have bought though just to be on the safe side.

www

It really is nice to be on the service and put back together side of things now. It feels like the project is running towards getting an MOT which should only be a few months away...

nickysmith.me
 
I had never done a cam belt before my engine swap either! Come to think of it, I had never done an engine swap (to a different engine) either!
Just take your time and follow one of the many tutorials to the letter and you will be fine!
May be worth running a tap down the water pump holes if there is any sign of corrosion. A smear of copper slip or grease on the threads wont hurt either when you throw it back on!

Rich
 
Thanks Rich all good things to bear in mind :)
I've not done a cambelt but i am sure it cannot be any worse than most of the stuff I have stupidly put my hand too in the past!

Watch this space, it wont be long ;)
 
Leaps & Bounds.
The 110 Posted by Nicky Smith Sat, December 03, 2016 20:29:46
Sometimes I am amazed by the kindness of strangers. Now this may sound stupid but I have, along with my ever suffering Wife, for a great number of years tried to make someone smile everyday. That person can be someone I know but more often than not it's a stranger. Sounds daft eh but a kind act or daft joke normally aimed at myself can make a huge difference to a persons day. I work on the proviso that you don't know other peoples stories so have no idea on what they can be going through, good or bad.

Turns out it's not only us that do this. A couple of days ago I put out a request for help on teaching me how to change the cambelt in the 200tdi engine. This is something I had never done before, I had read up on the do's and don'ts which seemed pretty straight forward but really wanted someone around when this was put into practice so I did not bugger the engine up before I had it out for an actual drive.
There were a couple of offers for which I was thankful but after my last blog post went out a chap called James contacted me again to say he had some time straight away if I wanted to get stuck into it!
Now until we met today James was a complete stranger so to say this was a kind offer is probably an understatement but you have to love the fact that there is still this sort of generosity out there.

He turned up in short time along with a great deal of tools then ran through what he was doing as the cambelt was slowly exposed behind the cover. First out was a pully to remove the wheel.

www

Then the cover was whipped off.

www
The tensioner was next off as was the other wheel (forget the name, it's late and I am tired) leaving the cambelt just dropping out. Some cleaner was applied then all of the timing lined up.

www

A locking pin was popped into place before most of that (yep I am getting tired and forgetful here) and soon enough the new cambelt was put into place. A couple of rotations and a check later, all was sitting well and where it should be :)

www

A couple of brews later along with some very good guidance on the transfer box linkage issues I am having and James was off!
I then set to getting the cover back into place along with the new water pump fitted.
First up was cleaning the two mating surfaces off. I spent a bit of time here making sure all of the surfaces were flat and free of any old gaskets and contaminants. That done I popped on a bit of instant gasket around to help hold the new gasket in place.

www

Then I cleaned each and every bolt back to a muck free condition and liberally applied some copper slip before putting them back into the holes that they came from through the cover. Once all were set into place neatly through the gasket I ran around them all a few times gently tightening them all up.
Then out came the new water pump (seeing as the old one was in such good condition I have cleaned it up and kept it as a spare) and that along with its replacement gasket were soon set into place.

www

I do still need to check that I have tightened up the came pulley bolt enough so I have marked this down on my to do list so I don't forget.
Due to the act of kindness from someone who started the day as a stranger I am now so much further on than I thought I would be for a few weeks. Looks like I may have found the hoses I needed for the oil cooler from another friend as well so I may just have this motor running within a week or so!
Is it me or are things starting to get exciting all of a sudden...

www


nickysmith.me
 
Looks like some good progress with the engine. Much better to get all those things changed whilst the radiator and body panels are out of the way.
 
Belts & Bolts
The 110 Posted by Nicky Smith Sun, December 11, 2016 19:54:23
Well I have had a busy couple of shifts on the 110 over the last 24 hours and I have surprised myself at how many loose ends I have managed to get tied up.
It was all nearly scuppered early on last night when the rain started to fall heavily. Now in the last house it would have been game over but with the car port covering most of the land rover and the shiny new garage roof keeping all of the water at bay outside where it belonged, I was happy as a pig in the proverbial pottering about with the dark winter nights being held at bay!

I have been sitting here for the last few minutes since finishing the first paragraph trying to remember exactly what I have done in what order but I am giving up with that! I will just pop in what I do recall as there has been quite a bit!
Firstly I put jubilee clips on the pipes I fitted last week, I had bought a large box off of the internet of the mixed sized ones and they have been a godsend, then it was onto getting the alternator and power steering belts.
I changed a couple of the bracket bolts over so they actually tightened up then after a ten minute mild panic hunting for the belts I knew I had bought in the garage then the spares shed, the belts finally turned up in the back of the 110 where I had put them so they would not get lost.
It took a mere couple of minutes to pop the into place and getting them tensioned up.

www

The top along with the bottom coolant hose were then fitted but the water pump bypass hose was a no go because I had bought the wrong one. I am off of work tomorrow so I will nip out and get the right one then.
I had bought a pair of intercooler pipe hoses thinking they would be long enough but after messing around with them fitting new O rings it turned out that they were exactly the same length as the ones I have already fitted.

www

Hmm what to do because I would really like to have a stab at getting the engine running this week and without these pipes I would quickly end up with all of the engine oil coating the garage and driveway, I don't think Wifey would be too impressed with that and cleaning up could take a while...
As a temp measure I sliced into the old pipes and extended them with metal pipe for now so I can at least get the engine fired up and will once again be able to move the motor about.

What now then? As I was still protected from the weather along with my new under car port lights creating a false daytime I decided that I may as well dig out the new radiator and get that lot fitted.
Out came the old one still in its frame along with the cooler and after a little more rummaging around I found the shiny new one too!

www

It literally took ten minutes to switch them over and drop the whole caged lot into place with the pipework plumbed in.

www
www
It's amazing how these little jobs take next to no time but make a huge difference!
That was enough for the evening because I was getting a bit cold and tired...the things that my shiny dry well lit work area could not help me with.

The following afternoon though I was in the mood for a little more titillating after all there were quite a few little jobs that needed finishing the majority of which were centred around the transfer and gearbox.
I had to dig out the transfer box linkage out from where it had become trapped somehow between the transfer and gearbox. It again was surprisingly easy...surely my luck could not hold here?

www


Then I swapped some of the bolts holding the transfer box onto the gearbox around as they had been put in in the wrong places...literally took minutes.

After a quick clean up I remembered that the handbrake cable would need to be attached and with the way things are going it should not be an issue.
Yep this is where it started to get a bit more challenging. Firstly I had fitted a Discovery transfer box to a Defender so the handbrake cable mounting was different. Ha! No problem there because I had the foresight to remove the one from the 1:6 ratio transfer box I removed.
With a slightly smug grin I removed the Disco one and it became very obvious that two of the bolts went into different places. Humph, I am on a roll at the moment so I would not be out off here. Now don't get me wrong I wanted to cry a couple of times as I tried to modify the defender bracket but after destroying three different drill bits, and I am also pretty sure I have broken my drill, the old bracket now sat proudly in place all adjusted up with the handbrake working.

www

After sitting back with a brew in hand I wondered at the speed that the whole project seems to be coming together all of a sudden. There seemed to be months when all I seemed to be doing was constantly working on the old boy but seemingly getting nowhere but in what amounts to a couple of days the whole thing seems to be accelerating at a crazy pace towards completion. All of these little jobs are ticking the big jobs off of the to do list which is getting smaller and smaller by the day and it feels great!

So I will be picking up the bypass hose tomorrow which will leave the exhaust to try and get fitted, the clutch needs bleeding then my friends it will be time to to get this beast started..

nickysmith.me
 
Bypass & Bleeding
The 110Posted by Nicky Smith Mon, December 12, 2016 16:26:00
Are there any other Males, especially Dads, out there that have any idea what Christmas presents have been bought for their daughters? I have to admit I don't have a clue before hand but as I informed my youngest daughter last night when she brought this up that I personally vet each and every gift when it is unwrapped on the big day,.
If I am honest it doesn't stop with my daughters either, it runs out to our friends and family who when tell me "thanks for the present, it was just what I wanted!" I tend to reply "That's great, I am really pleased that you like it. What did I buy you?"
Some would say that I this is really bad not having a clue what has been bought and leaving all of the festive cheer for my ever suffering Wife to sort out, but not really it is for the best.
I am rubbish at buying gifts and even worse at wrapping them!
Luckily the girls are now older and tend to (Always without fail) wrap their Mothers gifts from me vetting them as they go and handing back with receipts in bags the ones I need to change along with a list of what I should change them too. Then they look at me for about two seconds, take the bags back off of me and just put their hands out for my debit card usually muttering "Just give it all here, I will sort it tomorrow."
You see it's not for a lack of trying...I am just a little bit rubbish at the whole thing! I did buy a few extra gifts for my Wife today and they are currently sat in hiding waiting for my youngest to get home to tell me how well I have done but one thing is for sure, if the crowds (more like mobs) I saw out today were like that on a Monday I do not want to be anywhere near any sort of store until about February!
Then it needs only to be a car shop.

After that little swaray (I'm sure I have spelt that wrong) venturing into the great retail world I decided that seeing as I am on such a roll with The 110 I may as well have a stab at a few of the little jabs that are outstanding.
I had nipped into Paddocks on my way around earlier so the water pump bypass hose along with the top intercooler hose were just itching for fitting.

The bypass hose was soon out of it's packet and into place along with a couple of shiny new Jubilee clips.

www

The intercooler hose though would need extending and seeing as I had just spent what was left of my bank account on Wifey for Christmas I was going to have to be a little creative here.
Off to the spares shed I pottered with the beginnings of an idea forming at the back of my mind if the part was still in there. After a minute of moving things around, I really need to tidy up in there, I found a shiny new V8 exhaust down pipe that was exactly the right width! Now this had been part of a job lot bought a long time back which I had already made my money back on so chopping it up was not going to be an issue.
In my nice dry garage I measured out the length that I needed, chopped it off and fitted it in no time!

www

The bottom hose is on back order so that will be done later in the week. I decided that as I was already in my dirty work clobber I may as well bleed the clutch. The old fluid was really dark so who knows how long it had been sitting in there!
I have a non return bleed pipe that cost me about two pounds a lifetime ago which still works wonders when you are doing this sort of job alone.
Again it all went really smoothly with me getting the correct pressure build up nicely on the clutch pedal very easily and quickly.

Another few jobs down then. Feels like the reality of driving the bugger is actually an option now in the not to distant future. I did realise whilst stood back looking at it (as you do) that I still need to plumb up the power steering pipes before I fire it up as well.
Not a problem as I have those pipes but not today, I need to do the whole Dad breakdown and recovery thing for my eldest daughter who managed to crash her motorbike once again today. Thankfully she is ok but as for the bike, well, that remains to be seen.

nickysmith.me
 
Back
Top