Terrafirma Shock Absorbers

This site contains affiliate links for which LandyZone may be compensated if you make a purchase.

tom1979

Well-Known Member
Full Member
Posts
2,180
Location
East of England, UK
I had a shock gone and with the MOT due ordered two news ones. The only ones were the Terrafirma Pro Comps which were on the vehicle when I bought it, since they've lasted at least 4 years I thought I'd get the same again.

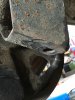
The new ones have metal discs around both sides of each bush, as per the first image. Fitting like this they didn't fit. Looking at how the old ones were fitted only the outside metal discs were used, with the rubber bushes resting on the metal support, so this is how I've fitted as in the second photo.

Question is, is that ok ?

Bushes out of the box:
bush1.jpg

Shock fitted with two discs removed:
bush2.jpg
 
The bushes wont last very long like that.

I fitted em all round at the start of the year, it was a pain but eventually got them seated and fitted. Been very comfy since
 
I bought them from JGS, they said the top is fine like that as I have a terrafirma adapter plate fitted but the discs need to face outward to help articulation. the bottom one needs a bit cut off the mount of it wont seat right
 

Attachments

  • image.jpeg
    image.jpeg
    370.4 KB · Views: 250
I had to grind off those cups, had to grind them 100% flat before they would fit. Once they where flat enough, i got them on enough to just get the nut on then tightened.
 
Makes you wonder if some of the bad reviews Terrafirma have had are just people installing wrong. There's no instructions or advice anywhere that I could find only on here
 
If you mean the big blue one it was destroyed in a fit of rage trying to get the shock undone. However I am doing the other side tomorrow so as that sides not knackered it should come off in a more civilised way! If it comes off nicely you can have it, I don't want any money
 
The way you have the washers in the first photo is the correct way of fitting, the lip on the inner washers should locate the bushes on the mounting in such a way that the bolt does not contact the bracket.
It is sometimes an absolute ball-ache to get the nut started on the thread, but this is what you should do, otherwise over time the bolt hole in the lower mount will become oval, also the movement of the bush against the mount will wear the bushes very quickly.
Find some way of compressing the bushes to get the thread started. Try wrapping a strip of foam or rubber mat around the shocker to protect while using something (big stilsons ?) to lever against the coil.
 
Because i have the Terrafirma plate I'm told it should be ok at the top, except the washers should face outwards to give maximum articulation. For the bottom they said to cut off the external cup, which may give enough room to use them all except the top ones which don't need it. It's done ok for at least 4 years without all the cups/discs
 
They are the same set up on mine and all the washers are fitted, it
Screen Shot 2016-08-19 at 07.26.46.png
was a few years ago now but i dont recall any issues.
 
I found it impossible to get the nut started with all of the washers. That nut doesn't look like its on very far. I have contacted Terrafirma for their advice, as I am getting mixed opinions. Is that a Terrafirma bracket?
 
Just found this thread from this forum - looks like I need to take the inside cup off too.... PDF attached. I don't know why it didn't come up in the search when I was looking.
 

Attachments

  • Shock-Bush-Isolation-Washers.pdf
    109.5 KB · Views: 245
Thanks! If it does come of clean id be very happy!! Send you some cash for postage etc...

I did have to cut all the cups off. That took a long time with a grinder and chisles. The cups are actually spot welded in 4 points so soon as you break the weld they come off clean. (Sorry i didnt mention thia before slipped my mind!)

Get a chisle in and start hammering, should reveal where the welds are and enable you to remove them. I even got one off whole!

I have seen a few threads around the web where leaving the cups on has resulted in broken shocks...

I cant check right now but look at my build thread, i think theres some pics from when I did mine.
 
I cut the bottom one off with a recip saw and then ground it flat and put some underseal over it. Should be much quicker on the otherside now I know they're only spot welded! (why would I think they would be properly welded on a landrover!!!!)

I'll let you know if the dust cover is ok!
 
I've the other cup off. At the top I can just about get the nut on with all four discs in place but I am finding when tightening up that because of the angle the discs change angle and will eventually cut into the bush. Any ideas?
 
Earlier I spoke to someone at Allmakes4x4 who was really helpful as they are main (possibly only) distributors. The way I had it in the attached photos is correct but they recommend the discs are the other way around so they face outwards (I forgot to do this). You definitely need to remove all of the welded cups before fitting these. Also it turns out that although these shocks are identical looking to my old ones they are actually about 3" shorter. He recommended using the TF169's which are +5" extreme long travel adjustable shocks, a newer version of what I had (we think TF122LT). Should have measured them! I might put the TF120's on ebay with the one I've fitted free or something. It's still new as it hasn't been driven but it's been fitted so seems fair.

Top:
image.jpeg
Bottom:
image.jpeg
 
Back
Top