landyman04
New Member
- Posts
- 6
Hello all,
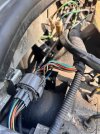
I'm currently part the way through replacing my two front wing wiring looms. The O/S side it relatively easy to replace without removing the wing entirely - the passenger side however, is made harder by a duct being largely in the way [scratchy head, think]
Progress was going well until I came against the 'C1266 - grey female' connector, adjacent the heater assembly, clipped up to the bulkhead...does anyone know how you separate it - is there a particular knack to it. I've pushed the leaver down to release the clip part of it, but its still not budging
Attachments
Last edited:

 . [hgfc]
 ,) and the duct has been screwed to the inside of the fender
  I've also got to get to the lower bulkhead to work out wiring to the passenger door as the electric window has stopped working (I suspect a loose connection again) as I did replace the motor regulator mechanism - and wiring through the door grommet it very tight; that, or a burnt out terminal somewhere
 , I've also switched out the dip/dim relay, and doesn't always solve my immediate problems either