Stubborn swivel housing assembly bolts

This site contains affiliate links for which LandyZone may be compensated if you make a purchase.

SMG

Member
Posts
43
Location
UK
Think I'm setting a record for the slowest front hub overhaul known to mankind...

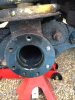
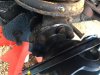
Have been trying to remove the x7 bi-hexagonal nuts that attach the swivel housing assembly to the axle... the ones where you can't get a socket on them. I've been using a combination of penetrating oil / Innotec deblock ice / hammer.... don't have a long spanner, so have been using the 2 ring spanner trick.

2 of the 7 cracked off no trouble, the rest are total swines and refuse to budge. Tried abit of heat on one of them, but didn't like the way it seemed to be taking off the teflon coating of the swivel housing.

Very tempted to grind the heads off the bolts which would probably leave a 1cm shank to work with.. I don't have access to a welder to stick nuts onto them though... and not really sure if I'll be able to twist the shanks out with molegrips.

Good idea to grind, or am I better off buying a proper long ring spanner to try shifting them first?

Cheers

Simon
 

Attachments

  • IMG_0836.JPG
    IMG_0836.JPG
    55.2 KB · Views: 168
Ring spanner with a metal tube over it.
Ring spanner with bigger 2 spanner trick than you are using.
Ring spanner and hit it with a decent hammer
Ring spanner and push with your foot.
2 spanner trick and push with your foot.
 
Ring spanner with a metal tube over it.
Ring spanner with bigger 2 spanner trick than you are using.
Ring spanner and hit it with a decent hammer
Ring spanner and push with your foot.
2 spanner trick and push with your foot.
This ^^ Just keep adding length and soaking the back threads (axle side) with penetrating fluid.
 
Wow, bloody good tip about the 2 spanner + foot push, managed to shift another 2..... ;)
 
Well the good news is that I managed to get 5 of them off.... bad news is that the other 2 decided to break in half, flush with the face.

Guess I have to drill them out, any tips... don't want to mess up the threads.

Cheers
 

Attachments

  • IMG_0837.JPG
    IMG_0837.JPG
    69.2 KB · Views: 157
Well the good news is that I managed to get 5 of them off.... bad news is that the other 2 decided to break in half, flush with the face.

Guess I have to drill them out, any tips... don't want to mess up the threads.

Cheers
I ground slots down the middle of mine and I've a thick, flat blade socket that fitted the slot and got them off with the socket set. I could post pics later, on phone at the moment and pics are on laptop.
 
Prior to snapping bolts like this, I have a little oxy propane set. Heat it up really well, and let it cool. There isn't too much around to set fire to - not much help now, maybe for the future.

But at this stage, do all drilling and if it' isn't budging give it some heat, but might end of hardening the steel making it undrillable - hence drilling first.

Just be careful not to wreck the thread, these bolts are 10.9 grade so take a lot of load making repairing a bad idea.
 
IMG_5097.JPG
IMG_5098.JPG
IMG_5099.JPG

I would recommend you try something like this before you resort to drilling and risking the threads.
Heating the bolt ends, as benpalmer suggests, is the way to go. I think the heat from the angle grinder did it for me. I don't think I needed to add extra heat from my torch. I know not many sockets sets have the flat head bit in them though! You may be able to grind a square to take a socket or something. Good luck.
 
I ground heads off and they came out with a set of stillsons. I know your past this point though - I'd try drill and easy outs first before drilling and re-tapping.
 
If they are really stuck best just cutting the heads off. The high grew vibrations tend to free them up and there’s enough sticking out to get some grips on. Snapping off flush to the face will be a pain.
 
Use a punch to mark the centre of the broken bolts with a good indent, use a small sharp drill first to drill a hole centrally into the bolt then a slightly larger drill bit, ensuring you keep in centred and away from the thread, you can drill again with another larger drill bit but again ensure you don't go near the thread, then use an easy out bolt extractor, ideally left hand drill bits running drill in reverse are best and this sometimes results in the bolt coming out while drilling.
 
Thanks, will see if I can get hold of some left hand drill bits and some quality easy outs.... another set of tools that I never knew existed before LR ownership to add to my collection ;)

Will let you know how I get on.

Cheers
 
Thanks, will see if I can get hold of some left hand drill bits and some quality easy outs.... another set of tools that I never knew existed before LR ownership to add to my collection ;)

Will let you know how I get on.

Cheers
Do you have an angle grinder? Small blow torch or one of those small blow torches folk use to caramelise the top of food?
 
Hi Al203 - Yes I have an angle grinder and a blow torch. The bolts have shorn flush with the axle face stopping me from grinding slots in them. Ben also advised to try drilling first before applying heat to avoid hardening the steel.
 
Hi Al203 - Yes I have an angle grinder and a blow torch. The bolts have shorn flush with the axle face stopping me from grinding slots in them. Ben also advised to try drilling first before applying heat to avoid hardening the steel.
Ahh, thought they'd sheared off flush with the swivel flange, my mistake :rolleyes:
Not sure about the heating and hardening. Going back to my apprenticeship days :eek: IIRC heating and slow cooling tempered steel. Heating and fast cooling (plunged in to water) hardened steel. This still depended on the carbon content. You could heat mild steel with a very low carbon content and then put in in to a carbon dust bath, the surface absorbed carbon and this case hardened it. I think you would have to heat it and fast cool it after the carbon bath. Anyway, you could try a small flame on the torch and heat the axle flange, circling around the broken bolt. The object being trying to get a small amount of thermal expansion in the flange before the heat has too much affect on the broken bolt. You'd be surprised by the affect of a small amount of thermal expansion. Then stud extractors are the way to go. But gently does it!! As Marjon said earlier, once you snap a stud extractor inside the bolt it's a whole new world of pain :(
 
Spent the last hour looking at different types of stud extractor on Amaz*n. The world of stud extractors seems like a minefield - nearly every model has at least someone complaining how they didn't work / broke off / made things worse. Had a look at the Irwins, but they are very dear / long lead times.

Think I'm going to get these, reviews seemed fairly positive for a change - Laser 0295 Screw Extractor Set 6pc
If you haven't already get some proper penetrating fluid, not just WD40. Take your time drilling a decent hole in ie decent diameter to fit the largest stud extractor you can WITHOUT putting the thread in danger! And deep enough for the extractor not to bottom out without getting a solid grip. Then, slowly, slowly catch a monkey. Bit of heat, penetrating fluid, try turning it out with extractor. Monitor the torque and don't over do it. Bit of heat, penetrating fluid try turning the extractor etc. Have a cup of tea, then start again. It's worth taking time at this stage because if you snap the extractor time magnifies ten fold! Heat, penetrating fluid, firm pressure and TIME will get them out.
 
Back
Top