Series 3 109 Station Wagon, full ground up resto and 88 redo careless resto driving project

This site contains affiliate links for which LandyZone may be compensated if you make a purchase.
PXL_20220205_125839223.MP.jpg


But it’s history is still retained in a lovely patina which after washing was encapsulated using Carnauba wax, as it’s used to seal turned wood by melting on the spinning part by the heat created through friction, so it worked on my knob lol.
PXL_20220205_134520280.MP.jpg


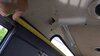
Fitting the sprung part, I found using a windscreen arm removal tool useful to compress the spring enough to get a nice fat split pin in.
PXL_20220206_145933520.MP.jpg
PXL_20220206_145946710.MP.jpg


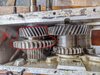
I also noticed that the teeth were more worne toward one side, so on reassembly I introduced an extra washer, which is very thin to persuade the teeth to engage less on the worn side and more over the less worn parts.

Due to the general wear. Having an extra thin washer may help take some of the extra play from decades of use too.
PXL_20220204_184502946.MP.jpg

The teeth are actually shown from the opposite side here, so are the other way round
PXL_20220206_143214818.jpg

So all the cleaned and greased parts were able to come back together
PXL_20220206_134226012.jpg


Everything seems to work well and I hope this part will be good for another 47 years.

I am very tempted to make and fit a black leather cover to the upper handle. A job for another time.
PXL_20220206_151244284.jpg


PXL_20220206_151300764.jpg
 
Bulkhead

Before refitting the gearbox, there is some rust corrosion and rather good examples of MOT welding at its worst.

The affected areas are to the bottom corners of the bulkhead bell housing to footplates
PXL_20220207_134635055.jpg

PXL_20220207_134640723.jpg

PXL_20220207_134658012.MP.jpg
PXL_20220207_134649639.jpg


I suppose these areas are covered up and not visible from above normally, so perhaps someone thought they didn’t matter.

I cut back to solid metal, made card templates, and transferred these to some galvanized sheet..
PXL_20220207_141936872.jpg
PXL_20220207_154800485.jpg

PXL_20220207_163356121.NIGHT.jpg

PXL_20220207_224135070.jpg


I have a repaired part from a later bulkhead, where this part is separate, and it also gave me a reference as to how the part would have been originally.
PXL_20220208_114212293.jpg


There was also some holed for a left hand drive, which I had just the right sized grommets to fill
PXL_20220209_170619220.NIGHT.jpg

PXL_20220210_123046125.jpg


Because of the difficult space to paint in, I used my Devilbiss Dagr airbrush, which took a while but avoided paint sticking to everything and getting everywhere.
Yes I could have used a paint brush , but I have an airbrush and it’s just more fun :¬)
PXL_20220210_135015330.jpg


Using 2 Pack/ 2K paint as ever.
PXL_20220210_135204353.MP.jpg

Replacing the slave and master clutch cylinders next, as they both were leaking.
 
Well it's been a busy few weeks, actuallu about six :eek:
So I've some catching up to do.

Starting with the seatbox only. Because it had to be removed to change the gearbox, and lots of other jobs became necessary too, all at once, or so it felt like.


Seatbox

PXL_20220111_143706443.MP.jpg


Essentially having restored all the individual parts, and stored them in my Caravan ‘Velma’, so called because she used to be towed by Scooby Doo the Subaru. I had a kit to build a new seat box.

Some parts were replaced such as the sides and the rusty old tool box.
PXL_20220110_214113512.MP (2) - Copy.jpg

I used a caravan non-set sealing strip, because it’s just great for making an almost permanent seal for decades, and it keeps the dissimilar metals apart.
PXL_20220309_125926145.MP.jpg


The holes are already pre drilled before paint, but using this stuff is difficult because it’s so thick and really sticky.

My solution was to paint over the second sticky side with paint thinners, which makes it temporarily slimey.

This could only work without damaging the paint because it’s painted with 2 Pac 2K paint, so this does not react with the very powerful thinners.

So it was possible to slide the steel toolbox component into position and then with a thinner soaked pointy thing, open up the holes for the closed rivets to pass through.

Then with the air riveter, and lots of effort join the two parts
PXL_20220309_154726424.jpg
PXL_20220309_160231934.jpg
PXL_20220309_161933477.jpg
PXL_20220309_171110354.jpg
PXL_20220309_172412425.jpg

PXL_20220309_175543292.jpg


Next was to put everything back together, with the original parts some of which have a lovely pattena..
PXL_20220309_221951177.jpg
PXL_20220309_222017311.jpg
PXL_20220309_222043704.jpg
PXL_20220310_171835773.jpg
 
Sills

The original 1975 sills are in pretty good shape still, with the exception of the nearside front which has deteriorated.

So I re-fabricated it.
PXL_20220223_151638838.jpg

PXL_20220223_171832373.NIGHT.jpg

The sill was originally galvanized, as is the repair section, but I gave the itl a liberal application of Kurust as it was cleaned up and on the bench.
PXL_20220223_172659797.NIGHT.jpg


PXL_20220223_172709034.NIGHT.jpg


Followed by a couple of coats of acid etch primer from a rattle can.
PXL_20220224_170452373.jpg

Also fitted a new rubber seal, which is actually made in the UK, much to my delight, and is just lovely soft and proper rubbery
PXL_20220225_182857208.jpg
PXL_20220225_190055119.jpg
PXL_20220225_190842416.jpg
PXL_20220226_100310373.jpg


I didn’t see the point of getting too fussy about how it looks, as it’s not really seen, but needs to have its proper strength to do its job.

The rubber seal had all the holes in exactly the same places as the metal origin part, which was satisfying.

( I do need to replace the wire on my heat gun as the more observant of you may have noticed.)
 
The continuing saga of the gearbox
PXL_20220220_104728586.jpg


So After fitting the reconditioned gearbox which I bought from a Landie Dealer in Cornwall at a total cost of almost £1000 delivered, on the understanding that my gearbox would be returned on the same palette at their cost. The idea is they then rebuild my old one and so on.

There were lots of other jobs which presented as hurdles such as the galvanic corrosion which had eaten important bits of the seat box structure, thus I rebuilt it with some panels new, and some I was able to tig weld with bits of the damaged parts I’d removed.

The master ans slave clutch Which were both leaking so were replaced and a better seal made on the bulkhead mounting too.
PXL_20220216_095805655.jpg

PXL_20220217_110649222.MP.jpg

I used a caravan sealing mastic strip because it stays soft and durable for decades, and it can be removed easily with a blade and paint thinners.
PXL_20220217_123217044.jpg

There's no servo assist on the old girl either, but the brakes work fine, if you're not in a hurry to stop lol. Which makes a dashcam a must, just in case ! But it makes driving more engaging, having to plan further ahead !!
So everything is in and run without the drive shafts connected for a couple of miles, but struggling to get her into High range, but I figure maybe it’s a bit stiff because of new bearings and stuff.
 
:confused:o_O

Nope I'm definitely stuck in FWD Low. Max speed about twenty. So it's on the phone to ? well No names because we all f*^* up, and despite being megga disappointed, and having taken far longer than I would have in my twenties, (Day in a pub car park would have done).

I explained the problem and so began the Whats app video calls, which had me being instructed to hit the end of the transfer box selectors with a hammer and such like unkind things because the builder whom I shall call ‘X’ thought the selector rod was stuck.
PXL_20220322_162854198.jpg


These bits, (removed from box in pic).

The next thought is that the intermediate gear in the transfer box may have been fitted with a newer type which has a different number of teeth than the original part.

So could I remove the bottom sump cover and have a look to see if it was bigger.
PXL_20220313_082653306.jpg

But first I removed the intermediate gear on my old box, as it was more accessible and a good practice run. Also my thinking was that if my old one was good enough I could fit that, and it also gave me a reference for the correct part too.
PXL_20220313_102738020.jpg

My original is in good shape, and the straight cut low range teeth still have their machining marks, so not even run in.
Low gear.jpg

On the new gearbox, once the sump cover was removed the problem became apparent.
PXL_20220314_133209769.jpg

PXL_20220314_133137251.jpg

PXL_20220314_133152659.jpg

Here is a vid I sent him which helps see why the car can’t get into High range. It shows how the gear has been fitted the wrong way round. Nop It's too large sorry.
 
Last edited:
So He apologized for his Fu** Up, and dutifully posted his ‘own’ transfer box, via UPS. So that I could remove and fit the replacement transfer box while the rest of the gearbox remained in the car.

It was a bit of a pain, because it also entailed removing the transmission brake and drive shafts again.

But what was a bigger pain was that the UPS driver failed to get the replacement part to his local depot.

It just disappeared! Also Mr X had only insured it for a hundred quid, so we both lost big time on that.

By now my patience was beginning to wear a little thin!

The whole thing about having and using a Land Rover is being self reliant, and not on other folk like garages who I generally lack faith in, having worked in a few.

It was time to stand up and take control of this ridiculous mess.

Gigi my Landy was beginning to resemble the running of our top UK boys club. who have been letting everybody down recently, and make our whole country look like a joke, selfish folk who lack empathy, and that’s just not the British Landy way lol.

The only solution was for me to do it myself, so I did.
PXL_20220315_124600232.jpg
PXL_20220320_104430869.NIGHT.jpg
PXL_20220320_104454724.jpg
PXL_20220320_133921355.MP.jpg

PXL_20220320_133930814.jpg
PXL_20220320_135423572.jpg
PXL_20220320_135501419.jpg
PXL_20220320_153406913.jpg

With my big Ash persuader onto the nut to protect the threads, I’m having to drive the new bearings back out, without damaging them :eek:
PXL_20220320_153417755.jpg
PXL_20220320_173221377.jpg
PXL_20220320_173227562.jpg


Now it’s time to put together everything I just took apart. The Donkey and old school desk supported by an axle stand and clamped together proved just the right support with a handy hole to support and knock through.
PXL_20220320_181435789.MP.jpg


Above that's the transfer box rebuilt with the gear the correct way and Low gear engaged.

Below with the High gear engaged via the small dog teeth.
PXL_20220320_181451248.jpg
 

Attachments

  • This way.jpg
    This way.jpg
    434.7 KB · Views: 83
The gearbox is working great, weve covered a thousnd miles and changed the oil.
Also found and fitted smaller round wing mirrors, which strangely being concave show more than the not origional rectangular ones which were on.
2021_1024_131130_FR.JPG


Into an old original electrical accessory dash center console, I’ve installed a dual usb, 12V socket and volt meter. They only come on when switched on by the lower toggle switch.

The switch at the top switches on a rear work light which I fitted as I use her in the woods as for working and there was already an existing hole from a previous installation.

The only thing I’m not sure about is that it’s an LED work light so the reflector is not very in keeping with Gigi’s genuine 1970’s look and feel.
PXL_20220419_172043934.MP.jpg


I don't have a photo of the light but theyre common on ebay.

PXL_20220430_112204631.jpg


I didn't think it would be easy to get a slow puncture with these big, narrow, heavy tread tyres. But I have one N/S/F.

Took the tyre off to investigate.
PXL_20220521_171415019.jpg
PXL_20220521_180455121.jpg
PXL_20220523_142606821.jpg


There was a small puncture in the upper side, which it would appear has been caused by some grit chafing the tube.


PXL_20220521_180520289.MP.jpg
PXL_20220521_180530514.MP.jpg


Or it may have been a bit of tyre label which was stuck inside. So a new tube is ordered and also an old fashioned puncture repair kit.
Because I reckon you could repair one of these tubed tyres by the side of the road without even removing the wheel.
These old narrow rims dont have a bead to prevent the tyre coming off in the event of a puncture at speed.

Which makes breaking the bead and removing the outside of the tyre to access the tube not very hard.

I believe having tubed tyres can some times be better for hard off-roading because when the tyre is pushed off the bead, the tube pushes it back on again, so it doesn't go flat.
When this occurs with tubeless tyres they lose all their air instantly.
It’s probably most useful if you've let most of the air out to get more grip and they're very soft to start with.
 

Attachments

  • PXL_20220523_111158554.MP.jpg
    PXL_20220523_111158554.MP.jpg
    358 KB · Views: 136
Last edited:
Well it's been a busy few weeks, actuallu about six :eek:
So I've some catching up to do.

Starting with the seatbox only. Because it had to be removed to change the gearbox, and lots of other jobs became necessary too, all at once, or so it felt like.


Seatbox

View attachment 262046

Essentially having restored all the individual parts, and stored them in my Caravan ‘Velma’, so called because she used to be towed by Scooby Doo the Subaru. I had a kit to build a new seat box.

Some parts were replaced such as the sides and the rusty old tool box.
View attachment 262047
I used a caravan non-set sealing strip, because it’s just great for making an almost permanent seal for decades, and it keeps the dissimilar metals apart.View attachment 262048

The holes are already pre drilled before paint, but using this stuff is difficult because it’s so thick and really sticky.

My solution was to paint over the second sticky side with paint thinners, which makes it temporarily slimey.

This could only work without damaging the paint because it’s painted with 2 Pac 2K paint, so this does not react with the very powerful thinners.

So it was possible to slide the steel toolbox component into position and then with a thinner soaked pointy thing, open up the holes for the closed rivets to pass through.

Then with the air riveter, and lots of effort join the two parts
View attachment 262049 View attachment 262050 View attachment 262051 View attachment 262052 View attachment 262053
View attachment 262054

Next was to put everything back together, with the original parts some of which have a lovely pattena..
View attachment 262055 View attachment 262056 View attachment 262057 View attachment 262058

Top job - looks factory fresh now!
 
The small dog's found the perfect spot for her bed, while stopped in the woods.
PXL_20220507_094304767.MP.jpg

Been getting loads of daily use recently.
There is some big end knock, so I changed the oil with added Lucas Heavy Duty Oil Stabilizer.
It has stopped the knocking and is only a temporary measure while I get a spare engine working.
The plan is to swap out with the working spare and rebuild the origional engine with hardened valve seats so she can run unleaded petrol.
PXL_20220526_153150948.jpg

Have removed the radiator cover also, since it's not winter for a few weeks.
 
Having removed the vinyl backed choir sound deadening, which is across the middle of the bulkhead for the purposes of repairing and slightly upgrading the wiring behind the dash, tiding up the bulkhead, with some welding and fabrication. Also having removed the bottom sections of the dash for access and to refurbish it.
Phew, that was long :confused:.
I am trying to source a new but original like piece of vinyl backed choir sound deadening. But there's nothing like it.
I think it's choir- coconut hair formed into a felt like structure with vinyl like dash material stuck to it.
I could reuse the original piece, but does anyone know of a source for this stuff?
It is probably fire proof.
I could carefully recover the original piece with new vinyl over the old which may work well. But it would be so easy to cut a new piece if I could only source it o_O
16575323914559201339262164859466.jpg

16575325789806862266225704616922.jpg

Maybe reconstruction of the original is my only option, but if I could find this material the original could be used as a pattern to cut an original equipment replacement.
Then the plates which were riveted over, can be put back.
This is the station wagon, many commercial models just had the plates riveted directly to the bulkhead firewall.
 
Dashboard refurb
I've found a fabric supplier you can phone up and speak to on the phone.
16579629513683633158197429377675.jpg

They're really helpful, and even sent me five samples so I could get the best match and fit.
16579631010097281609005016718453.jpg


The vintage Nero is the closest match, to the original dash and seat fabric also.
It's the most expensive one, and comes in a width 1370mm wide which will be useful; Because the width is just that along the top.

16579636208483038149962054914462.jpg

It will do the back head cushions fitted to the station wagon just.
Think I'll be buying enough to to do two station wagons, seats also and redo door trims ect. I have a 150 year old singer with a modern 1940's electric motor upgrade which can stitch thin leather. Ot has no plastic drive cogs, but all metal components so it's very tough, and less than 0.3mm play between the drive and needle.
16579645197768742186508575672547.jpg

They really don't build them like this anymore
16579646113953856016542476544936.jpg
 

Attachments

  • 16579631759773478754796705214430.jpg
    16579631759773478754796705214430.jpg
    166.1 KB · Views: 86
  • 16579639328977003539289928692613.jpg
    16579639328977003539289928692613.jpg
    192.4 KB · Views: 68
Last edited:
Will do,
I need to carefully strip the old fabric for a pattern and do some thing metal fabrication. There are several parts so I'll start with the top which looks not too complicated, I hope lol
 
Doing some essential maintenance
16581580444224728826778115063445.jpg

It's a hot day, the small dog won't even sleep in side Gigi. Prefers the vented garage floor
16581582285455247268845631384352.jpg

I was getting some engine knock, Mike local peterculter garage guy suggested retard the ignition timing.
I checked with my awesome 70's style timing gun
16581584686851816782122556005529.jpg

Yep it was massively advanced, and when I retarded it the knock has vanished completely:D:cool:.
So I'm giving all the electrical bits a service.
Such a relief, I seriously thought the big or little ends were not happy.
I'll have to drop by with some ice-cream for them all at Mikes garage once I get done.
 
16581684217777911595957205150998.jpg

That's everything running just thought now
I don't know why but she seems to need to be just advanced of the mark, timing. She's running very hot and lacking power of I set the timing on the first mark, which is for 90-96 octane.
This may be because I use the more expensive fuel as in 5% ethanol rather than 10% as in regular.
New Shell V-Power unleaded is a 99RON octane.
She's running very well though, maybe the 10% bio ethanol would be fine, but it's hydroscopic and absorbs water and can attack some rubbers, I don't know what's best, will stick with premium just now.
 
I took the folk at Mike's garage a couple of boxes of magnum ice-creams, they were appreciated.
I'm cleaning the air filter, not a fun job!
16582534495394347354694149692986.jpg


And shoved on a quickly cleaned spare from my other car. This was a mistake :confused:
As it's obviously not in good internal shape and is leaking oil from the top ?

16582536347031079479869763083466.jpg

And it's making starting more difficult, probably because it's saying here have some oil to the engine lol
16582537865731979223808203740402.jpg


So i'd better get the clean original back in.
Not painting it just yet, we just need to drive around :cool: That can wait for another day
 
Back
Top