Series 3 109 Station Wagon, full ground up resto and 88 redo careless resto driving project

This site contains affiliate links for which LandyZone may be compensated if you make a purchase.
IMG-20210317-WA0002.jpeg

Shiny part has arrived. Looks very close to the origonal
PXL_20210317_190822618.jpg
started playing with a pattern, but may try from one piece with partial folds and other bends welded, rather than three separate bits.
Need to make separate card patterns for top and bottom, then see how they may fold from one piece of steel ..
 
PXL_20210318_233413063.jpg
PXL_20210319_202209330.jpg
PXL_20210319_202238165.jpg
PXL_20210320_094928389.jpg
PXL_20210320_172825860.jpg
So I'm happily making replacement parts and I go to my Oxford welder with 6013 stick and begin welding out up.
But there's a problem, is slag inclusion.
 
I wouldnt get to uptight over the slag inclusion. Its a land rover chassis , It wont be any less strong , considering it was probably being run spit thin and rotten before it was laid up. Your doing a great job and being really conscientious with the repairs and how your tackling them . A wee bit of slag here and there wont get in the way of the overall strength .. It will be fine . I wonder if using the galv sheet is causing the problem? You will be aware of the toxic fumes that come off galv when welding it.. at very least, hold your breath :) mean while keep up the good work :)
 
Thank you,
Yes welding galv steel emits extremely poisonous gasses.
I always wear a 3m respirator under my welding helmet and when I'm grinding too. The area to be welded has the galv surface ground off pre weld. Also with the garage door open and the back door, there is a good flow of fresh air too. I think welders used to drink milk to counter the Zinc fumes
PXL_20210323_172731572.jpg
PXL_20210323_192213015.NIGHT.jpg


PXL_20210321_201250930.NIGHT.jpg
PXL_20210323_172722721.jpg
so I borrowed this MIG from work
PXL_20210323_133821504.jpg
PXL_20210323_172722721.jpg


PXL_20210323_192213015.NIGHT.jpg


Hmm mig with Argoshield Universal BOC gas.
I really like this, and there is no Slag Inclusion.

The problem with inclusion for me is more long term, don't want it causing rust down the line, and a Land Rover needs rust like well enough said.
PXL_20210323_192242702.NIGHT.jpg


So the chassis can be welded by stick, bit it is too easy to blow a hole and cleaning the slag off much thicker metal is much easier.
So after many hours finding the right mig for me, and deciding not to go tig, beautiful although they weld.
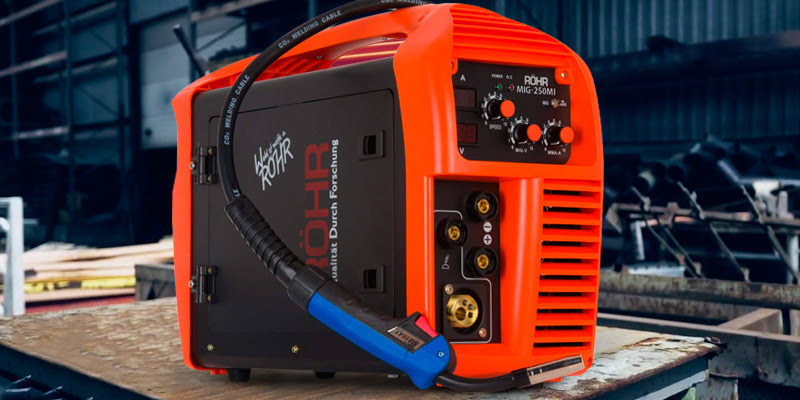
I came across this ROHR 250 mi mig welder
upload_2021-3-26_22-26-59.png

Which has some interesting features.
'
IGBT MONOTUBES
The Röhr MIG-250MI has to be the most well-thought-out and complete MIG welder within its price range. There are so many little details here separating this product from its competition that you can start anywhere.

For one, there's the latest IGBT tech. Incorporating this bipolar transistor that uses an insulated gate electrode, the semi-conducting device gives you the field-effect transistors' easy control and the bipolar transistors' fast-switching and high breakdown voltage. At the same time, limiting electrical continuity, this tech makes the unit pretty much immune from short circuits.

Using ARC Force, the machine makes sure that the current is increased automatically when the arc gets shorter. Meanwhile, the Hot Start works wonders automatically boosting the tension at the arc's ignition of the arc, facilitating electrical arc ignition.

Of course, the product is about its high-end components as much as it is about these technologies/features. Incorporating inverters, this MIG welder increases its efficiency by 30 percent, drastically reducing the power required to weld and producing the most consistent power supply, making sure that the welding arc remains stable and secure.

Apart from that, the aforementioned IGBT monotubes increase the machine's efficiency too when you compare these tubes' performance to standard MOS tubing.


98dcc897ef873c00bef7659d2f86ac6b.jpg

MIG AND MAG WELD

So I got one, and also got an Argoshield Light Cylinder from BOC.
After years of making a rod for my own back, using a 100A gasless mig which I now realise only went down to 80A on it's low setting lol
16167992052272191629087458858289.jpg

Can't wait to get a regulator tomorrow and get going :- )
 
Youve got the Arg shield now but BOC will refund you the rental if you cancel.. Why do I say that . After 30 years of being a BOC customer it just about became impossible to find a supplier withing a 25 mile radius near me .. So I ditched all my BOC stuff and switched to HOBBY weld Its a 1 off refundable deposit for the bottle the gas is only marginally cheaper but from my personal experience so far and having been provided with half filled BOC bottles, Ive found that the Hobby gas are filled to a higher pressure and seem to last longer than the equivilent BOC product ..I have my argon mix and pure argon for the tig from Hobby weld and will be shifting to there oxy acetylene as soon as my current bottles run dry ..

I bought my tig from Poland . Its identicl in iits design and functions to the Jasic machine but £1250 CHEAPER.. £450 for a fully electronic AC DC TIG I did wonder when I bought it if it was just going to be crap , my old tig was getting tempremental and it was ancient so scrapped that when I found the Polish machine was the nuts .. and its fully transportable ..

The mig will serve you well .. :) and you mae the right choice for the type of work. The TIG is great but its not for new to old , It likes good clean material and can be a chore to get into some tight areas on home restos .. The mig wire gets into all sort of nooks and crannies and you always have one hand free as a steady :) Tig is great for siting at a bench making pretty welds on good clean materials :)

Just mentioning the gas alternative to save you and others some money...
 
Last edited:
Thanks Auld Duffer,
That's good to know and useful too.
Maybe because I'm in Aberdeen, and with the Oil and Gas there is a big BOC supply shop serving the local industries.
I got what they call a Hobby deal, so instead of £90 rental the bottle is £50/Year and that's including VAT. It's also about the same for a replacement full bottle. I didn't think the deal too bad and from work, I can pop by at lunch time and get a replacement when needed.
They also had a similar type welder MIG but 200 A and £1400 + VAT lol.
Dave who works there said he thought it was also probably made in China so the only real life differences where a five year warranty and better support services.
I would love to TIG as I do paint a bit and really do appreciate a beautiful manifold. But my Landy would never get done lol
PXL_20210325_203401850.NIGHT~2.jpg

One of my paintings : - )
 
I had the hobby deal with boc too for a wee while , But the annual charge for all my bottles was becoming a chore .. Gas prices were always going up too. Its not for everyone especially if you have a good service from BOC but I am finding the hobby weld products are pretty good for a one off payment of £50 .. But in Aberdeen I guess there will be no shortage of supply.. Im just down the A90 near Forfar closest for me is either Dundee or Brechin, or I can get the hobby gas from Forfar .. Anyhooo , Good score on the welder .. I think the Jaysic machine is the same Branding price increase as the BOC machine .. Good job on the art too, Oil or Acrylic ?
 
PXL_20210327_211044254.jpg

First try setting up the new MIG. Two pieces of 2mm galv to butt welded.
PXL_20210327_211108242.jpg

Everything set quite low and slow
PXL_20210327_213411108.jpg

Three stitch passes and a quick grind flat
PXL_20210327_213436806.jpg


A fourth pass would likely be good, but I'm happy enough for the sake of a play around
PXL_20210327_213538501.jpg

Penetration was ok also.
Boy what a difference compared to stick or flux cored MAG.
Why did I wait so long to get a decent MIG and gas. ಠ_ʖಠ
 

Attachments

  • PXL_20210327_211044254.jpg
    PXL_20210327_211044254.jpg
    314.3 KB · Views: 66
PXL_20210402_133140528.jpg

Made pattern marked up and plasma cut piece of 2mm galv for n/s front chassis leg repair piece.
PXL_20210402_151938836.jpg

Folded formed and tacked together
PXL_20210402_181649161.jpg

After mote stitch welds and work with some hand tools
PXL_20210330_163524120.NIGHT.jpg

Which I've reorganised because I got a new MIG
PXL_20210402_181835546.jpg
PXL_20210402_182020475.NIGHT.jpg

New and old pattern parts.
So this will be the other outside front ready to weld in place, before removing and replacing all the inside parts, once its all welded front and back but not on the central seam
PXL_20210402_182411572.NIGHT.jpg
 
Trying to get this straight down the outside, cut a couple of slits to let the metal in which wil pull together when I weld them up
16176157062676560850083048832474.jpg
16176157719044593311635837545030.jpg
 
16176469307327519640852427404415.jpg
16176469738812022275352438171965.jpg

Getting a test fit.
The inner edge has been flanged to sit beyond the overlap
16176471431846826577995621894217.jpg
16176472370249033973852507191082.jpg
The extra 10mm could be trimmed off, but I figure it will do no harm sitting beyond the overlap inside of the chassis leg
16176474816548574024003455163345.jpg
 
Making the internal baffle plate as origonal, non structural. I assume this is to allow airflow and reduce the ingress of perhaps water ?
No Idea really but not hard to make. It is thinner metal which I have a plenty
1617811354451528356088772830571.jpg
16178114042771004624574768435383.jpg
16178114347632843204424582517175.jpg
1617811531586599293246778816135.jpg

Card template to transfer to 1.2mm galvinised steel sheet
 
I know mice lived in the gearbox bell housing, because they left the TV on, but I'm beginning to think moles lived in the chassis by the astonishing amount of soil I'm still getting out
1617887402161497602689936870093.jpg
16178874333719207054896598812812.jpg

And that's after extensive power flushing.
However in other areas there is still the original paint
PXL_20210408_131543833.NIGHT.jpg

Which does not photograph well. It looks much fresher when viewed.
Just as well I'm not in a hurry lol
 
So its time to remove the central parts as both outer front rail parts have been replaced and the dumb irons are supported
16180622390664584012016396416258.jpg

So it's time to remove all the middle bits
16180623158143900502398770972082.jpg
16180623542601127674645523533654.jpg

And of course the most fun is cutting the cross member out
1618062496363367631767049508299.jpg

Which has an astonishing amount of crud in it
16180625664036106645579620114901.jpg
16180626148362132989333191010323.jpg
This allows me to remove each inside party of the chassis rails independently and make them out of new metal.
16180628062374825233948010187644.jpg
 
This is the inside party of the chassis leg that attached to the cross member
16180642927977291934881838760836.jpg

So not much strength to support the steering relay which is housed just beyond this structure.
Multiple really thick plates welded to paper thin metal don't really do much either lol.
But it's great to have access from the inside now two re-fabricate the chassis leg
16180646200697733470726759085656.jpg
16180648275077294379742056410758.jpg


And by staggering the joins I hope to make a stronger repair.
Plus there is double thickness metal here for the shock absorber mount, which will give a good place to join to I hope
16180650949868100892966029650014.jpg
16180656476903887768254898469270.jpg
 
16180690395652547690063199944804.jpg
a lovely clear space to work with now, just need to cut the rest of the crossmember from the inner rails and I'll have lovely patterns to work from.
16180690723123468800705335763773.jpg

Thank goodness for the plasma cutter. It's made light work of all the cutting.
 
Back
Top