restarting my D1 V8 project - been a while!!

This site contains affiliate links for which LandyZone may be compensated if you make a purchase.

IandiscoV8

P38 mmm I feel some money is going to be spent!
Full Member
Posts
225
Location
Blyth Northumberland
Hi all hope everyone is keeping well in these strange days?
I decided to make restart on my 1999 reg D1 V8 yesterday, lovely day so why not?

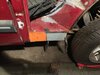
OK situation as is now; rear X member needs replacing, rear floor needs replacing and the surrounding supporting lip/ledge, floor supports need replacing, the usual panel has gone rear of the rear doors the one with the seal under the window, panels rear of the wheel tubs need work.

I have bought all the repair panels available but will have to make some sections, I have been getting some inspiration from Fitzees Fabrications channel on the youtube device, what a great knowledgeable bloke.
OK work done yesterday was;
check to see if any critters had taken residence as I removed the floor last year, none present that I could see, loads of spiders webs!!
Removed the fuel tank I temporarily installed to move V8 beast, before removal I chucked some fresh fuel in and the old girl fired up no bother :)
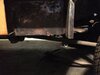
The next few hours spent removing the tow hitch, LPG gas filler nozzle, gas pipes, rear brake lines, splitter set up and the anti roll bar plus drop links - they are toast so just going to angle grind off, I have new ones to fit.
The A frame needs to come off as it looks like ships anchor, the bushes and the ball joint can be replaced while off.
I had another look at the chassis rot where the A frame attaches and it extends further than I anticipated.

So I am back to the thorny subject of lifting the body up and I will have to do this to repair a section where the A frame large cross member tube attaches, I was warned by a few of you sages last year that this would be the case and I bow to your knowledge.

OK I will disconnect all the body mounts and lift the body at the rear up about 2 feet? I guess gear knob and high low will need disconnecting and the associated wiring.
The outriggers are all OK and I am planning renewing the front body mounts with the inner wings and light panels.
Onward
Ian
 
Last edited:
Work done today;
Removed the arms connected by the ball joint on the axle top, took my time and got the nuts and bolts off, took 45 minutes, the bushes are still sound.
Removed the seat belt to chassis mounts, again I took my time and saved all the hard ware.
Cleaned the Lpg pipes and the axle breather pipe.
cleaned up rear door retainer bar fittings and remover circlip.

Tomorrow's plan is to remove rear dampers, rear door.
Rest of the week try and get the body mountings undone and off - not looking forward to that task.

Onward
Ian
 
Excellent. Take pics for you but also for us!!
You will want the pictures!
You probably won’t even have to remove the mount bolts to lift it haha! Mine were barely attached to the body.
Is the plan to lift it in order to roll the chassis out?
 
Hello,
Yes I will take some pics.
I cannot fully remove / move the chassis out due to where I have the beast parked.
Plan is to remove all the mounts up to the front ones then just loosen these off then lift the body at the rear, this should give enough clearance to do the welding repairs and stabilise the rust.
HE HE I am an optimist.
Removing mounts and LPG tanks tomorrow - LPG tanks first as I WILL be doing some grinding of body mounts!!
Onward
Ian

how do you plan to support the body? Mounts will be completely ****ed and if your sills aren’t any good you’ll probably want to repair/box them when you do the mounts? Also, if you need to do the rear crossmember I’d recommend supporting it through rear windows when you get to that I.e taking rear quarters off - worth attacking those rear quarters anyway.
I then removed rear door and welded a bar across the opening to stop the body flexing.
You can see bar with the insulation on is welded in low down to stop splay when the crossmember is chopped out

C08EEA32-2E11-4FE5-9DCF-43D218D97B14.jpeg
 
Discovery 2 pics 017.JPG
Discovery 2 pics 018.JPG
Discovery 2 pics 019.JPG
Discovery 2 pics 021.JPG
Discovery 2 pics 022.JPG
Discovery 2 pics 023.JPG
Discovery 2 pics 024.JPG
Discovery 2 pics 026.JPG
I am going to make up some sort of frame work to support the body when lifted, could be tricky on an angle.
Rear quarters are off, sills are in very good original condition, only the rear of the sills to plate and I am going to weld these up 1st then do the door inner panels to the C post then do the 2 outer floor panels around the wheel arches.this will give it some strength. I will weld a bar across the rear opening yes.
Yours looks a lot worse than mine tbh.
Just need to get it high enough to get at the chassis top below the rear seats.
 
Last edited:
OK Hello everyone.
Hope everyone had a bit more freedom this summer, we had a week away in Scotland in our self contained motor-home, and I am glad I bought it a few years ago, great holiday near Sheil bridge in the highlands.
OK back now from holibags and I have been thinking again - for a while about the Discovery - restore or re-body? and after a long discussion and thoughts with the boss and my brother yesterday.
I am going to continue with the restoration of the V8 beast.
I will take some pics today of the progress so far - not much more since last spring!!!
I plan to get the beast into my garage which has meant sorting my garage out - jeez Louise if you see my garage this will be easier said than done - anyway it will be done.
Kintail Mountain rescue just outside the campsite, nice Defender, I was told a more modern TD5 inside.

Onward
Ian
 
Last edited:
Hi all, well the resto of the V8 beast has begun finally.
I have cleared the garage - still got some to do but I am confident I can work in how it is at the moment.
The beast is installed in the garage.
So what has been done, SWMBO and the daughter have bought me some skids for the wheels so I can move the V8 around - they are great pieces of kit, I ordered the machine mart ones after looking online, the ebay and amazon ones looked a bit ropy to me, the Clarke ones are very tough and should be able to take some punishment - happy days!!
I have removed both inner door shut panels, quite an easy job, I have uploaded a video to my Youtube channel showing doing one side.
Next was to sand down some surface rust which had taken hold while outside for sooooo long.
Next job on the list will be cutting the rot out of sill ends - which is the worst part of the complete sills.
welding repair panels in, welding repair panel into the lower door shut where it meets inner wing then weld in the curved shut panels.
see my Youtube channel Ian's Garage Workshop
I will keep the pics coming - first one here

Discovery videos 021.JPG


Fuel tank only strapped in to drive the V8 into the garage
Onward
Ian
 
Last edited:
Yes it looks quite neat, I think its meant to look like some sort of chequer plate.
I will need new one's as I have lost 2 panels
 
Hi all, not much done last few days, I have been mostly tidying the garage.
I have rubbed down the nearside rear inner wing, rust stabiliser on some of the captive nuts etc and painted some zinc primer onto the good metal - still lots of good metal on the inner wing, bottom edge needs cutting off and replaced
Onward
Ian
 
An update, not much done.
I have rubbed down and rust treated the near side rear inner quarter panel.
Bought 2 floor outer repair panels

Onward
Ian
mq1.jpg
inner wing 001.JPG
 
Hi All,
I have finally cut some rot out of the bodywork, the sill end rot on the nearside.
The repair panel is cut down and fits the hole.
Need to treat the inside of the sill with some rust converter

[/ATTACH] Sill end 1 014.JPG Sill end 1 012.JPG
 

Attachments

  • Sill end 1 003.JPG
    Sill end 1 003.JPG
    285.9 KB · Views: 75
  • Sill end 1 001.JPG
    Sill end 1 001.JPG
    288.1 KB · Views: 93
Back
Top