L81ker
Member
- Posts
- 19
- Location
- Suffolk-Cambridge-Essex border
My handbrake cable ('04 Def TD5) has been sticking for a while, and i'm pretty sure it was on the way out for quite a time. It snapped last Wednesday, so after a bit of checking around, decision was made to get a new OE one. Online price was found to be the same as the stealer price, so collected one from the local stealer yesterday - the last one in stock. £81.00.
This morning, changed it.
With the vehicle chocked and also parked against a low wall:first gear selected and left.
I started with removing the handbrake end. Fold up the handbrake cover, and remove the clevis pin and disconnect the handbrake sensor switch.
Remove the top and bottom bolts (10mm) securing the handbrake lever assembly, and ease it gently forwards. The rubber grommet on the sensor wire can be squeezed out, and the entire wire set aside. This let me get at and remove the end of the old cable by squeezing the end of the rubber piece using pump pliers and forcing it out of the hole.
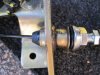
Next, with the handbrake lever removed from the vehicle, clean it up if needed and lubicate moving parts that need it. Spray the rubber piece at the end of the handbrake cable very liberally with silcone lubricant, and quickly push the end through and into the handbrake assembly. I had to push it VERY hard to get it in, and it would be impossible without the silicone lube. I also ran some lube onto the cable down inside the sheath at this point.
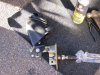
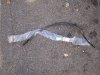
Postiion the handbrake lever assy back in the vehicle, and carefully feed the other end of the cable through the bodywork hole, and put the sensor wire back in place before securing the entire assembly. I temporarily put the clevis pin back into the cable BEFORE I started doing this, to make sure the cable doesn't get twisted up. You can see the new cable beside the old in my pictures.
The handbrake assembly should be properly bolted into place, and then fix the clevis pin in permanently replacing the washer and split pin to secure it. Leave the cover up for now so you can see whats happening.
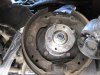
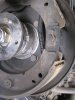
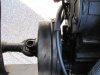
Next, under the vehicle, mark up the rotational position of the prop and the drum so you can put them back in the same place, then remove and secure the propshaft, turn the handbrake adjuster (bottom of the backplate) anticlockwise till the drum is turning with no sign of binding (it will only move a few degrees back and forth). Remove the securing screw from the brake drum, and gently ease off the drum - if it doesnt clear the brake shoes, wind the adjuster out a bit more.
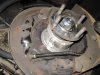
Once the drum is off, remove the bottom spring from the brake shoes, then take off the the LEFT shoe retaining spring clip very carefully - don't get any oil or grease on either the shoes or the inside of the drum. The top spring can be removed by carefully moving the LEFT shoe out from the bottom and manouvering it upwards and off of the top metal separator till the top spring can be relaxed and carefully removed. Note the position of the adjuster, the adjuster piece may drop as you take the left shoe off.
Once the left shoe is off, move the top metal separator (be careful to keep it's spring in place) away from the RIGHT shoe which can now move freely.
You can now get at the spring clips on the end of the OLD cable and I used a screwdriver to press each spring tab in turn and pop it out. I could then use strong pliers to release the end of the cable from behind the right brake shoe without removing the shoe.
Thats it, the old one is now off the vehicle. I cleaned up any moving surfaces, and got some coppaslip onto them.
Position and feed the end of the new cable in through the back plate, and locate the spring clips. Using pliers and hands, move the spring up the cable exposing the 'tab' at the end of the cable, keeping the spring back with snipe-nose pliers, I could then get the end of the cable very easily into its place behind the right shoe.
I then reassembled the left shoe, and checked that the cable worked as it should and nothing was wrong.
I could then put back on the drum, reconnect the prop shaft, and finally wind the adjuster in till it was holding, and backed it off 1/2 a turn. Jumping in the cab, I found I had got the adjusment spot on for 3 clicks.
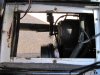
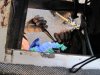
Job done, just have to put all the covers back on. You can see that I have the cover plate off under the cubby/middle seat, I haven't mentioned that too much as yours might be different to mine -you can see from the pics what I've done though.
Hope this helps someone!
Clive.
This morning, changed it.
With the vehicle chocked and also parked against a low wall:first gear selected and left.
I started with removing the handbrake end. Fold up the handbrake cover, and remove the clevis pin and disconnect the handbrake sensor switch.
Remove the top and bottom bolts (10mm) securing the handbrake lever assembly, and ease it gently forwards. The rubber grommet on the sensor wire can be squeezed out, and the entire wire set aside. This let me get at and remove the end of the old cable by squeezing the end of the rubber piece using pump pliers and forcing it out of the hole.
Next, with the handbrake lever removed from the vehicle, clean it up if needed and lubicate moving parts that need it. Spray the rubber piece at the end of the handbrake cable very liberally with silcone lubricant, and quickly push the end through and into the handbrake assembly. I had to push it VERY hard to get it in, and it would be impossible without the silicone lube. I also ran some lube onto the cable down inside the sheath at this point.
Postiion the handbrake lever assy back in the vehicle, and carefully feed the other end of the cable through the bodywork hole, and put the sensor wire back in place before securing the entire assembly. I temporarily put the clevis pin back into the cable BEFORE I started doing this, to make sure the cable doesn't get twisted up. You can see the new cable beside the old in my pictures.
The handbrake assembly should be properly bolted into place, and then fix the clevis pin in permanently replacing the washer and split pin to secure it. Leave the cover up for now so you can see whats happening.
Next, under the vehicle, mark up the rotational position of the prop and the drum so you can put them back in the same place, then remove and secure the propshaft, turn the handbrake adjuster (bottom of the backplate) anticlockwise till the drum is turning with no sign of binding (it will only move a few degrees back and forth). Remove the securing screw from the brake drum, and gently ease off the drum - if it doesnt clear the brake shoes, wind the adjuster out a bit more.
Once the drum is off, remove the bottom spring from the brake shoes, then take off the the LEFT shoe retaining spring clip very carefully - don't get any oil or grease on either the shoes or the inside of the drum. The top spring can be removed by carefully moving the LEFT shoe out from the bottom and manouvering it upwards and off of the top metal separator till the top spring can be relaxed and carefully removed. Note the position of the adjuster, the adjuster piece may drop as you take the left shoe off.
Once the left shoe is off, move the top metal separator (be careful to keep it's spring in place) away from the RIGHT shoe which can now move freely.
You can now get at the spring clips on the end of the OLD cable and I used a screwdriver to press each spring tab in turn and pop it out. I could then use strong pliers to release the end of the cable from behind the right brake shoe without removing the shoe.
Thats it, the old one is now off the vehicle. I cleaned up any moving surfaces, and got some coppaslip onto them.
Position and feed the end of the new cable in through the back plate, and locate the spring clips. Using pliers and hands, move the spring up the cable exposing the 'tab' at the end of the cable, keeping the spring back with snipe-nose pliers, I could then get the end of the cable very easily into its place behind the right shoe.
I then reassembled the left shoe, and checked that the cable worked as it should and nothing was wrong.
I could then put back on the drum, reconnect the prop shaft, and finally wind the adjuster in till it was holding, and backed it off 1/2 a turn. Jumping in the cab, I found I had got the adjusment spot on for 3 clicks.
Job done, just have to put all the covers back on. You can see that I have the cover plate off under the cubby/middle seat, I haven't mentioned that too much as yours might be different to mine -you can see from the pics what I've done though.
Hope this helps someone!
Clive.
Attachments
-
 LR-TD5-HANDBRAKE-CABLE 018.jpg580.3 KB · Views: 4,528
 -
 LR-TD5-HANDBRAKE-CABLE 019.jpg217.3 KB · Views: 3,218
 -
 LR-TD5-HANDBRAKE-CABLE 024.jpg352.1 KB · Views: 2,751
 -
 LR-TD5-HANDBRAKE-CABLE 025.jpg401 KB · Views: 3,027
 -
 LR-TD5-HANDBRAKE-CABLE 026.jpg324.8 KB · Views: 3,153
 -
 LR-TD5-HANDBRAKE-CABLE 028.jpg273.3 KB · Views: 2,429
 -
 LR-TD5-HANDBRAKE-CABLE 031.jpg322.7 KB · Views: 4,326
 -
 LR-TD5-HANDBRAKE-CABLE 032.jpg262 KB · Views: 3,020
 -
 LR-TD5-HANDBRAKE-CABLE 033.jpg673 KB · Views: 2,379