55FM58
Member
- Posts
- 48
- Location
- Dagenham, Essex
Back in Oct 2014 I was heading down the M3 to pick up a Sankey for a friend in my Series 3, Needed to come of at J9 and as I approached the slip roads the clonk, clonk clonk of a flat started up. Pulled over onto the hard shoulder to find the n/s front was flat. Changed it over and went to pull away again only to find a strange lack of power. Engine would start fine first turn of the key and appeared to be idling OK but barely moved once the clutch was up. Up until the puncture it had been running as sweet as anything. Long story short I wound up coming home on the back of 2 RAC beaver tails - 1 for the Landie and 1 for the Sankey,
Once home I started investigating. The screened ignition system checked out OK with a nice fat spark on each plug so I carried out a compression test on each cylinder. with the throttle pedal held down as recommended. the problem became immediately apparent:
Cyl #1 90 psi
Cyl #2 80 psi
Cyl #3 0
Cyl #4 0
Book said it should be around 150 psi on every cylinder. Obviously there was a problem there so off came the head to investigate. Series owner will know the lifting the head off is not something easily done single handed so I wrapped paracord through the lifting eyes, slid a scaffold pole under that and get my daughter to give me a hand lifting the head off and out. With the head off the problem was immediately apparent:
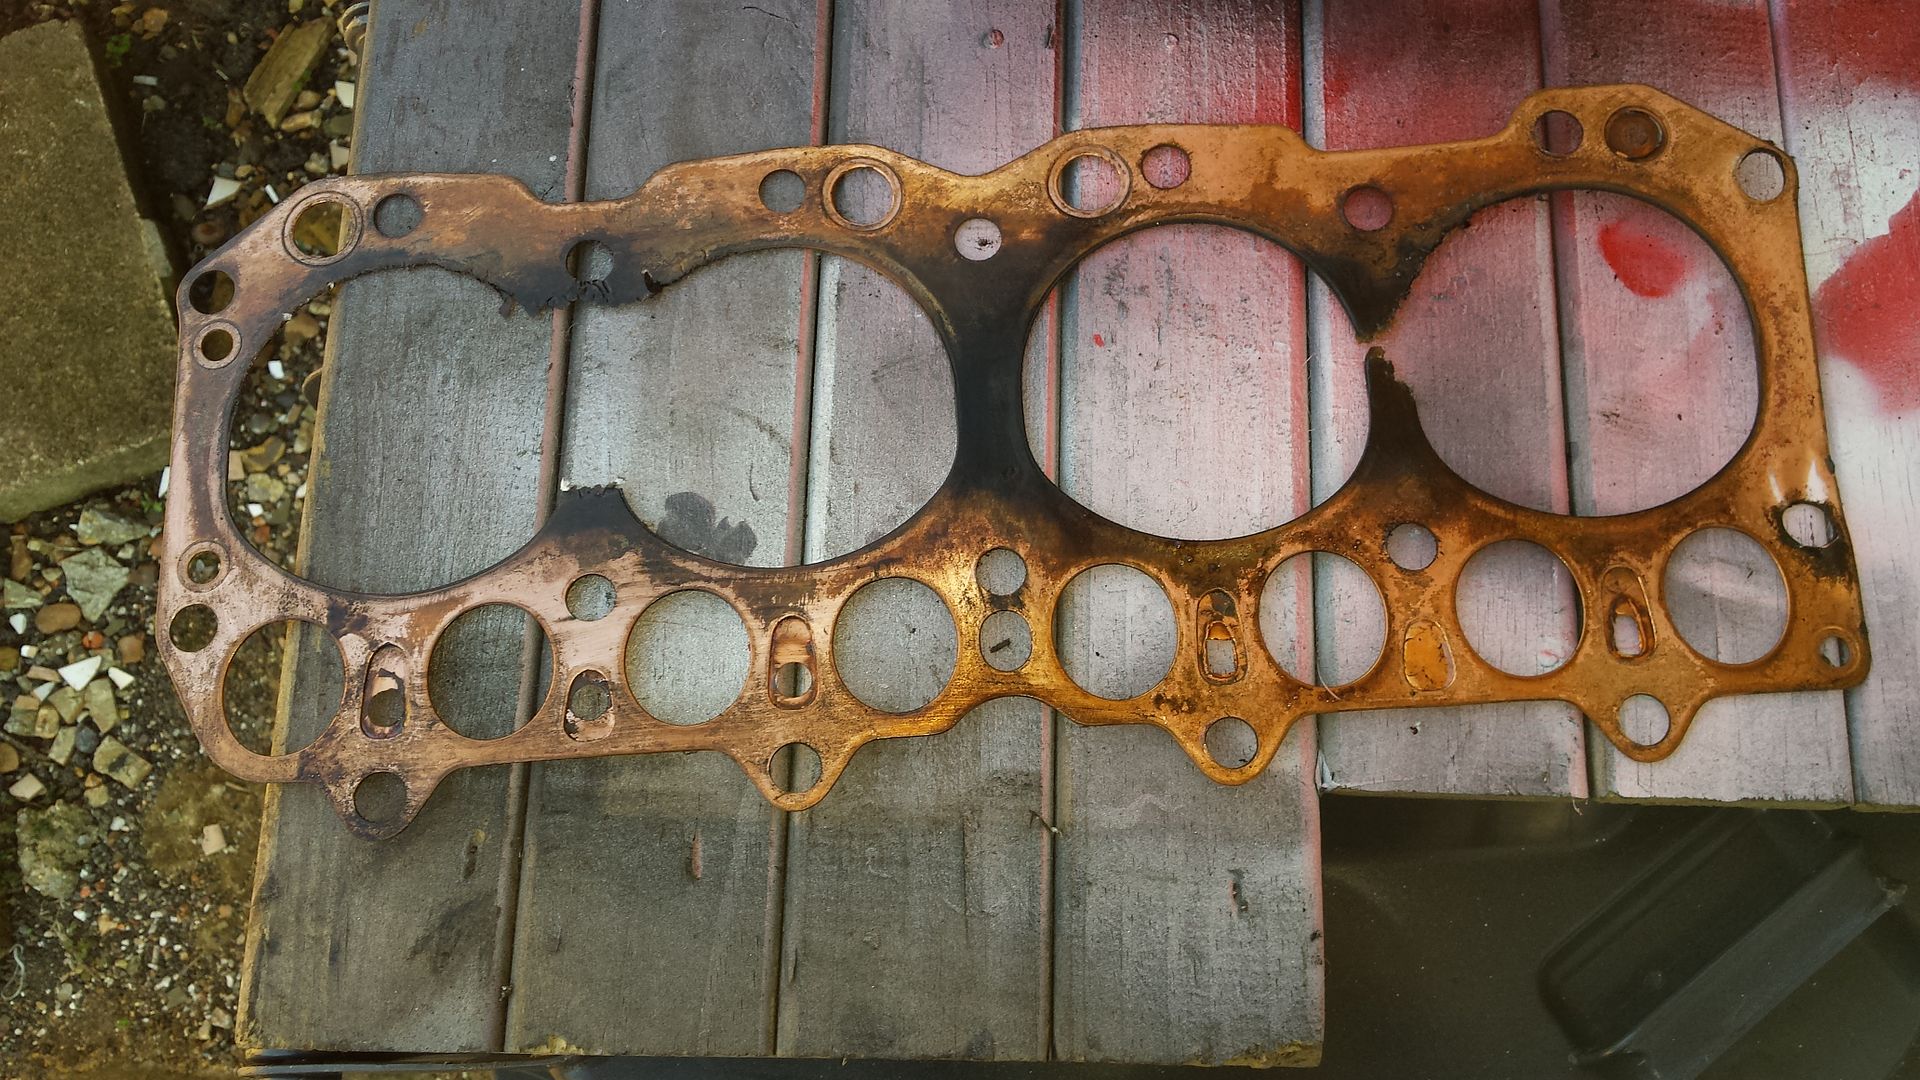
As can be seen - the head gasket between #4 and #3 cylinders was gone completely and was starting to go between #2 and #1. I have absolutely no idea why this happened.
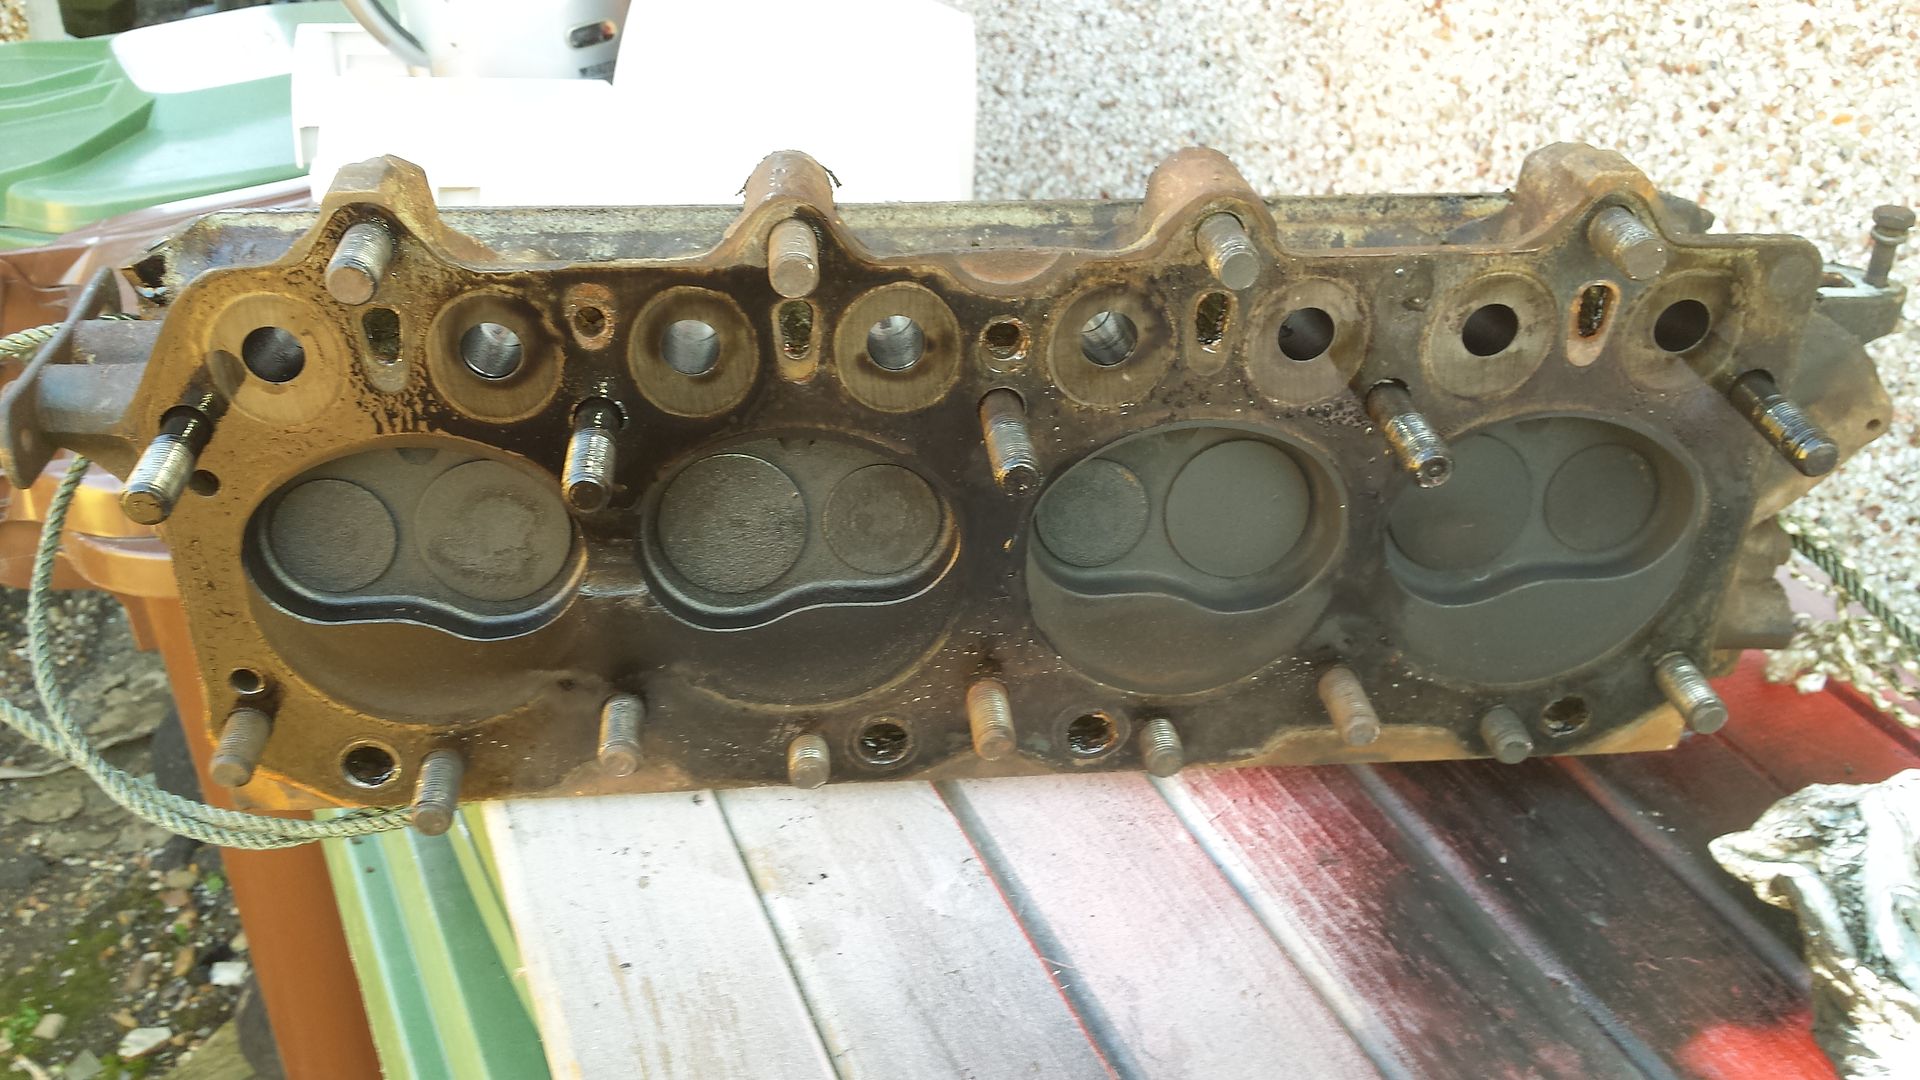
Even worse an examination of the cylinder head revealed a path had been cut between #4 and #3 cylinders.
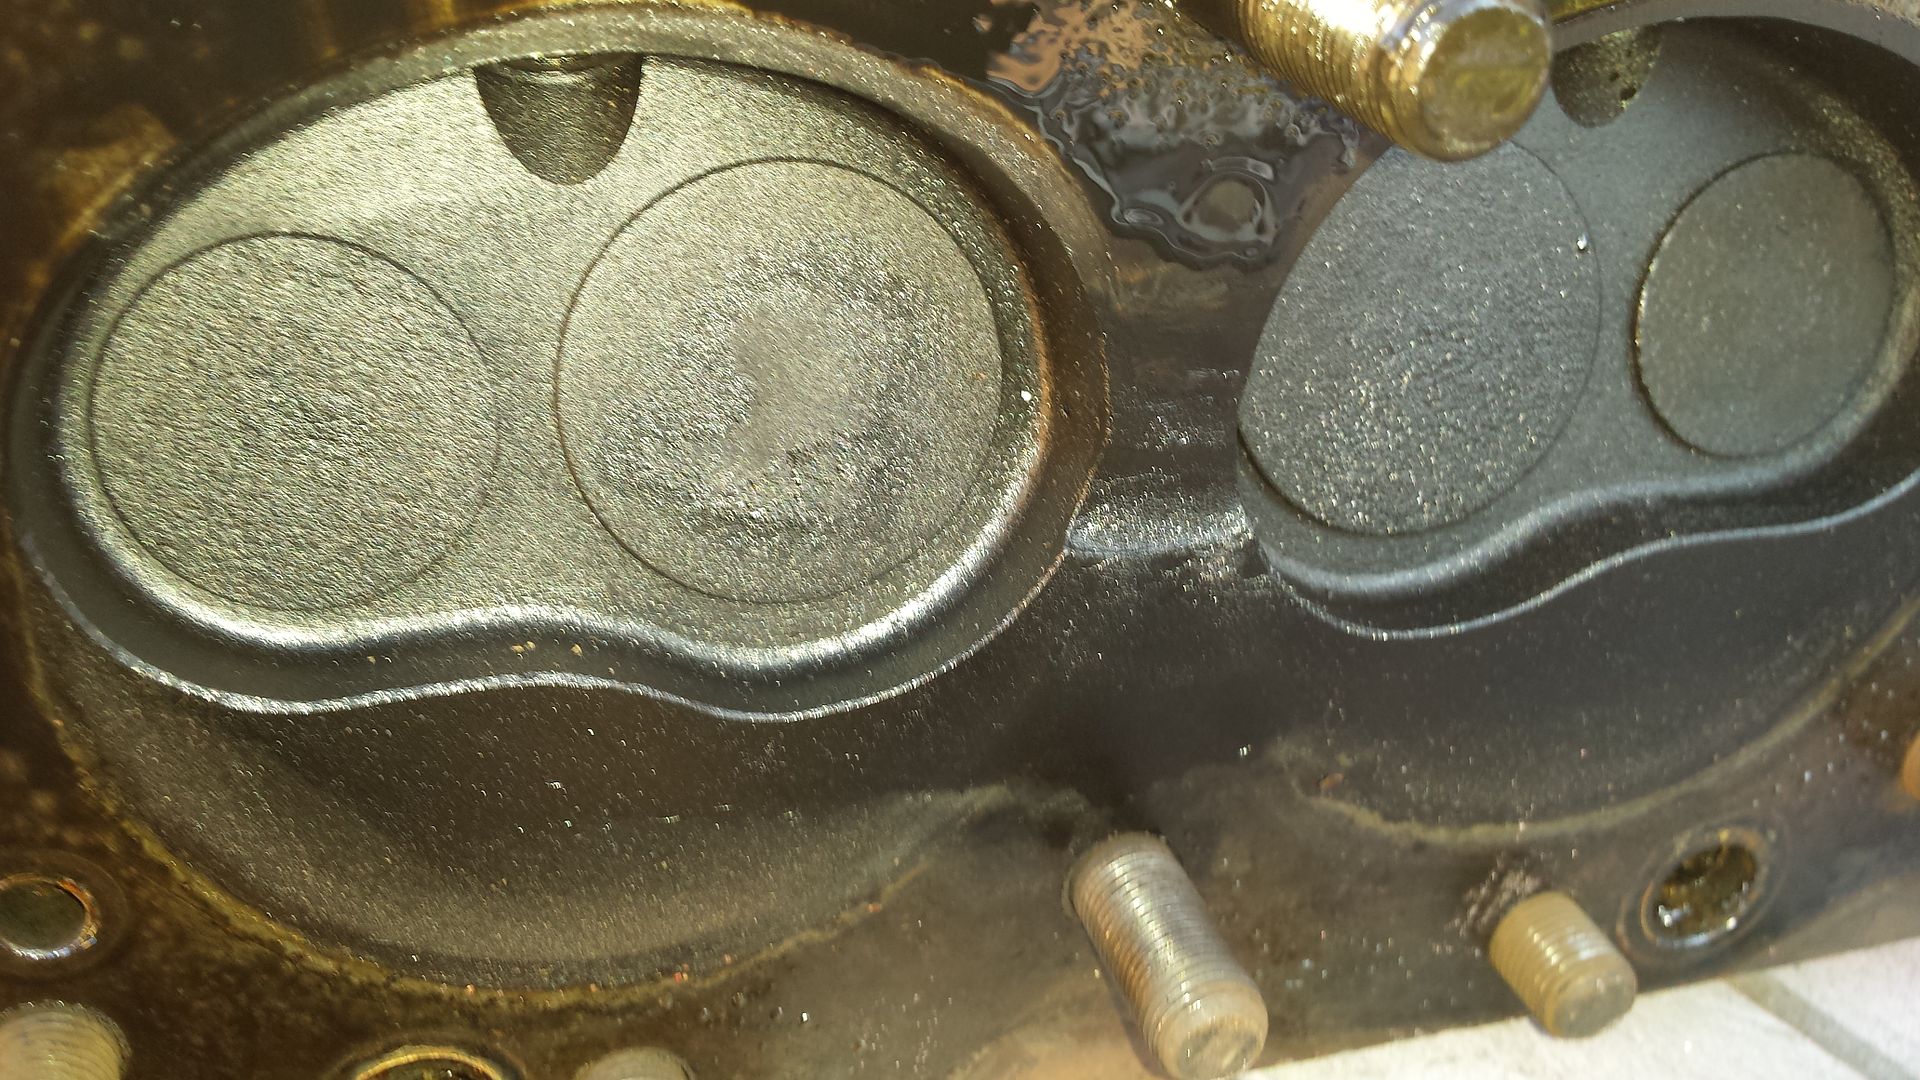
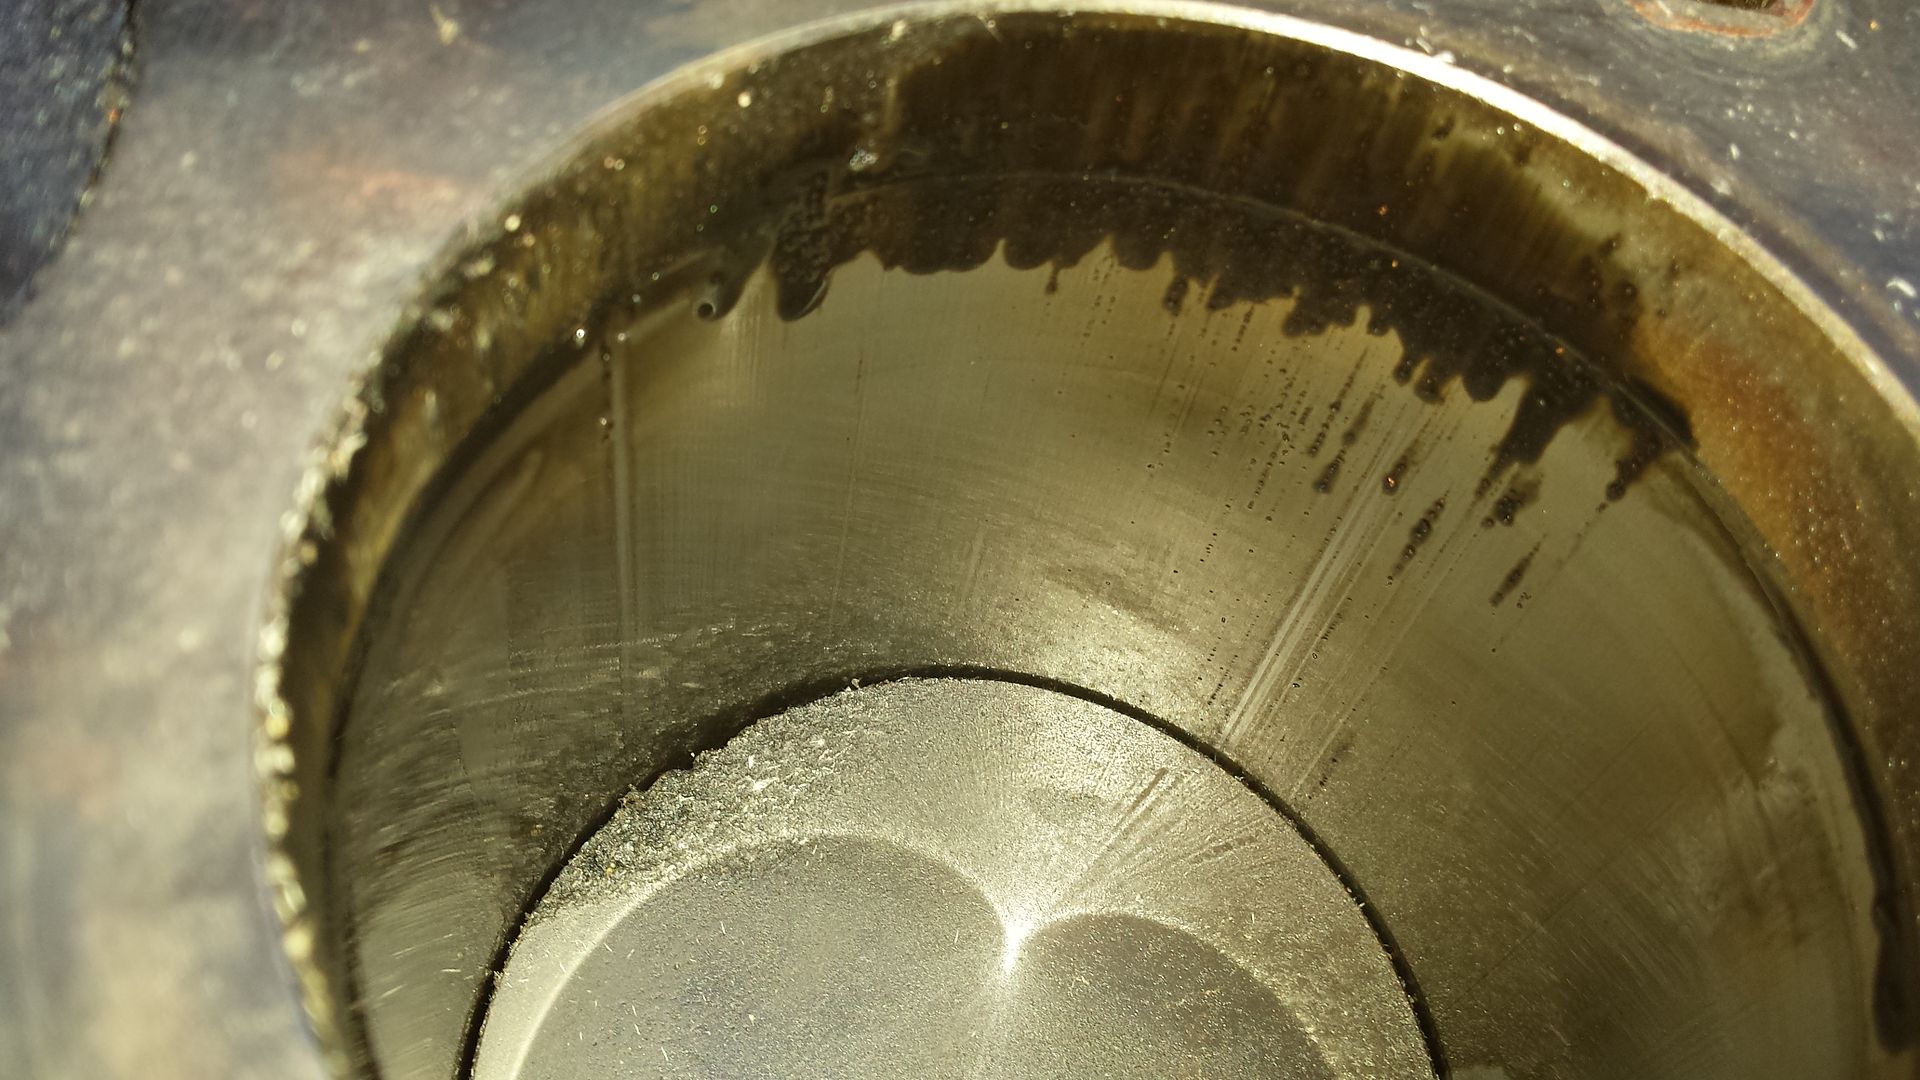
Local machine shops all said it was beyond recovery so I had to replace the head. Luckily I had a scrap engine - main bearings shot - beside the garage to I took the head off of that and put it in for cleaning up and valves to be checked/machines as required. Whilst that was in attention was turned to the block and pistons. The face of the block was undamaged and flat so that was OK. However there was evidence of damage to piston #3 and piston #4
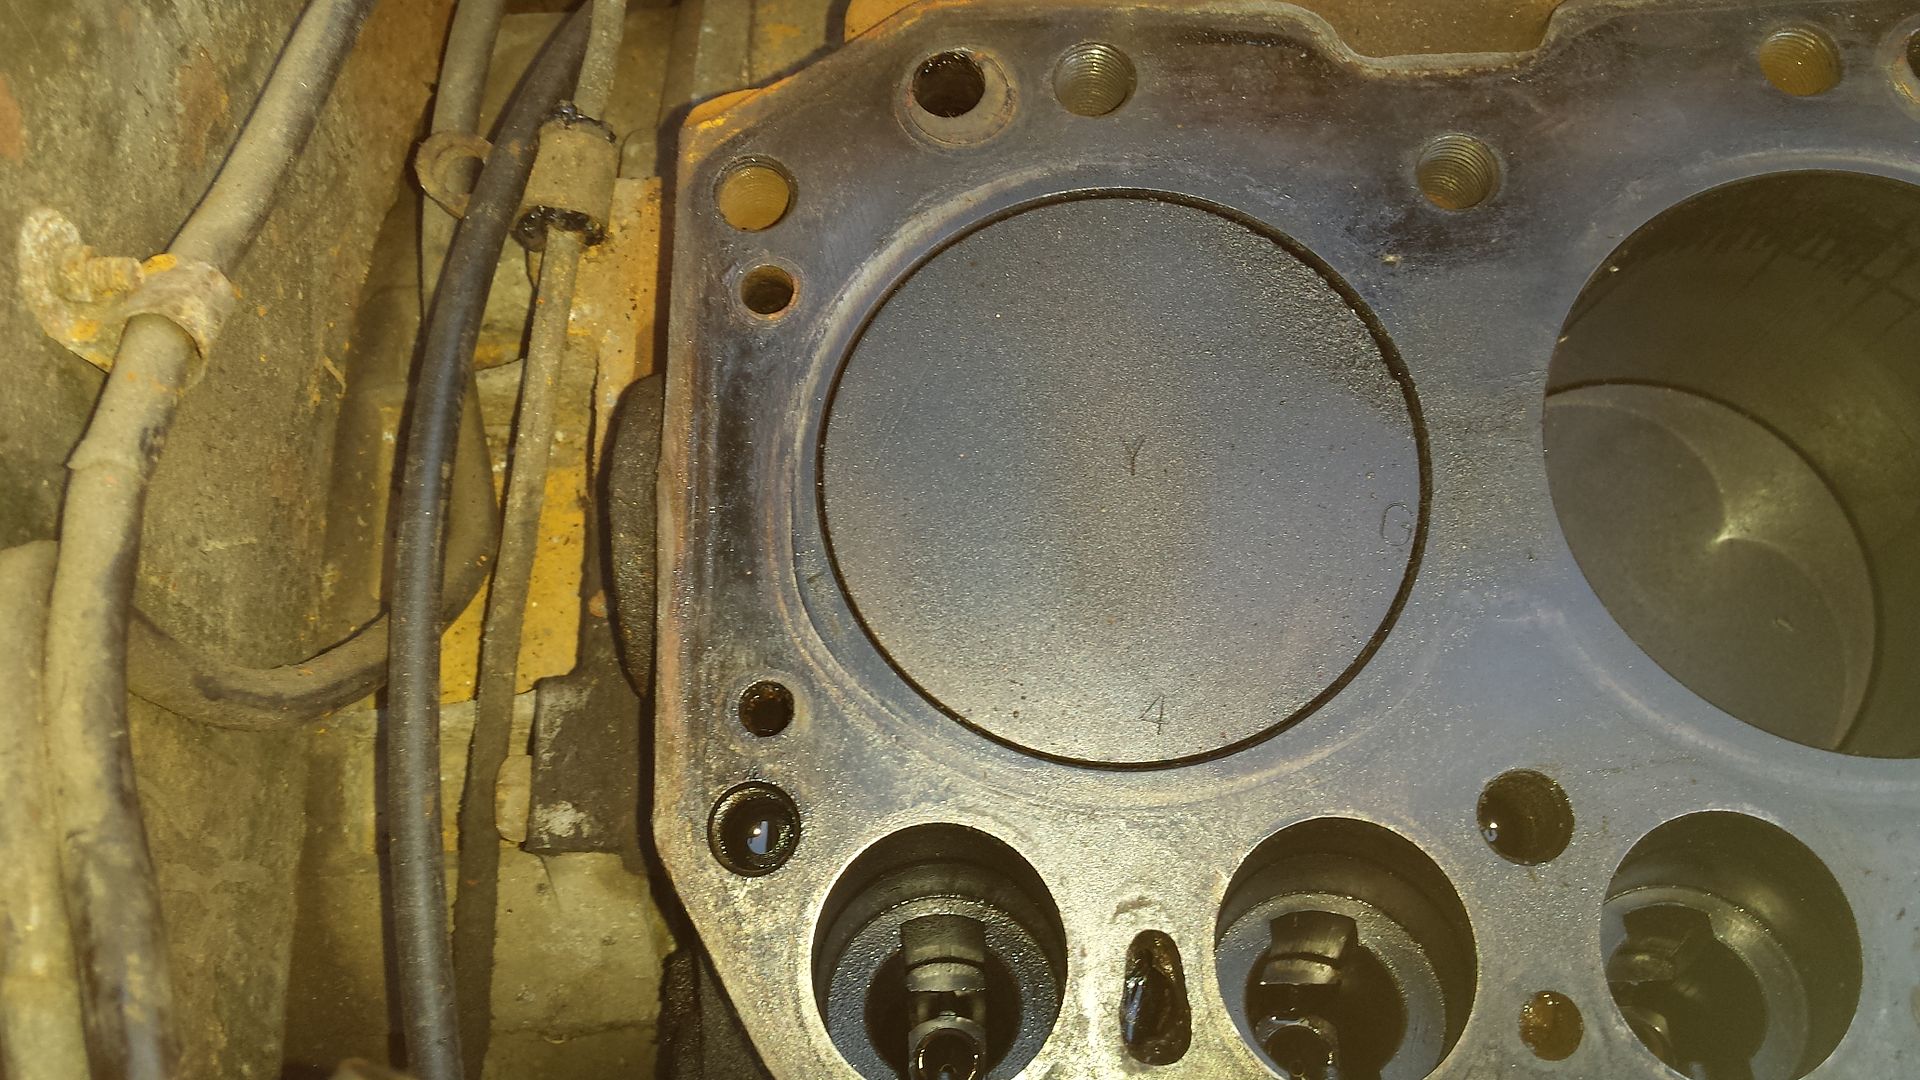
So it was decided to replace these pistons too as a set. The pistons were marked and then the sump was dropped and the bearing caps removed and marked then the pistons and con rods removed by knocking a block of wood up under the crown till it popped free of the block. Once out the gudgeon pins were tapped out and the new pistons fitted to the con rods. Before fitting the bores were examined and found to be free of cores and scratches which was a relief. However there was a pronounced carbon edge at the top of each cylinder which, if left, would have likely broken the top ring.
I used a dremel type tool to cut these ridges away until the tops of the cylinders felt smooth against the rest of the bore. Once done the pistons and con rods were refitted, the bearing caps refitted and torqued up and then the sump refitted.
In the mean time the head had returned from the machine shop so the coffee table was commandeered and the head given a coat of paint together with the rocker cover and brackets.

Once fried it was refitted with new gaskets - once again borrowing the daughters boyfirend this time to repeat the scaffold pole lift and place. To make sure everything was lined up I cut the heads off of 4 old head bolts and used then as guides to locate the head gasket and then guide the head into place as it was lowered. The rockers were then reinserted and the rocker shaft bolted back on then the head bolts were torqued down to the book value in 3 steps. Once done they were triple checked to make sure. Valve clearances were then set. rotating the engine by hand using the starting handle and again triple checked. Then the rest of the top end was reassembled. Murphys law kicked back in at one point when one of the bolts in the thermostat housing sheared off needing the remains to be centre drilled so an Ez-Out could be used to remove the remains. Once out the threads were cleaned out using the appropriate size tap and the vacuum cleaner used to get any swarf out of the blind holes whilst a scriber was used to agitate the base.
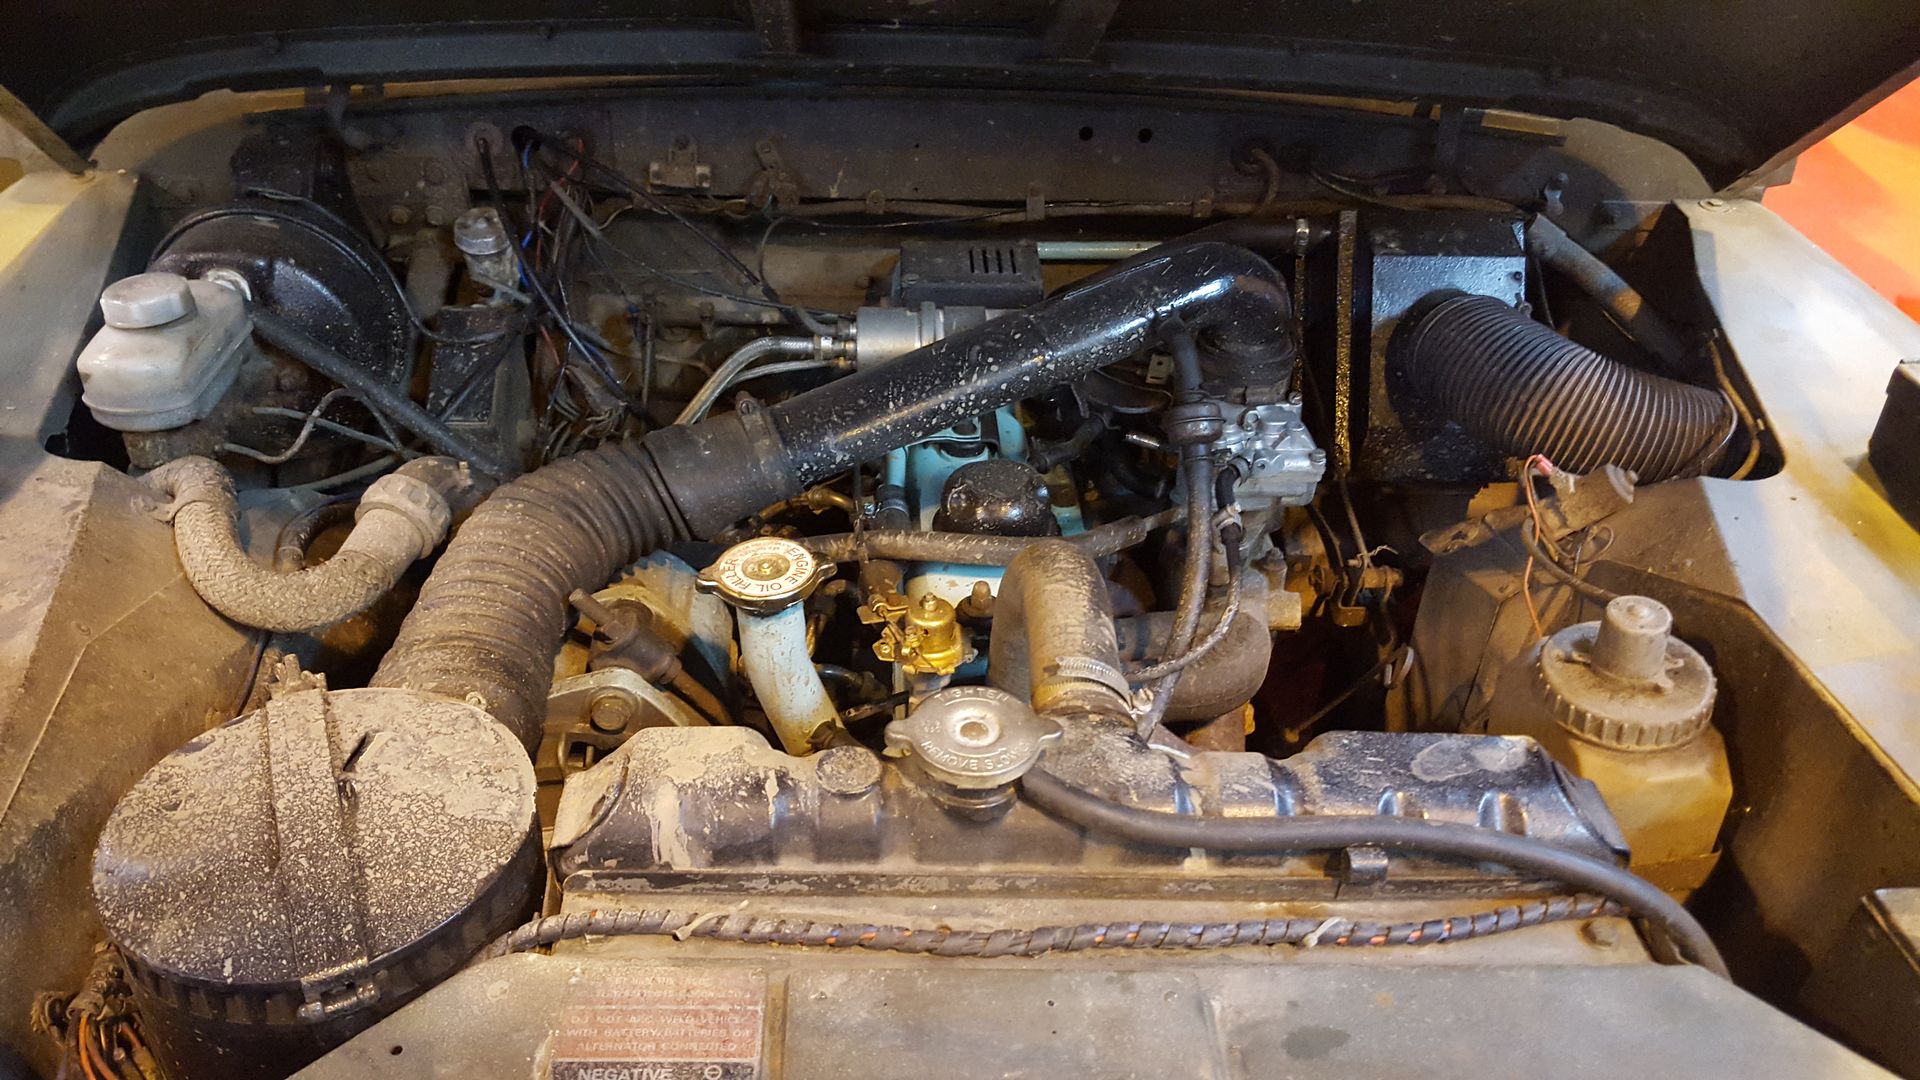
Up until the failure the engine had been running on a Weber conversion but I decided to revert to to the OE fitment of a Zenith having got a new OEM one from Dunsfold. Once assembly was completed and the fluids replaced the engine was spun over a few times with the king lead disconnected to get oil around it, then the lead was reconnected and she fired up first turn of the key. Idle speed and mixture was then set by eye/ear as this is a 24v FFR unit so the usual tools of a colour tune and timing strobe cannot be used.
A couple of short runs showed some minor coolant leaks that were solved by tightening the clamps and then all was well. This was followed by the trip down to the War and Peace show which went without a hitch, wading through the inevitable sea of mud with ease. Then she did the run up to the NEC last October for the Classic Car Show with out missing a beat. Before this work was done 50 mph was the absolute top speed. Now 50 is achieved with ease and there is still a bit more available if needed.
The only issue on the NEC trip was 4 flat tyres - but that's another story!!")
Once home I started investigating. The screened ignition system checked out OK with a nice fat spark on each plug so I carried out a compression test on each cylinder. with the throttle pedal held down as recommended. the problem became immediately apparent:
Cyl #1 90 psi
Cyl #2 80 psi
Cyl #3 0
Cyl #4 0
Book said it should be around 150 psi on every cylinder. Obviously there was a problem there so off came the head to investigate. Series owner will know the lifting the head off is not something easily done single handed so I wrapped paracord through the lifting eyes, slid a scaffold pole under that and get my daughter to give me a hand lifting the head off and out. With the head off the problem was immediately apparent:
As can be seen - the head gasket between #4 and #3 cylinders was gone completely and was starting to go between #2 and #1. I have absolutely no idea why this happened.
Even worse an examination of the cylinder head revealed a path had been cut between #4 and #3 cylinders.
Local machine shops all said it was beyond recovery so I had to replace the head. Luckily I had a scrap engine - main bearings shot - beside the garage to I took the head off of that and put it in for cleaning up and valves to be checked/machines as required. Whilst that was in attention was turned to the block and pistons. The face of the block was undamaged and flat so that was OK. However there was evidence of damage to piston #3 and piston #4
So it was decided to replace these pistons too as a set. The pistons were marked and then the sump was dropped and the bearing caps removed and marked then the pistons and con rods removed by knocking a block of wood up under the crown till it popped free of the block. Once out the gudgeon pins were tapped out and the new pistons fitted to the con rods. Before fitting the bores were examined and found to be free of cores and scratches which was a relief. However there was a pronounced carbon edge at the top of each cylinder which, if left, would have likely broken the top ring.
I used a dremel type tool to cut these ridges away until the tops of the cylinders felt smooth against the rest of the bore. Once done the pistons and con rods were refitted, the bearing caps refitted and torqued up and then the sump refitted.
In the mean time the head had returned from the machine shop so the coffee table was commandeered and the head given a coat of paint together with the rocker cover and brackets.
Once fried it was refitted with new gaskets - once again borrowing the daughters boyfirend this time to repeat the scaffold pole lift and place. To make sure everything was lined up I cut the heads off of 4 old head bolts and used then as guides to locate the head gasket and then guide the head into place as it was lowered. The rockers were then reinserted and the rocker shaft bolted back on then the head bolts were torqued down to the book value in 3 steps. Once done they were triple checked to make sure. Valve clearances were then set. rotating the engine by hand using the starting handle and again triple checked. Then the rest of the top end was reassembled. Murphys law kicked back in at one point when one of the bolts in the thermostat housing sheared off needing the remains to be centre drilled so an Ez-Out could be used to remove the remains. Once out the threads were cleaned out using the appropriate size tap and the vacuum cleaner used to get any swarf out of the blind holes whilst a scriber was used to agitate the base.
Up until the failure the engine had been running on a Weber conversion but I decided to revert to to the OE fitment of a Zenith having got a new OEM one from Dunsfold. Once assembly was completed and the fluids replaced the engine was spun over a few times with the king lead disconnected to get oil around it, then the lead was reconnected and she fired up first turn of the key. Idle speed and mixture was then set by eye/ear as this is a 24v FFR unit so the usual tools of a colour tune and timing strobe cannot be used.
A couple of short runs showed some minor coolant leaks that were solved by tightening the clamps and then all was well. This was followed by the trip down to the War and Peace show which went without a hitch, wading through the inevitable sea of mud with ease. Then she did the run up to the NEC last October for the Classic Car Show with out missing a beat. Before this work was done 50 mph was the absolute top speed. Now 50 is achieved with ease and there is still a bit more available if needed.
The only issue on the NEC trip was 4 flat tyres - but that's another story!!